


FREEDOM UNIVERSAL 2.0
12
FREEDOM AXIS
MAINTENANCE
Important!
Discharge yourself of any static electricity buildup before touching any parts containing sensitive electronic components.
You can do this by placing your hand on any adjacent metal countertop or shelf unit.
Routinely check the SmartCable to ensure the cable is not damaged or worn (i.e., no kinks or no exposed wires visible through the
cable jacket) and the connectors are not bent or damaged.
TROUBLESHOOTING
All MTI products are designed and manufactured to provide consistent, trouble-free service. If the display has a problem, refer to the
troubleshooting table below. If the problem persists, contact MTI Customer Service at 1.800.426.6844 (toll-free) or 503.648.6500
(international), from 7AM - 5PM Pacific Time, Monday through Friday. Please send faxes to 866.200.9166 or e-mail cservice@mti-
interactive.com.
FCC COMPLIANCE
This equipment has been tested and found to comply with the limits for a Class A digital device, pursuant to part 15 of the FCC
Rules. These limits are designed to provide reasonable protection against harmful interference when the equipment is operated in a
commercial environment. This equipment generates, uses, and can radiate radio frequency energy and, if not installed and used in
accordance with the instruction manual, may cause harmful interference to radio communications. Operation of this equipment in
a residential area is likely to cause harmful interference in which case the user will be required to correct the interference at his own
expense.
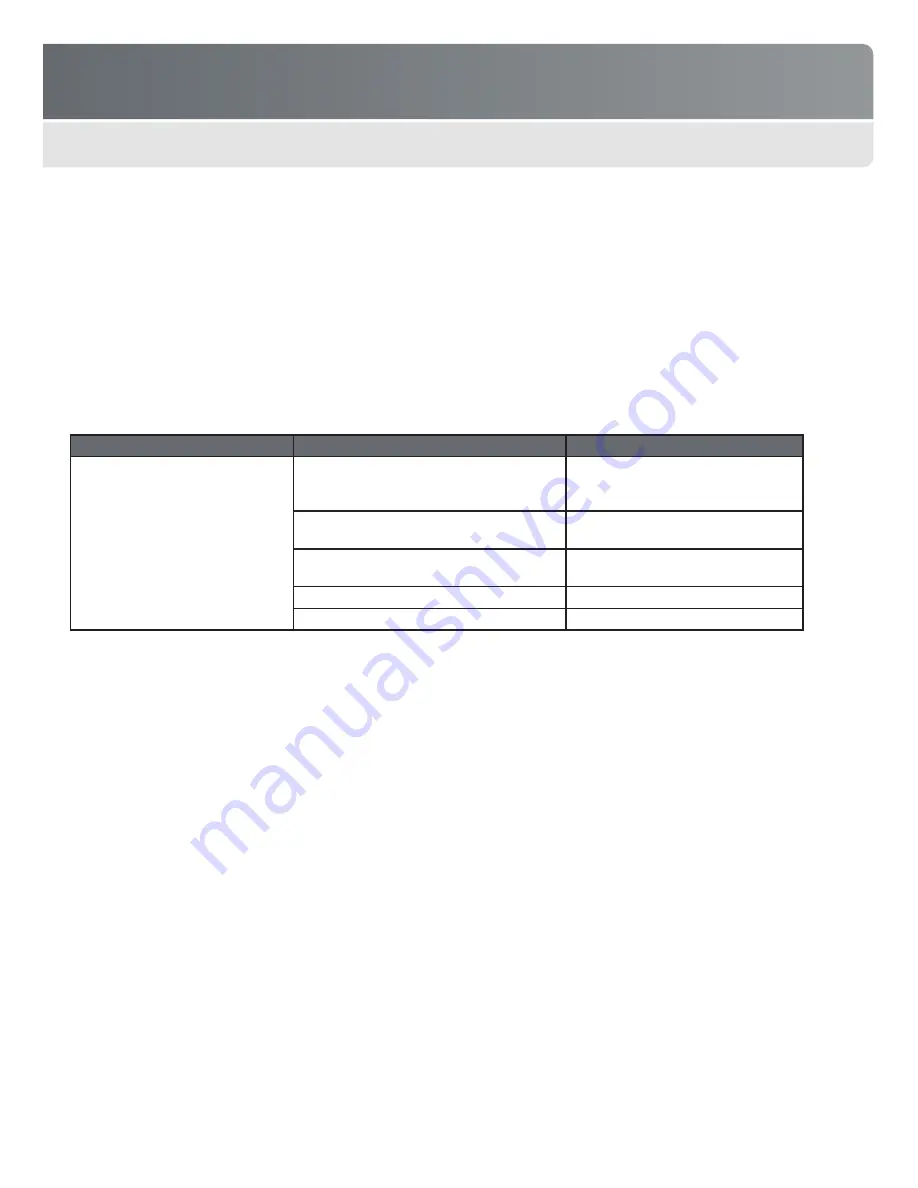
Problem
Probable Cause
Solution
Device battery is not charging or only
charging intermittently
AC power plug is unplugged from the wall
outlet, or the power strip (if used) is turned off
Ensure AC power is securely plugged
into the wall outlet and the power strip
is on
Power supply is not connected to the base
adapter cable
Plug power supply into the base
adapter cable
Wrong SmartCable was used, is not
connected, or is damaged
Connect a correct and/or undamaged
SmartCable
AC cord not connected to the power supply
Connect AC cord to the power supply
Base adapter cable is damaged
Replace adapter cable


