background image

Page 30

MTI Part Number 7001-0040

Revision 3.1 August 7, 2014

TOOLS Menu – Calibration Wizard Continued

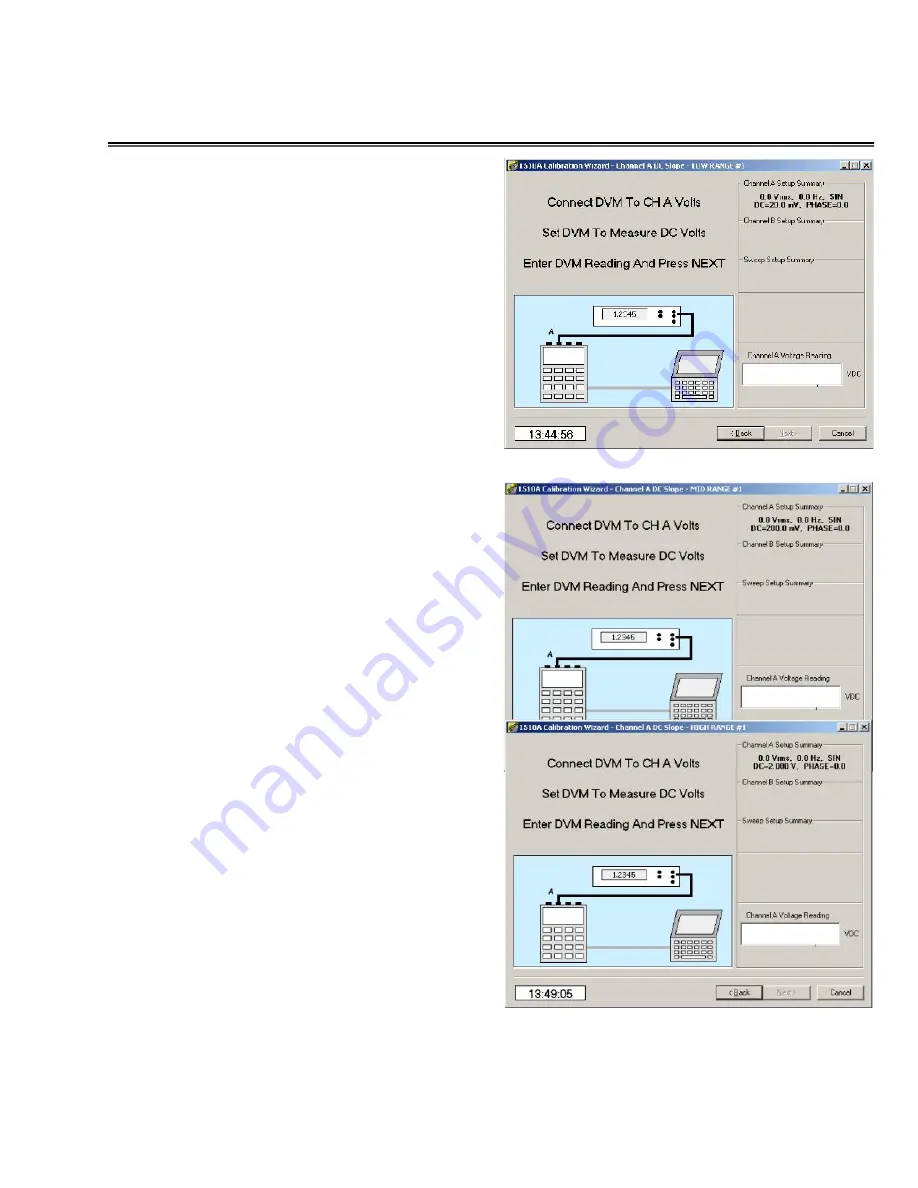
Channel A DC low range calibration

Next, click in the Voltage Reading

window and enter the reading of the

voltmeter.

Set the voltmeter for DC readings.

This screen is repeated for the three

low range voltages (20, 50, and 80

mvdc) used.

Channel A mid range DC calibration

Next, click in the Voltage Reading

window and enter the reading of the

voltmeter.  Verify that the correct

units (Pk, Pk-Pk, or RMS) are

selected for the type of voltmeter

you are using.

Set the voltmeter for DC readings.

This screen is repeated for the three

low range voltages (200, 500, and

800 mvdc) used.

Channel A high range DC calibration

Next, click in the Voltage Reading

window and enter the reading of the

voltmeter.

Set the voltmeter for DC readings.

This screen is repeated for the three

low range voltages (2, 5, and 8 vdc)

used.

Summary of Contents for 1510A

Page 1: ...thout written permission of MTI Instruments Inc be used released or disclosed in whole or in part This legend shall be marked on any reproduction hereof in whole or in part MTI Instruments Inc 325 Washington Avenue Extension Albany New York 12205 USA Phone 518 218 2550 FAX 518 218 2506 Note Performing a user calibration with the software package will result in an accuracy of 2 at best A factory ca...

Page 2: ...ower of your 1500CS Precision Calibrator or 1510A Precision Signal Source Once the software has been loaded on a standard PC computer and the communications link installed and connected to the 1500CS Calibrator the software package will enable you to perform many useful maintenance and calibration tasks including Setup of the 40 Memory Locations Manage the configuration of your 1500CS or 1510A Con...

Page 3: ...e 1510A USB Driver 3 Before you start the Software 5 Connecting to your Calibrator 6 Starting the Software 7 TAB FUNCTIONS Setup 8 Calibration Factors 9 Memories 10 Memory Labels 12 DROP DOWN MENU FUNCTIONS Device 15 Configuration 16 Setup 18 Factors 19 Memory 20 Tools 22 Remote Control Panel 23 Calibration Wizard 26 Help 41 OPTIONAL ACCESSORIES Useful System Accessories 42 ...

Page 4: ...nloaded in the unit using this Software Package Review Memory Location Programs The 1500CS and 1510A have 40 memory locations that can hold pre programmed signal settings Each or all of the 40 memory location settings can be up loaded from the unit for review and editing Changes can then be downloaded back into the unit Check Calibrator Configuration The 1500CS and 1510A have several internal para...

Page 5: ... installation continues a welcome display will be produced followed by the License acceptance display At the conclusion of the installation process the software loading completion display will appear as illustrated below Click on the FINISH button to complete the process At this time you may also wish to install a copy of the Acrobat Reader which is also included on the CD Note that the CD also in...

Page 6: ...is file exists If it does not manually copy the file from the USB folder on the CDROM and placed it in your Windows INF folder After verifying that the INF file exists connect the USB cable to the 1510A and connect it to a free USB port on your computer The Windows Found New Hardware Wizard screen will display Select No not this time and press Next Select Install the software automatically Recomme...

Page 7: ...ttings Control Panel and double click the System icon When the System Properties dialog displays click the Hardware tab Then click the Device Manger button In Device Manager scroll down to the Ports category and open it Locate the 1510A Charge Calibrator entry and note the assigned COM port In the next step the COM port value must be entered into the program INI file Close the Device Manager ...

Page 8: ...recision Signal Source Software Package CDROM contains a copy of the Adobe reader installation package Also verify that the Serial Port number listed in the INI file is correct for your system 1 COM1 2 COM2 etc For the 1500CS set PORT1 to the appropriate serial port number For the 1510A set PORT2 to the port number previously determined from Device Manager Make the necessary changes SAVE and close...

Page 9: ...ifically to connect between the 1500CS and your computer Your 1510A accessory kit includes a communications cable that connects between the 1510A Precision Signal Source and your computer via a USB port MTI Cable 6000 2001 has been designed specifically to connect between the 1510A and your computer For successful communications ensure that your computer port is connected as illustrated above 1500...

Page 10: ...licking on the program icon will launch the 1500 Series Precision Signal Source Software Program An introductory display will first be visible Followed by the user interface display The following sections of this manual will explain the various features and functions of the software package ...

Page 11: ...lay will be blank as illustrated To refresh the data displayed in the windows use the CONFIGURATION drop down menu and select the Upload From Unit option as illustrated After acknowledging the Upload success message the display will be updated with the current 1500CS internal settings Although the serial number and software version numbers cannot be changed it is useful information when talking to...

Page 12: ...veral different calibration constants maintained for the different ranges of the 1500CS The CALIBRATION FACTORS tab at right reveals the internal calibration constants of the 1510A Precision Signal Source Note that there are several different tabs along the bottom of the display that are used to select the calibration constants maintained for the different ranges of the 1510A These calibration fac...

Page 13: ...rs will be displayed on the 1500 Series unit display when the memory is selected You may also name memory locations using the Memory Label tab CHANNEL A SETTINGS FUNCTION This may be set to SINE TRIANGLE SAWTOOTH or SQUARE wave signals using the drop down menu selector ENGINEERING UNITS The amplitude units of the signal may be set to PEAK PEAK to PEAK or RMS using the drop down menu selector FREQU...

Page 14: ...ET Enter the desired amount of DC voltage offset of the signal PHASE OFFSET Enter the desired phase offset in degrees relative to Channel B signal SIGNAL TYPE Use the drop down feature to select between VOLTS and Single Ended SE or Differential DE CHARGE type of signal ...

Page 15: ... will stop FREQUENCY UNITS Use the drop down tool to select either Hz hertz or cycles per second or RPM Revolutions per Minute SWEEP TIME Enter the period of time in seconds in which the sweep will be performed CHANNEL B SETTINGS FUNCTION This may be set to SINE TRIANGLE SAWTOOTH SQUARE PULSE TACH or TTL signals using the drop down menu selector PULSE MODE The 1500CS and 1510A produce a single pul...

Page 16: ...ected this window is used to designate the ratio value A value greater than 1 000 will produce a signal frequency greater than Channel A while a value of less than 1 0000 will produce a lower frequency AMPLITUDE Enter the desired amplitude value see ENGINEERING UNITS Above of the signal ODD CYCLE AMPLITUDE When in TACH mode the amplitude of the odd signal is expressed as a percentage of the other ...

Page 17: ...selected Naming each of the memory locations can avoid confusion and eliminate mistakes Initially the unit will not have any memory locations predefined and consequently the list of names will be empty as illustrated to the right To enter names into each of the locations click into the line of the desired location and type in the name As illustrated a few of the memory locations have been given un...

Page 18: ...urrent selected type of unit Setup Communications Selecting this option enables the user to select the communications port that connects the computer the 1500CS or 1510A After changing the communications port exit the program and then restart it Verify Communications Selecting this option causes the software to establish a communications link to the 1500 Series unit and to test communications ...

Page 19: ...trated to the right a file identification dialog is opened to allow selection of the desired file name and location SAVE to DISK Selecting this option enables the user to save the current 1500 configuration to a file on the user s computer As illustrated to the right a file identification dialog is opened to allow definition of the desired file name and location UPLOAD from UNIT Selecting this opt...

Page 20: ...ugust 7 2014 DOWNLOAD to UNIT Selecting this option establishes communications with the 1500 and downloads the values displayed on all tab into the appropriate memories in the 1500 At the conclusion of the Download a success message will be displayed ...

Page 21: ...1 0040 Revision 3 1 August 7 2014 SETUP OPTIONS Menu CLEAR SETUP INFORMATION This function clears all the calibration date information on the Setup Tab display This command does not alter any settings within the 1500 Series unit ...

Page 22: ...Page 19 MTI Part Number 7001 0040 Revision 3 1 August 7 2014 FACTORS Menu There are no active functions for the FACTORS menu in this version of the software ...

Page 23: ...nted by one 1 and the 40th location is lost DELETE MEMORY and COMPACT This command deletes the currently displayed memory All subsequent locations are decremented by one 1 and a new and blank 40th location is created UPLOAD MEMORY FROM UNIT This command establishes communications with the 1500 and uploads a single memory location from the 1500 to the currently displayed location of the memory edit...

Page 24: ... 7001 0040 Revision 3 1 August 7 2014 DOWNLOAD ALL MEMORIES TO UNIT Selecting this option establishes communications with the 1500 and downloads the stored values from all 40 memory locations of the editor to the 1500 memory ...

Page 25: ...m the computer Users may select any controllable parameter of the 1500 from the user interface and when the set up has been completed a click of the DOWNLOAD to 1500 button will command the 1500 to generate the selected signal s CALIBRATION WIZARD This selection begins a fully sequenced set of measurements to re calibrate the 1500CS or 1510A unit The procedure results in the creation of a calibrat...

Page 26: ...all of the setting windows with the current settings from the unit NOTE that even under this mode of operation the 1500 keyboard is active and keyboard entries can change settings CHANNEL A SETTINGS FUNCTION This may be set to SINE TRIANGLE SAWTOOTH or SQUARE wave signals using the drop down menu selector ENGINEERING UNITS The amplitude units of the signal may be set to PEAK PEAK to PEAK or RMS us...

Page 27: ... of machinery START FREQUENCY This value defines the frequency at which the SWEEP will begin STOP FREQUENCY This value defines the frequency at which the SWEEP will stop FREQUENCY UNITS Use the drop down tool to select either Hz hertz or cycles per second or RPM Revolutions per Minute SWEEP TIME Enter the period of time in seconds in which the sweep will be performed CHANNEL B SETTINGS FUNCTION Th...

Page 28: ...ected this window is used to designate the ratio value A value greater than 1 000 will produce a signal frequency greater than Channel A while a value of less than 1 0000 will produce a lower frequency AMPLITUDE Enter the desired amplitude value see ENGINEERING UNITS Above of the signal ODD CYCLE AMPLITUDE When in TACH mode the amplitude of the odd signal is expressed as a percentage of the other ...

Page 29: ... and 1510A The Wizard guides users thru the process of measuring different outputs from the unit Results of the measurements are used to recalibrate the 1500 Series device Users simply need to follow the instructions displayed on each page and when completed click the NEXT button To calibrate a 1500 Series unit you will need a high accuracy voltmeter and the cables listed ...

Page 30: ...7001 0040 Revision 3 1 August 7 2014 Connection to the 1500 Series unit Before continuing ensure that the communications cable has been connected between the 1500CS 1510A and the computer that is running the Calibration Wizard ...

Page 31: ... back of the unit Connect to Channel A Connect a BNC cable between the 1500CS 1510A Channel A output connector and the input to the voltmeter Set the voltmeter for AC RMS readings Channel A Low range AC calibration Click in the Voltage Reading window and enter the reading of the voltmeter Verify that the correct units Pk Pk Pk or RMS are selected for the type of voltmeter you are using This screen...

Page 32: ... is repeated for the three low range voltages 140 mv 350 mv and 560 mv used Channel A high range AC calibration Next click in the Voltage Reading window and enter the reading of the voltmeter Verify that the correct units Pk Pk Pk or RMS are selected for the type of voltmeter you are using This screen is repeated for the three low range voltages 1 4 v 3 5 v and 5 6 mv used Channel A DC offset cali...

Page 33: ...d range DC calibration Next click in the Voltage Reading window and enter the reading of the voltmeter Verify that the correct units Pk Pk Pk or RMS are selected for the type of voltmeter you are using Set the voltmeter for DC readings This screen is repeated for the three low range voltages 200 500 and 800 mvdc used Channel A high range DC calibration Next click in the Voltage Reading window and ...

Page 34: ...he voltmeter Set the voltmeter for DC volts readings Be sure to wait for the bridge output voltage to stabilize Bridge Mode span calibration Next click in the Voltage Reading window and enter the reading of the voltmeter Set the voltmeter for DC volts readings Be sure to wait for the bridge output voltage to stabilize This screen is repeated for the three bridge mode voltages 20 50 and 80 mvdc use...

Page 35: ...ing window and enter the reading of the voltmeter Verify that the correct units Pk Pk Pk or RMS are selected for the type of voltmeter you are using This screen is repeated for the three low range voltages 14 mv 35 mv and 56 mv used Channel B Mid range AC calibration Next click in the Voltage Reading window and enter the reading of the voltmeter Verify that the correct units Pk Pk Pk or RMS are se...

Page 36: ...d Channel B High range AC calibration Next click in the Voltage Reading window and enter the reading of the voltmeter Verify that the correct units Pk Pk Pk or RMS are selected for the type of voltmeter you are using This screen is repeated for the three mid range voltages 1 4 v 3 5 v and 5 6 v used ...

Page 37: ...hase calibration Skip this step for a 1510A Next click in the Phase Reading window and enter the reading of the phase meter NOTE If you do not have access to a phase meter verify that the value 3 57 degrees is in the reading window and click the NEXT button Next click in the Phase Reading window and enter the reading of the phase meter NOTE If you do not have access to a phase meter verify that th...

Page 38: ...s of tests Even small motion of the cable can induce measurement errors Low Range Single Ended charge calibration Next click in the SE Charge Adapter ID window and enter the ID number of the cable Use caution to enter the ID number in the correct format If the ID is entered incorrectly the following message will be displayed Next click in the Voltage Reading window and enter the reading of the vol...

Page 39: ... or RMS are selected for the type of voltmeter you are using This screen is repeated for the three low range charge outputs 80 350 700 pC rms used High Range Single Ended charge calibration Next click in the SE Charge Adapter ID window and enter the ID number of the cable Use caution to enter the ID number in the correct format Now click in the Voltage Reading window and enter the reading of the v...

Page 40: ...ven small motion of the cable can induce measurement errors Low Range Differential charge calibration Next click in the DE Charge Adapter ID window and enter the ID number of the cable Use caution to enter the ID number in the correct format If the ID is entered incorrectly the following message will be displayed Next click in the Voltage Reading window and enter the reading of the voltmeter Verif...

Page 41: ... selected for the type of voltmeter you are using This screen is repeated for the three low range charge outputs 80 350 700 pC rms used High Range Differential charge calibration Next click in the DE Charge Adapter ID window and enter the ID number of the cable Use caution to enter the ID number in the correct format Now click in the Voltage Reading window and enter the reading of the voltmeter Ve...

Page 42: ...e numbers are near 1 000 and that the offset factors are near 0 0000 For the 1500CS verify that the Phase constants are approximately 3 or 4 degrees For the 1510A the phase constants should be zero If all factors are reasonable click the DOWNLOAD FACTORS button to update the 1500 Series unit memory Otherwise click CANCEL If factors were downloaded verify that the Download button has grayed out Cli...

Page 43: ...letes the following message will be displayed Select the Calibration Factors tab and examine the current factors for each voltage range To verify that the calibration date has been updated in the 1500CS click on the Setup tab It is also recommended that at the conclusion of calibration the configuration be saved on the computer To do this use the Configuration Upload from Unit function and then th...

Page 44: ... to the complete 1500 Users Manual in PDF format This link will only work if the instructions found on page 4 Before you start the Software have been performed Software Guide This provides a link to the complete 1500 Calibrator Software Support Manual in PDF format This link will only work if the instructions found on page 4 Before you start the Software have been performed About produces a summar...

Page 45: ...more information 1500CS Replacement AC Power Adapter 4000 0013 Replacement NiMH batteries 4000 0012 Differential Charge Output Adapter cable 7500 7509 PBS 4100 4 Channel Charge Amplifier Adapter Cable Set 8103 6589 Single Ended Charge Output Adapter Cable Set 7500 7508 RS232 Control Cable and Software Set 7000 7503 Replacement USB Control Cable 6000 2001 Replacement Protective Booty for 1500CS 700...

Page 46: ...Page 43 MTI Part Number 7001 0040 Revision 3 1 August 7 2014 NOTES ...

Page 47: ...Page 44 MTI Part Number 7001 0040 Revision 3 1 August 7 2014 NOTES ...

Page 48: ...Page 45 MTI Part Number 7001 0040 Revision 3 1 August 7 2014 NOTES ...

Page 49: ...nvolves the new offset tooth design the TSC 4800A will condition all of these types of signals up to 3 channels N1 N2 N3 Portable Vibration and Balancing System The PBS 4100 is a powerful and full function vibration analysis system designed for flightline analysis of gas turbine engines Trim balancing is fast and easy with the Balancing Wizard Accessories are available for civilian and military en...

Page 50: ...325 Washington Avenue Ext Albany NY 12205 USA ...

Reviews: