MTD Pro H70SS Operator'S Manual Download Page 5

Each time the head is bumped, about 1 inch (25.4 mm) of
trimming line releases. A blade in the cutting attachment shield
will cut the line to the proper length if any excess line is released.

For best results, tap the bump knob on bare ground or hard
soil. If you attempt a line release in tall grass, the engine may
stall. Always keep the trimming line fully extended. Line release
becomes more difficult when the cutting line gets shorter.

NOTE:

Do not rest the Bump Head on the ground while the
unit is running.

Some line breakage will occur from:

• Entanglement with foreign matter

• Normal line fatigue

• Attempting to cut thick, stalky weeds

• Forcing the line into objects such as walls or fence posts

TIPS FOR BEST TRIMMING RESULTS

• For best trimming results, operate unit at full throttle.

• Keep the cutting attachment parallel to the ground.

• Do not force the cutting attachment. Allow the tip of the line to

do the cutting, especially along walls. Cutting with more than the
tip will reduce cutting efficiency and may overload the engine.

• Cut grass over 8 inches (200 mm) by working from top to

bottom in small increments to avoid premature line wear or
engine drag.

• Cut from left to right.

• Slowly move the trimmer into and out of the cutting area at

the desired height. Move either in a forward-backward or
side-to-side motion. Cutting shorter lengths produces the
best results.

• Trim only when grass and weeds are dry.

• The life of your cutting line is dependent upon:

- Proper adherence of explained trimming techniques

- What vegetation is cut

- Where vegetation is cut

For example, the line will wear faster when trimming against a
foundation wall as opposed to trimming around a tree.  It is
normal for some line breakage to occur from regular use.

DECORATIVE TRIMMING

Decorative trimming is accomplished by removing all
vegetation around trees, posts, fences and more.

Rotate the whole unit so that the cutting attachment is at a 30°
angle to the ground (Fig. 11).

HOLDING THE TRIMMER

Before operating the unit, stand in the
operating position (Fig. 9). Check for the
following:

• The operator is wearing eye protection

and proper clothing

• With a slightly-bent right arm, the

operator’s right hand is holding the
shaft grip

• The operator’s left arm is straight, the

left hand holding the handle

• The unit is at waist level

• The cutting attachment is parallel to the ground and easily

contacts the grass without the need to bend over.

Adjusting Trimming Line Length

The Bump Head cutting
attachment allows you to
release trimming line without
stopping the engine. To
release more line, lightly tap
the cutting attachment on the
ground (Fig. 10) while
operating the trimmer at high
speed.

NOTE:

Always keep the trimming line fully extended. Line
release becomes more difficult as cutting line becomes
shorter.

Fig. 9

Fig. 11

WARNING:

Always wear eye, hearing, foot and

body protection to reduce the risk of injury when
operating this unit.

WARNING:

Do not remove or alter the line cutting

blade assembly. Excessive line length will make
the clutch overheat. This may lead to serious
personal injury or damage to the unit.

Fig. 10

5

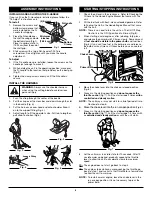
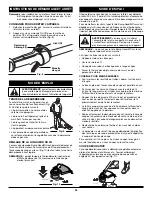
STOPPING INSTRUCTIONS

Note:

This unit has a Momentary Switch. The On/Off Contol
Switch will be in the On position at all times.

1.

Release your hand from the throttle control. Allow the
engine to cool down by idling.

2.

Press the On/Off Stop Control in the OFF (O) position and
hold until the unit completely stops running. (Fig. 8)

Start/On ( I )

Stop/Off (O)

Throttle

Control

Fig. 8

OPERATING INSTRUCTIONS

OPERATING INSTRUCTIONS

STARTING/STOPPING INSTRUCTIONS

Summary of Contents for H70SS

Page 1: ...ons carefully Be familiar with the controls and proper use of the unit This unit was not designed to be used as a brushcutter Do not attach or operate this unit with any type of brushcutting blade or...

Page 2: ...RULES FOR SAFE OPERATION Use the right tool Only use this tool for its intended purpose Do not overreach Always keep proper footing and balance Always hold the unit with both hands when operating Keep...

Page 3: ...7 1 standards and ear protection when operating this unit Use a full face shield when needed ON OFF STOP CONTROL ON START RUN ON OFF STOP CONTROL OFF or STOP KEEP BYSTANDERS AWAY WARNING Keep all byst...

Page 4: ...Engine Manual that came with the unit NOTE There is no need to turn the unit on The On Off Stop Control is in the ON I position at all times Fig 8 3 When starting a cold engine or after refueling full...

Page 5: ...ee It is normal for some line breakage to occur from regular use DECORATIVE TRIMMING Decorative trimming is accomplished by removing all vegetation around trees posts fences and more Rotate the whole...

Page 6: ...Fig 13 If necessary remove burrs or replace the reel and spool WARNING Never use metal reinforced line wire chain or rope These can break off and become dangerous projectiles NOTE SplitLine can only...

Page 7: ...e old inner reel Fig 12 4 Place the spring in the new inner reel NOTE The spring must be assembled on the inner reel before reassembling the cutting attachment 5 Insert the ends of the line through th...

Page 8: ...DVANCE LINE CAUSE ACTION Oil cleaner or lubricant in cutting head Clean and thoroughly dry the cutting head CUTTING LINE ADVANCES UNCONTROLLABLY Drive Shaft Housing Aluminum Tube Throttle Control Fing...

Page 9: ...NOTE 9...

Page 10: ...7310 MTD PRO LLC P O Box 361131 Cleveland OH 44136 0019 The limited warranty set forth below is given by MTD Pro LLC with respect to new merchandise purchased and used in the United States its posses...

Page 11: ...conserver ces instructions pour un usage ult rieur LISEZ TOUTES LES INSTRUCTIONS AVANT UTILISATION Lisez soigneusement cette notice Familiarisez vous avec les commandes et la marche suivre pour une b...

Page 12: ...icien agr Ajustez la poign e D votre taille afin d assurer une prise optimale CONSIGNES DE S CURIT Assurez vous que l accessoire de coupe n est pas en contact avec tout autre l ment avant de d marrer...

Page 13: ...et les animaux domestiques en particulier d au moins 15 m 50 pi de la zone de coupe LES OBJETS PROJET S ET LA T TE ROTATIVE PEUVENT CAUSER DES BLESSURES GRAVES AVERTISSEMENT ne faites pas fonctionner...

Page 14: ...propre et sans plomb Consulter la section Remplissage du r servoir de l appareil dans le manuel du moteur Honda qui est fourni avec l appareil REMARQUE il est inutile de mettre l appareil en marche La...

Page 15: ...vite si vous coupez le long d un mur de fondation que si vous coupez autour d un arbre COUPE D CORATIVE La coupe d corative consiste d blayer la v g tation autour des arbres des bornes des cl tures e...

Page 16: ...oulinet int rieur et la bobine ext rieure Fig 14 Enlevez les barbures ou remplacez le moulinet et la bobine au besoin AVERTISSEMENT n utilisez jamais de fil de cha ne ou de cordon renfort m tallique c...

Page 17: ...ns le moulinet int rieur neuf REMARQUE le ressort doit tre install dans le moulinet int rieur avant de remonter l accessoire de coupe 5 Ins rez les extr mit s du fil dans les illets de la bobine ext r...

Page 18: ...soire de coupe LE FIL DE COUPE AVANCE DE MANI RE INCONTR L E Logement de l arbre d entra nement Tube en aluminium Manette des gaz G chette actionn e du bout des doigts avec interrupteur momentan Poids...

Page 19: ...D PANNAGE F9...

Page 20: ...1 800 800 7310 MTD PRO LLC P O Box 361131 Cleveland OH 44136 0019 La garantie limit e nonc e ci apr s est accord e par MTD PRO LLC et concerne les marchandises neuves achet es et utilis es aux tats Un...

Page 21: ...nes antes de operar la unidad a fin de garantizar la seguridad del operador y cualquier transe nte Guarde estas instrucciones para uso posterior LEA TODAS LAS INSTRUCCIONES ANTES DE OPERAR LA UNIDAD L...

Page 22: ...rtificial NORMAS PARA UNA OPERACI N SEGURA Evite arranques accidentales Est en la posici n de arranque cada vez que hale la cuerda de arranque El operador y la unidad deben estar en una posici n estab...

Page 23: ...a cuando la necesite CONTROL DE ENCENDIDO Y APAGADO ENCENDIDO ARRANQUE MARCHA CONTROL DE ENCENDIDO Y APAGADO APAGADO o PARADO MANTENGA ALEJADOS A LOS ESPECTADORES ADVERTENCIA Mantenga a todos los espe...

Page 24: ...nidad 2 Llene el tanque de combustible con gasolina sin plomo limpia y fresca Consulte la secci n C mo Llenar de Combustible la Unidad en el Manual del Motor Honda que vino con la unidad NOTA No hay n...

Page 25: ...DECORATIVO El recorte decorativo se realiza eliminando toda la vegetaci n de alrededor de los rboles postes cercos etc Gire toda la unidad a modo de que el accesorio de corte se ubique a un ngulo de...

Page 26: ...soga etc Estos elementos pueden desprenderse y convertirse en un proyectil peligroso 5 Verifique el desgaste de los dientes de posici n del carrete interior y bobina exterior Fig 14 Si es necesario s...

Page 27: ...ES DE MANTENIMIENTO Y REPARACI N E7 4 Coloque el resorte en el carrete interior nuevo NOTA El resorte debe estar ensamblado en el carrete interior antes de volver a instalar el accesorio de corte 5 In...

Page 28: ...ACE AVANZAR LINEA CAUSA ACCI N El cabezal de corte tiene aceite Limpie el aditamento de corte LA L NEA DE CORTE AVANZA SIN CONTROL Caja del eje motor Tubo de aluminio Control del regulador Gatillo de...

Page 29: ...E9 NOTAS...

Page 30: ...NOTAS E10...

Page 31: ...193 Gearbox Assembly includes 14 15 14 791 182195 Gearbox Screw 15 791 145569 Anti Rotation Screw 16 753 05033 Blade Assembly 17 753 05476 Shield Assembly includes 16 18 791 182196 Blade Driver 19 753...

Page 32: ...dor de servicio local m s cercano marque el n mero 1 800 800 7310 MTD PRO LLC P O Box 361131 Cleveland OH 44136 0019 MTD Pro LLC concede la garant a limitada establecida debajo para mercanc as nuevas...

Reviews: