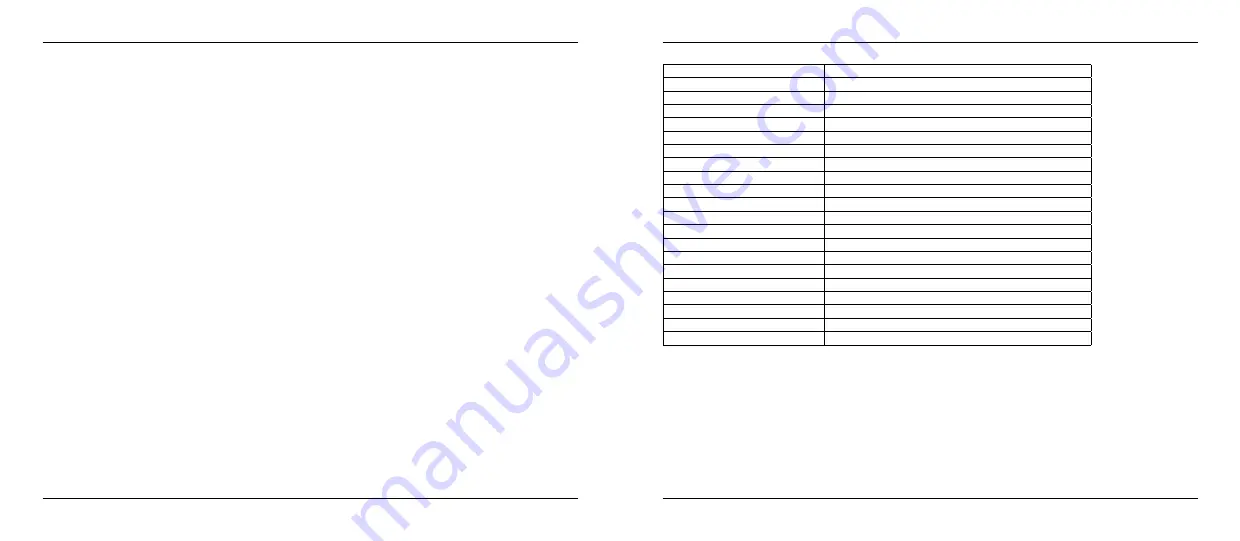
MT Vision IC-10 User Manual Download Page 14

4. Operation

5. Specifications

12

13

ENGLISH

ENGLISH

Frame Rate Setting

1. In the setting mode, press the or button to select ‘RECORDER SETTING’, and then press OK.
2. Press the or button to select ‘Frame Rate’ and then press OK button.
3. Press the or button to toggle between different frame rates. Once your desired rate is selected, 

press OK button to confirm and press the MENU button to exit.

All specifications
are subject to
minor change
without prior
notice.

Time Stamp Setting

1. In the setting mode, press the or button to select ‘RECORDER SETTING’, and then press OK.
2. Press the or button to select ‘Time Stamp’ and then press OK button.
3. Press the or button to toggle between On and Off. Once your desired selection is made, press OK 

button to confirm and press the MENU button to exit.

Event Playback

1. In the setting mode, press the or button to select ‘EVENT PLAYBACK’, and then press OK.
2. Refer to user manual instructions on Playback of Video/Picture, Deleting Video/Picture, and Dele-

ting Folder for guidance.

Imaging Sensor

CMOS

Total Pixels

640 x 480 (PAL) / 640 x 480 (NTSC)

Horizontal Viewing Angle

45°

Tube Diameter

9 mm

Minimum Illumination

0 Lux (LED ON)

LCD Screen Type

2.7“ TFT-LCD

Display Format

Graphic  960 x 240  Dot-matrix

Video System

PAL/NTSC

Power Supply

AA x 4 batteries (1.5 V x 4)

Capacity of SD Card

2 GB  ~  32 GB

Data Transmission

USB 2.0

Picture Type

JPEG

Video Type

MP4

Picture/Video Pixels

640 x 480

Video Segment Time

30 minutes

Frame Rate

5 / 10 / 15 / 20 / 25 / 30 frame pro second

Waterproof Capacity

IP67 (for lens/tube only)

Dimensions (W/D/H)

241 x 92 x 50 mm  (Excluding Flexible Tube)

Approx. Weight

416 g

Operating Temperature

10° ~ 50° 

Operating Humidity (Max.)

15 ~ 85% RH

Declaration of Conformity

This attesting conformity with the following directives / standards:
Electromagnetic Compatibility Directive 2004/108 / EC
EN 55013: 2001 + A1: 2003 + A2: 2006
EN 55020: 2007
EN 61000-3-2:2006 + A1:2009 + A2:2009
EN 61000-3-3:2008
Low Voltage Directive 2006/95/EG
EN 60065: 2002 + A1: 2006 + A11: 2008

Summary of Contents for IC-10

Page 1: ...Bedienungsanleitung Inspektionskamera IC 10 ...

Page 2: ...n haben Bitte lesen Sie das Benutzerhandbuch vor Gebrauch sorgfältig durch Dieses Gerät wurde als Fernprüfgerät konzipiert und ist geeignet um Videos aufzuzeichnen und Fotos zu machen Es ist für den Gebrauch in Vermessungsrohren oder anderen schwer zugänglichen Orten wie Einrichtung oder Möblierung Autoreparatur etc geeignet Die Ausstattung umfasst eine wasser dichte LED Linse Echtzeit Aufnahme un...

Page 3: ...nde bevor Sie Batterien einlegen oder ersetzen 1 Entfernen Sie die Batteriefachabdeckung 2 Ziehen Sie die Batteriebox aus dem Griff legen Sie vier AA Batterien mit der richtigen Polarität in die dafür vorgesehenen Vertiefungen wie auf dem Batteriefach beschrieben ein 3 Setzen Sie die Batterieabdeckung wieder ein Stecken Sie die beiden Enden zusammen Befestigen Sie den Gewindeknopf Anzeige USB Ansc...

Page 4: ...e durch Doppelklick auf das Mein PC Symbol auf Ihrem Desktop und anschließendem Navigieren zu den Wechseldatenträgern das Gerät suchen 1 Drücken und Halten Sie den Einschaltknopf für ungefähr 3 Sekunden um die Kamera anzuschal ten Die Betriebsanzeige wird aufleuchten und der LCD wird sich einschalten Video Ausgang Schließen Sie das eine Ende eines Videokabels an den Video Ausgang des Monitors und ...

Page 5: ... Datei gespeichert Erscheint Speicher voll auf dem LCD Bild schirm bedeutet dies dass der Speicher der SD Speicherkarte voll ist Hinweis Das JPG Dateiformat ist ein Bild Das MP4 Dateiformat ist ein Video SD card icon Recorded time Video aufnehmen 1 Im Echtzeit Überwachungsmodus drü cken Sie die Aufnahmetaste um mit der Aufnahme zu beginnen 2 Drücken Sie die Taste erneut um die Auf nahme wieder zu ...

Page 6: ...en und bestätigen Sie mit OK 3 Drücken Sie t oder u zum Umschalten zwischen Ja und Nein also Standard Einstellungen wie derherstellen oder abbrechen Bestätigen Sie mit OK und drücken die Menü Taste zum Verlassen Anzeigen von Versionsinformationen 1 Drücken Sie t oder u im Einstellungsmenü um Systemeinstellungen auszuwählen und bestäti gen Sie mit OK 2 Drücken Sie t oder u um Version auszuwählen un...

Page 7: ...handbuch unter Wiedergabe von Video Bild Löschen von Video Bild und Löschen von Ordnern beschrieben vor Alle Spezifikatio nen unterliegen geringfügige Änderung ohne vorherige Ankün digung Bildsensor CMOS Gesamtanzahl Pixel 640 x 480 PAL 640 x 480 NTSC Betrachtungswinkel 45 Rohrdurchmesser 9mm Mindestbeleuchtung 0 Lux LED ON LCD Bildschirmtyp 2 7 TFT LCD Anzeigeformat Grafische 960 x 240 Punkt Matr...

Page 8: ...nd 1 1 Januar 2015 Technische Änderungen Druckfehler und Irrtümer vorbehalten Megasat Werke GmbH Industriestraße 4a D 97618 Niederlauer www mtvision tv info mtvision tv User manual Inspection Camera IC 10 ...

Page 9: ...itor OSD manu for operation Video recording capability supports up to 32GB micro SD card Adjustable brightness on lens mounted LED light 3 useful accessories included hook mirror and magnet Lightweight handheld design flexible and convenient to use Packing List 9mm flexible tube with lens Handle with LCD screen USB cable Video cable User manual Hook Magnet Mirror Rubber ring 1 General Information ...

Page 10: ...er Switch Mirror To Install Batteries Dry your hands before installation or replacing batteries 1 Remove battery cover 2 Extract the battery box from the handle Insert four 4 AA batteries into their appropriate slots with proper orientation as indicated on the battery compartment 3 Replace battery cover Keyed end plugs into socket Fasten the treaded knob Indicator USB Port Mini Waterproof LED Lens...

Page 11: ...omatically recognize the new hardware which you may browse by double clicking on the My Computer icon on your desktop and then navigating into the Mobile Disk directory 1 Press and hold on the power switch for about 3 seconds to turn on the camera the power indica tor will illuminate and the LCD will become viewable Video output Insert video cable into the video out socket of the monitor insert th...

Page 12: ...E The video will be automatically saved as an individual file every 30 minutes Memory Full appears on the LCD screen indicates that the SD card memory is full NOTE The JPG format file is a picture The MP4 format file is a video SD card icon Recorded time Recording Video 1 In real time monitoring mode press the Recording button to begin recording 2 Press again to stop recording Taking photos In rea...

Page 13: ...ton 3 Press the t or u button to toggle between YES and NO that is to restore default or cancel Press the OK button to confirm and press the MENU button to exit View Version Information 1 In the setting mode press the t or u button to select SYSTEM SETTING and then press OK 2 Press the t or u button to select Version and then press OK button You will now be able to view the version details of your...

Page 14: ... 2 Refer to user manual instructions on Playback of Video Picture Deleting Video Picture and Dele ting Folder for guidance Imaging Sensor CMOS Total Pixels 640 x 480 PAL 640 x 480 NTSC Horizontal Viewing Angle 45 Tube Diameter 9mm Minimum Illumination 0 Lux LED ON LCD Screen Type 2 7 TFT LCD Display Format Graphic 960x240 Dot matrix Video System PAL NTSC Power Supply AA x 4 batteries 1 5V x 4 Capa...

Page 15: ...Status 1 1 January 2015 Technical changes misprint and errors reserved Megasat Werke GmbH Industriestraße 4a D 97618 Niederlauer www mtvision tv info mtvision tv ...

Reviews: