


6
7
remote controller
1. STANDBY : Turn the TV on or off.
2. MUTE: Press to turn ON/OFF the speaker output.
3. SOURCE: Input source conversion button.
4. PMODE: Press to change the current picture mode.
5. SMODE: Select the different sound mode directly.
6. SLEEP: Press to shift sleep time mode.
7. WWW.: In Smart TV mode quickly input letters "www.".
8. COM: In Smart TV mode quickly input letters ".com".
9. CHAR/NUM: In Smart TV mode switches between Letter and Number input modes.
10. DEL: In Smart TV mode deletes letters and numbers.
11. ALPHANUMERIC BUTTONS: Enters letters and numbers.
12. -/--: Figures 0-99 are used to directly key in channel number.
13. RECALL: Press to return to the channel last viewed.
14.
: In Smart TV mode press to access the Home menu.
15.
: Press to pop-up main menu, and press again to exit menu.
16. NAVIGATION buttons: Scrolls through menus or options.
17. OK: Selects menus or options and confirms your input.
18. MENU: Press to pop-up main menu, and press again to exit menu.
19.
/ EXIT: Press this button to return function or returns to the previous level.
20. : In Smart TV mode press display the information of notice.
21. : In Smart TV mode press Into the list of programs.
22. : Search.
23.
/ : In Smart TV mode press Turn on/off Mouse Mood.
24. INFO: in TV mode press to Views the information of the current program and screen.
25. FAV: In TV mode press to displays Favorite program list.
26. AUTO: Press this button to auto adjust the screen.
27. TV/RADIO: Selects TV or Radio modes.
28. VOL +/-: Adjust the volume.
29. CH+/-: Change the channel up and down.
30. RED: Press this button to into the red item or page.
31. GREEN/3D: Press this button to into the green item or page; Activate 3D content.
32. YELLOW/L/R: Press this button to into the yellow item or
page + Adjust 3D movie L/R images to achieve best 3D effect.
33. BLUE: Press this button to into the blue item or page.
34. PVR: Press this button to record the current program.
35. EPG: Press this button to display Electronic Program Guide menu.
36. SUBTITLE: Press this button to show subtitles for the program you are watching, if available.
37. AUDIO / / : Press this button to select the audio language, if available.
38. TEXT/ : In TV mode press to switch TV into text mode or press text to quit text mode; Zoom out.
39. HOLD/ :Press this button to freeze or unfreeze the screen of text you are viewing; Zoom in.
40. REVEAL: Press this button to show or hide the TEXT.
41. SUBPAGE: In the mode of text, press this key to select subpage, Subpage can be select by directly
enter a4-digit number or pressing red, green or / " keys press this key again to return to normal text mode.
42. T.SHIFT/
: Press this button to select the time shift function; Play/Pause in PVR and MEDIA mode.
43. : Stop in PVR and MEDIA mode.
44. INDEX: Press this key to return to the index page directly.
45. SIZE: In the mode of text, it is used text to change the display scale.
46.
: Fast reverse key in MEDIA mode.
47.
: Fast forward key in MEDIA mode.
48.
: Jump to previous track in MEDIA mode.
49.
: Jump to next track in MEDIA mode.
2
1
6
3
5
10
7
9
4
8
21
25
31
35
39
43
47
13
12
11
15
14
17
16
19
18
23
20
22
27
24
26
29
28
33
30
32
37
34
35
41
38
40
45
42
44
49
46
48
replacIng the batterIes
1. Open the battery cover.
2. Insert two AA batteries into the remote control. Make sure that the (+) and (-) symbols on the batteries match the (+) and (-) symbols inside
the battery compartment.
3. Close the battery cover.
• Use only good quality batteries.
• Inserting the batteries incorrectly may result in cracking or leakage that may cause a fire or result in injury.
• Dispose of old or dead batteries in accordance with local hazardous waste regulations.
• Keep batteries away from children and pets.
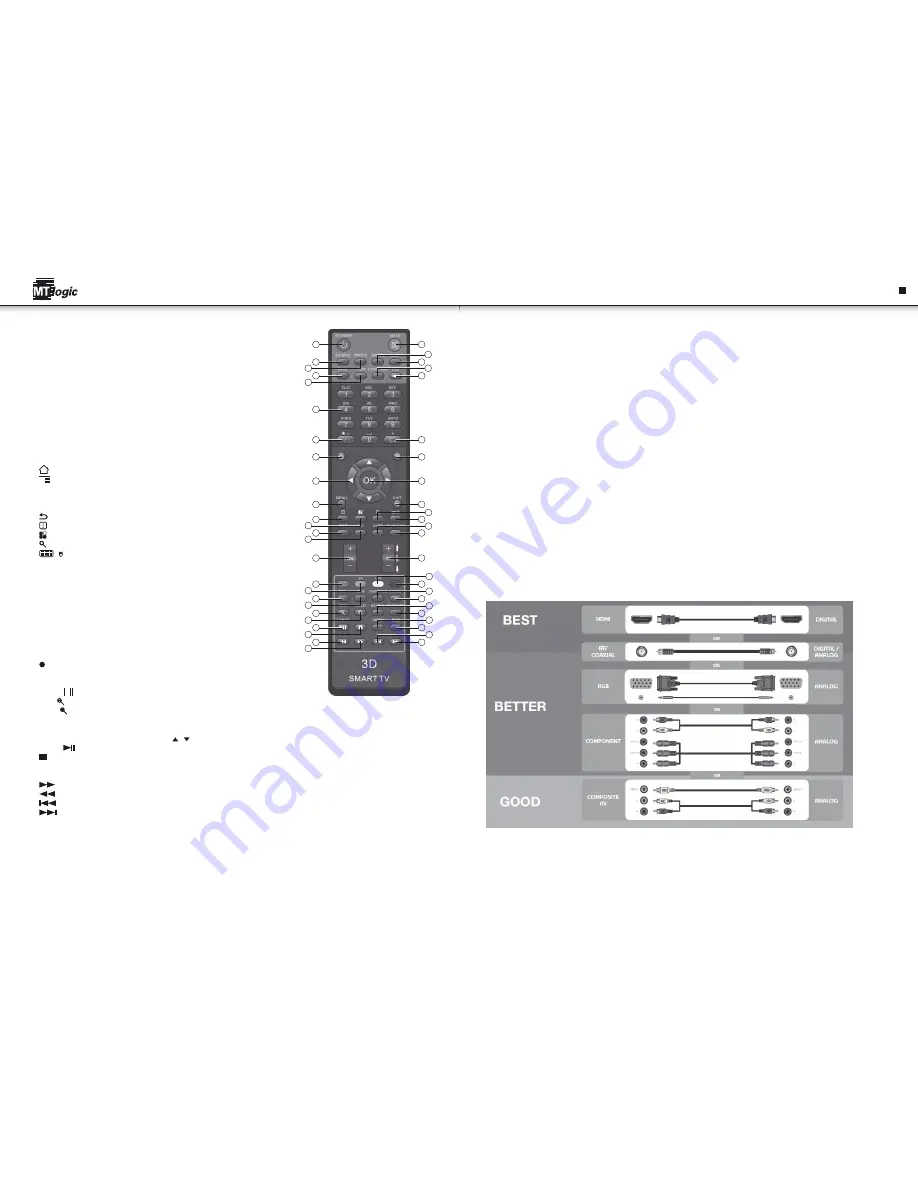
connectIng your deVIces
Once you have determined the best available connection type on both your device and the TV, ensure you have the corresponding cable.
To connect a device to the TV:
1. Ensure both the TV and your device are off.
2. Connect the device and the TV Use the best available connection. See the "Device Connection Chart" shown below. Ensure each end of the
cable is securely connected.
3. Turn the TV on by pressing the Power/Standby button on the remote.
4. Turn your device on.
5. When you are ready to use your newly connected device, press the SOURCE button on the remote and select the connection type (HDMI, RGB,
etc) from the on-screen menu. Press OK.
6. Check the list of devices/connection types below for special instructions:
• Cable TV (without cable box/directly from wall) Perform a channel scan.
• RGB Make sure the desktop resolution on the PC is set to 1920 x 1080. Set the Screen Mode to Normal.
• DVD Player with DVI Connect left (white) and right (red) audio cables to the L and R ports next to the HDMI ports on the TV we strongly
recommend you to connect other devices with TV by HDMI cable which create the best result for quality of video/audio
settIng up your netWork connectIon
Your TV is internet-ready and can be connected to your home network in two ways:
• Ethernet, using the RJ45 (LAN) connector on the left panel .
• Wireless, using your home wireless network.
Once you have connected to your home network and the Internet, you can use Apps to deliver popular online content to your TV.
en
Instruction Manual
Instruction Manual


