background image


3.


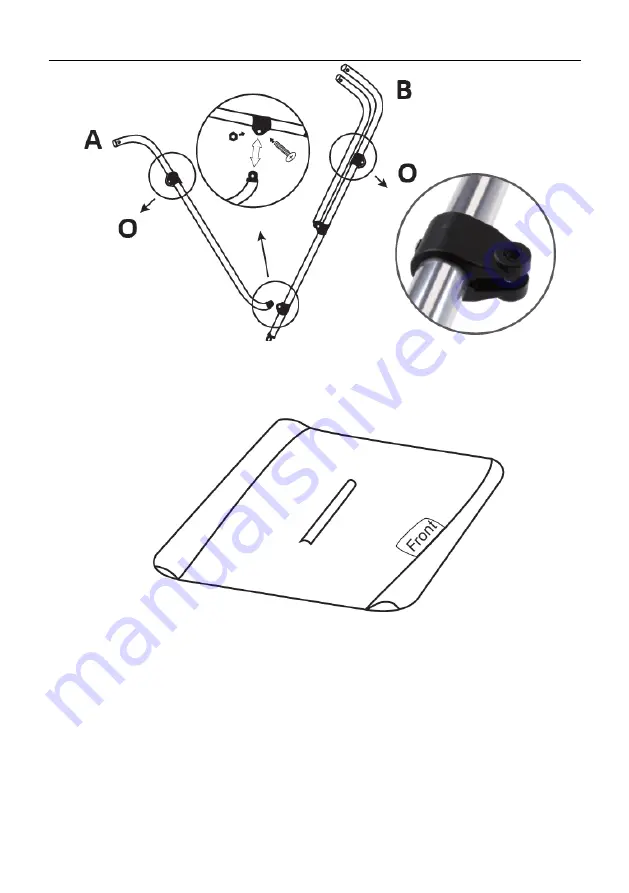
Extienda la tela sobre una superficie plana con la cara inferior hacia arriba, 

todas las mangas de los travesaños deben ser visibles y la etiqueta con el texto 

Front

 (frente) debe encontrarse a la derecha. 


Summary of Contents for MSW-MBT-01

Page 1: ...X P O N D O D E BIMINITOP MSW MBT 01 MSW MBT 02 MSW MBT 03 MSW MBT 04 BEDIENUNGSANLEITUNG User manual Instrukcja obs ugi N vod k pou it Manuel d utilisation Istruzioni per l uso Manual de instruccione...

Page 2: ...MSW MBT 04 EN Product model PL Model produktu CZ Model v robku FR Mod le IT Modello ES Modelo HU Modell DA Model DE Hersteller expondo Polska sp z o o sp k EN Manufacturer PL Producent CZ V robce FR...

Page 3: ...r Verwendung der neuesten Technologien und Komponenten und unter Einhaltung der h chsten Qualit tsstandards entwickelt und hergestellt VOR BEGINN DER ARBEITEN IST DIESE BETRIEBSANLEITUNG SORGF LTIG ZU...

Page 4: ...Ger t ordnungsgem funktioniert wenden Sie sich an den Kundendienst des Herstellers b Reparaturen d rfen nur vom Kundendienst des Herstellers durchgef hrt werden F hren Sie Reparaturen nicht selbst dur...

Page 5: ...ts zu modifizieren f Das Ger t muss von Feuer und W rmequellen ferngehalten werden g Um die Boots berdachung zu sch tzen w hrend diese nicht verwendet wird muss diese in der Aufbewahrungsh lle gelager...

Page 6: ...eschreibung des Ger ts Befestigungselemente N Querst ckbefesti gung O Klemme P Befestigung am Deck R Innenringende TEILELISTE Abbildung Beschreibung Zeiche n Meng e Vorderer Rahmen A 2 Hinterer Rahmen...

Page 7: ...ck C 3 Stoff D 1 Fl gelschraube E 2 Rahmenhalter Befestigung am Deck F 2 Schraube G 6 Sechskantmutter H 8 Riemen I 4 Riemenbefestigung J 4 Gewindefurchende Schrauben 2 zus tzliche sind im Set enthalte...

Page 8: ...ukt muss ausgepackt werden die Teile m ssen sortiert und die Vollst ndigkeit muss entsprechend der Teileliste berpr ft werden 2 Um den vorderen Rahmen A und den hinteren Rahmen B zu verbinden m ssen d...

Page 9: ...hen Oberfl che mit der unteren Seite nach oben ausgerichtet ausbreiten alle rmel f r die Querst cke sollten hierbei sichtbar sein und das Etikett mit der Aufschrift Front Vorderseite sollte sich auf d...

Page 10: ...deren und hinterer Rahmen in die Querst cke einsetzen und sicherstellen dass die Verbindungen sich mit dem Riegel blockiert haben Den Stoff aufziehen und sicherstellen dass der vordere Rahmen A sich a...

Page 11: ...6 Schritt Nr 5 wiederholen um die zweite Seite zu montieren...

Page 12: ...ie vier Riemen mit den Schrauben und Sechskantmuttern befestigen 8 Die Position der 2 Rahmenhalter und 4 Riemenbefestigungen ausmessen und dann mit den gewindefurchende Schrauben auf dem Boot befestig...

Page 13: ...nd alle Komponenten gut zu trocknen bevor das Ger t wieder verwendet wird c Lagern Sie das Ger t an einem trockenen und k hlen Ort gesch tzt vor Feuchtigkeit und direkter Sonneneinstrahlung d Das Ger...

Page 14: ...ccording to technical specifications using the latest technology and components and maintaining the highest quality standards PLEASE CAREFULLY READ AND UNDERSTAND THIS INSTRUCTION MANUAL BEFORE OPERAT...

Page 15: ...ice department may repair the unit Do not carry out repairs yourself c Keep these instructions for use for future reference If the unit is to be passed on to a third party the operating instructions m...

Page 16: ...The canopy should be folded when vessel speed exceeds 46 km h 25 nm h h Do not place any load on the product CAUTION Although the product has been designed to be safe with adequate safeguards and des...

Page 17: ...Attachment elements N Crossbar clamp O Clamp P Securing to deck R Inner ring lug PARTS LIST Drawing Description of the Symbol Quantity Front frame A 2 Back frame B 2 Crossbar C 3 Material D 1...

Page 18: ...E 2 Frame holder fastening to deck F 2 Screw G 6 Hexagon nut H 8 Belt I 4 Belt clip J 4 Self tapping screw 2 extra included K 14 Spring latch spare part not required for installation L 1 Cover for st...

Page 19: ...n ASSEMBLY OF THE UNIT 1 Unpack the product sort the parts and check them against the parts list 2 Use the bolt G and hex nut H to connect the front frame A and rear frame B together The two clamps O...

Page 20: ...and the label that says Front on the right side 4 Insert the three cross bars into the fabric sleeves 5 Slide the front and back frames into the crossbars and make sure the joints lock with the latche...

Page 21: ...6 Repeat step 5 to assemble the other side...

Page 22: ...7 Attach the four straps using hex bolts and nuts 8 Measure the position of the 2 frame brackets and the 4 strap attachments which are then secured to the boat deck using self tapping screws...

Page 23: ...e surfaces b After each cleaning all the parts should be dried well before the unit is used again c Store the unit in a dry and cool place protected from moisture and direct sunlight d Perform regular...

Page 24: ...wskaza technicznych przy u yciu najnowszych technologii i komponent w oraz przy zachowaniu najwy szych standard w jako ci PRZED PRZYST PIENIEM DO PRACY NALE Y DOK ADNIE PRZECZYTA I ZROZUMIE NINIEJSZ I...

Page 25: ...e lub stwierdzenia uszkodzenia nale y skontaktowa si z serwisem producenta b Napraw produktu mo e wykona wy cznie serwis producenta Nie wolno dokonywa napraw samodzielnie c Zachowa instrukcj u ytkowan...

Page 26: ...r w lub budowy f Trzyma urz dzenia z dala od r de ognia i ciep a g Aby chroni tkanin baldachimu gdy baldachim nie jest u ywany nale y umieszcza j w pokrowcu do przechowywania Baldachim nale y z o y gd...

Page 27: ...3 1 Opis urz dzenia Elementy mocowania N Zaczep poprzeczki O Zacisk P Mocowanie do pok adu R Wewn trzna ko c wka oczkowa LISTA CZ CI Rysunek Opis Symbol Ilo Przednia rama A 2 Tylna rama B 2...

Page 28: ...Poprzeczka C 3 Tkanina D 1 ruba skrzyde kowa E 2 Uchwyt ramy mocowanie do pok adu F 2 ruba G 6 Nakr tka sze ciok tna H 8 Pasek I 4 Zaczep paska J 4 ruba samogwintuj ca 2 dodatkowe w zestawie K 14...

Page 29: ...ania M 1 3 2 Przygotowanie do pracy MONTA URZ DZENIA 1 Rozpakowa produkt posegregowa cz ci i sprawdzi ich zgodno z list cz ci 2 Aby po czy ze sob przedni ram A i tyln ram B u y ruby G i nakr tki sze c...

Page 30: ...3 Roz o y tkanin na p askiej powierzchni spodni stron skierowan do g ry wszystkie r kawy na poprzeczki powinny by widoczne a etykieta z napisem Front prz d po prawej stronie...

Page 31: ...rzeczki do r kaw w tkaniny 5 Wsun przedni i tyln ram do poprzeczek i upewni si e z cza zablokowa y si za pomoc zapadek Naci gn tkanin i upewni si e przednia rama A jest umieszczona po stronie etykiety...

Page 32: ...6 Powt rzy krok nr 5 aby zmontowa drug stron...

Page 33: ...7 Zaczepi cztery paski za pomoc rub i nakr tek sze ciok tnych 8 Odmierzy po o enie 2 uchwyt w ramy oraz 4 zaczep w pask w kt re nast pnie zamocowa do pok adu odzi za pomoc rub samogwintuj cych...

Page 34: ...tkie elementy nale y dobrze wysuszy zanim urz dzenie zostanie ponownie u yte c Urz dzenie nale y przechowywa w suchym i ch odnym miejscu chronionym przed wilgoci i bezpo rednim promieniowaniem s onecz...

Page 35: ...i a komponent a p i zachov n nejvy ch standard kvality P ED ZAH JEN M PR CE SI D KLADN PROSTUDUJTE TYTO POKYNY Pro zaji t n dlouhodob ho a spolehliv ho provozu za zen dbejte na jeho dnou obsluhu a dr...

Page 36: ...zpe nost a Za zen nen ur eno k tomu aby bylo pou v no osobami v etn d t se sn en mi psychick mi smyslov mi a ment ln mi funkcemi nebo osobami bez p slu n ch zku enost a nebo znalost nejsou li pod dohl...

Page 37: ...e n a m lo dostate n ochrann prost edky a navzdory pou it dal ch bezpe nostn ch prvk chr n c ch u ivatele existuje i nad le mal riziko razu i zran n p i pr ci se za zen m Doporu ujeme abyste p i pou v...

Page 38: ...N chyt p ky O Svorka P Upevn n k palub R Vnit n o kov koncovka SEZNAM D L V kres Popis Symbol Po et P edn r m A 2 Zadn r m B 2 P ka C 3 L tka D 1 K dlov roub E 2 Dr k r mu upevn n k palub F 2...

Page 39: ...G 6 estihrann matice H 8 T men I 4 chytka t menu J 4 Samoz vitov roub 2 dodate n v kompletu K 14 Pru inov z padka n hradn d l nen vy adov n p i mont i L 1 lo n pouzdro M 1 3 2 P prava k provozu MONT Z...

Page 40: ...edn ho r mu A a zadn ho r mu B dohromady pou ijte roub G a estihrannou matici H Dv svorky O by m ly sm ovat ven jak je zn zorn no na obr zku 3 Polo te l tku na rovn povrch spodn stranou nahoru v echn...

Page 41: ...lo te t i p ky do ruk v l tky 5 Zasu te do p ek p edn a zadn r m a ujist te se e spoje do sebe zacvakly pomoc z padek Nat hn te l tku a ujist te se e p edn r m A je um st n na stran t tku s n pisem Fr...

Page 42: ...6 Pro mont druh strany opakujte krok 5...

Page 43: ...7 Zah kn te ty i t meny pomoc roub a estihrann ch matic 8 Zm te polohu 2 dr k r mu a 4 chytek t men a n sledn je p ipevn te k palub lunu pomoc samoz vitov ch roub...

Page 44: ...leptav l tky b Po ka d m i t n v echny sti dob e usu te ne budete za zen znovu pou vat c Za zen uchov vejte na such m a chladn m m st chr n n m p ed vlhkost a p m m slune n m z en m d Za zen pravideln...

Page 45: ...strict des sp cifications techniques avec les technologies et les composants les plus r cents et conform ment aux normes de qualit les plus lev es AVANT TOUTE UTILISATION CE MODE D EMPLOI DOIT TRE LU...

Page 46: ...apr s vente du fabricant b Le produit ne peut tre r par que par le service apr s vente du fabricant N effectuez pas les r parations vous m me c Conservez ce mode d emploi pour tout usage ult rieur Si...

Page 47: ...Gardez les appareils loign s des sources de chaleur g Lorsque le taud n est pas utilis la toile doit tre rang e dans la housse de protection Le taud doit tre repli lorsque la vitesse du bateau d passe...

Page 48: ...tion de l appareil l ments de fixation N Fixation de la traverse O Pince P Fixation au pont R Extr mit int rieure de la bague LISTE DES PI CES Plan D signation Symbol e Quantit Cadre avant A 2 Cadre a...

Page 49: ...Traverse C 3 Tissu D 1 Boulon ailettes E 2 Support du cadre fixation au pont F 2 Vis G 6 crou hexagonal H 8 Courroie I 4 Attache de sangle J 4 Vis autotaraudeuse 2 vis suppl mentaire s incluses K 14...

Page 50: ...fonctionnement ASSEMBLAGE DE L APPAREIL 1 D ballez le produit triez les pi ces et v rifiez qu elles correspondent la liste des pi ces 2 Reliez le cadre avant A au cadre arri re B l aide de la vis G e...

Page 51: ...3 Posez le tissu sur une surface plane la face inf rieure tourn e vers le haut tous les manchons des traverses doivent tre visibles et l tiquette Front doit tre droite...

Page 52: ...tissu 5 Faites glisser les cadres avant et arri re dans les traverses et assurez vous que les connecteurs se verrouillent en place avec les loquets Tendez le tissu et assurez vous que le cadre frontal...

Page 53: ...6 R p tez l tape 5 pour assembler l autre c t...

Page 54: ...7 Fixez les quatre sangles l aide des vis et des crous hexagonaux 8 Mesurez la position des 2 supports de cadre et des 4 attaches de sangle fixer au couvercle avec des vis autotaraudeuses...

Page 55: ...posants avant de r utiliser l appareil c Conservez l appareil dans un endroit sec et frais l abri de l humidit et des rayons directs du soleil d Effectuez des inspections r guli res de l appareil pour...

Page 56: ...specifiche tecniche utilizzando la tecnologia e i componenti pi recenti e mantenendo i pi alti standard di qualit PRIMA DI PROCEDERE AL LAVORO BISOGNA ACCURATAMENTE LEGGERE E COMPRENDERE QUESTO MANUA...

Page 57: ...rodotto o in caso di constatazione di un danno si prega di contattare il servizio di assistenza del produttore b Il prodotto pu essere riparato esclusivamente dal servizio di assistenza del produttore...

Page 58: ...o per modificarne i parametri o la costruzione f Tenere l apparecchio lontano dalle fonti di fuoco o dal calore g Per proteggere il tessuto del tendalino quando non in uso metterlo nella borsa di stoc...

Page 59: ...dispositivo Elementi di fissaggio N Attacco della traversa O Morsetto P Fissaggio al ponte R Capocorda interno ad anello ELENCO DELLE PARTI Disegno Descrizione Simbolo Quantit Telaio anteriore A 2 Te...

Page 60: ...Barra trasversale C 3 Tessuto D 1 Bullone ad alette E 2 Supporto del telaio fissaggio al ponte F 2 Vite G 6 Dado esagonale H 8 Cinghia I 4 Ponticello J 4 Vite autofilettante 2 extra incluse K 14...

Page 61: ...al lavoro MONTAGGIO DELL APPARECCHIO 1 Disimballare il prodotto ordinare le parti e controllarle rispetto alla lista delle parti 2 Per collegare insieme il telaio anteriore A e quello posteriore B ut...

Page 62: ...3 Stendere il tessuto su una superficie piana con il lato inferiore rivolto verso l alto tutte le maniche per le traverse devono essere visibili e l etichetta con scritta Parte anteriore a destra...

Page 63: ...ar scorrere i telai anteriori e posteriori nelle traverse e assicurarsi che i connettori si blocchino in posizione con i fermi Tirare il tessuto e assicurarsi che il telaio anteriore A sia posizionato...

Page 64: ...6 Ripetere il passo 5 per assemblare l altro lato...

Page 65: ...7 Fissare le quattro cinghie con bulloni e dadi esagonali 8 Misurare la posizione dei 2 supporti del telaio e dei 4 ponticelli che vanno poi fissati al ponte della barca con viti autofilettanti...

Page 66: ...re asciugati bene prima di utilizzare nuovamente l apparecchio c Conservare l apparecchio in un luogo asciutto e fresco al riparo dall umidit e dalla luce solare diretta d Eseguire ispezioni regolari...

Page 67: ...prescripciones t cnicas utilizando la tecnolog a y los componentes m s avanzados y manteniendo el m ximo nivel de calidad LEA ATENTAMENTE ESTE MANUAL ANTES DE TRABAJAR CON ESTA HERRAMIENTA Para exten...

Page 68: ...bricante b Cualquier reparaci n del producto deber ser realizada por el servicio t cnico del fabricante No reparar el producto por cuenta propia c Guardar el manual de uso para permitir su consulta en...

Page 69: ...alor g Cuando no se utiliza el toldo la tela debe guardarse en la funda protectora El toldo debe plegarse cuando la velocidad de la embarcaci n supere los 46 km h 25 mn h h No colocar ninguna carga so...

Page 70: ...positivo Elementos de fijaci n N Enganche del travesa o O Grapa P Fijaci n a la cubierta R Extremo interior de anilla LISTADO DE PIEZAS Figura Descripci n S mbolo Cantidad Marco delantero A 2 Marco tr...

Page 71: ...a D 1 Tornillo de mariposa E 2 Soporte del marco fijaci n a la cubierta F 2 Tornillo G 6 Tuerca hexagonal H 8 Correa I 4 Enganche de la correa J 4 Tornillo autorroscante 2 adicionales en el conjunto K...

Page 72: ...ara el trabajo ENSAMBLAJE DEL DISPOSITIVO 1 Desembale el producto clasifique las piezas y compruebe que corresponden con el listado de piezas 2 Conecte el marco delantero A al trasero B con el tornill...

Page 73: ...Extienda la tela sobre una superficie plana con la cara inferior hacia arriba todas las mangas de los travesa os deben ser visibles y la etiqueta con el texto Front frente debe encontrarse a la derech...

Page 74: ...la 5 Deslice los marcos delantero y trasero en los travesa os y aseg rese de que las juntas se bloqueen con los trinquetes Tire de la tela para tensarla y aseg rese de que el marco delantero A est col...

Page 75: ...6 Repita el paso n 5 para montar la otra parte...

Page 76: ...las cuatro correas utilizando los tornillos y las tuercas hexagonales 8 Mida la posici n de los 2 soportes del marco y de los 4 enganches de correas que deber n fijarse a la cubierta con tornillos aut...

Page 77: ...s las piezas despu s de cada limpieza antes de volver a usar el dispositivo c Guardar el dispositivo en un lugar fresco y seco protegido de la humedad y de la luz solar directa d Se deben realizar ins...

Page 78: ...m szaki megold sok s alkatr szek felhaszn l s val a legmagasabb min s gi el r sok betart s val lett tervezve s legy rtva A MUNKA MEGKEZD SE EL TT ALAPOSAN RT OLVAS SSAL TANULM NYOZZA A JELEN HASZN LAT...

Page 79: ...A term ket csak a gy rt szervize jav thatja Tilos n ll jav t sokat v gezni a term ken c A haszn lati utas t st meg kell rizni k s bb is sz ks g lehet r Ha a k sz l ket tadja egy k vetkez tulajdonosna...

Page 80: ...keket t zt l s m s h forr sokt l g A cs naktet anyag nak v delme rdek ben haszn laton k v l helyezze t rol huzatba A tet t le kell hajtani ha a haj sebess ge meghaladja a 46 km h t 25 nm h h Ne helyez...

Page 81: ...A k sz l k le r sa R gz t elemek N A kereszttart r gz t je O Szor t elem P R gz t s a fed lzethez R Bels szemes v gz d s Alkatr szek list ja Rajz Le r s Szimb lu m Mennyis g Mells keret A 2 H ts keret...

Page 82: ...Kereszttart C 3 Sz vet D 1 Sz rnyascsavar E 2 Keret tart r gz t s a fed lzethez F 2 Csavar G 6 Hatlap anya H 8 Sz j I 4 Sz jr gz t J 4 nmetsz csavar 2 extra tartoz k K 14...

Page 83: ...emel s el tt A K SZ L K SSZESZEREL SE 1 Csomagolja ki a term ket rendezze sz t az alkatr szeket s ellen rizze ket az alkatr szlist val 2 Az els keret A s a h ts keret B sszekapcsol s hoz haszn lja a c...

Page 84: ...3 Fektesse a sz vetet fejjel lefel egy sima fel letre a keresztrudakon l v sszes ujjnak l that nak kell lennie a jobb oldalon pedig a Front felirattal ell tott c mk nek...

Page 85: ...yag ujjaiba 5 Cs sztassa az el ls s a h ts keretet a kereszttart kba s ellen rizze hogy az illeszt sek r gz ltek e a reteszekkel Ny jtsa ki a sz vetet s gy z dj n meg arr l hogy az el ls keret A a Fro...

Page 86: ...6 Ism telje meg az 5 l p st a m sik oldal sszeszerel s hez...

Page 87: ...7 Akassza be a n gy hevedert csavarokkal s hatlap any kkal 8 M rje meg a 2 kerettart s 4 hevederkamp helyzet t s r gz tse ket a haj fed lzethez az nmetsz csavarokkal...

Page 88: ...en tiszt t s ut n az sszes alkatr szt alaposan meg kell sz r tani a k sz l k jb li haszn lata el tt c A k sz l ket h v s s sz raz helyen nedvess gt l s k zvetlen napf nyt l v dve kell t rolni d A k sz...

Page 89: ...r ved hj lp af de nyeste teknologier og komponenter samt opretholdelse af de h jeste kvalitetsstandarder L S BETJENINGSVEJLEDNINGEN OMHYGGELIGT INDEN DU STARTER MED AT ARBEJDE MED APPARATET For at sik...

Page 90: ...service b Produktet m kun repareres af producentens kundeservice Foretag ikke reparationer selv c Gem betjeningsvejledningen til senere brug Hvis apparatet videregives til tredjemand skal betjeningsve...

Page 91: ...ldakinens stof skal du placere det i et opbevaringsbetr k n r det ikke er i brug Baldakinen skal foldes ned n r fart jets hastighed er st rre end 46 km t 25 nm t h L g ikke v gt p produktet OBS P trod...

Page 92: ...1 Beskrivelse af enheden Fastg relseselementer N H ft tv rstangen O Klem P Fastg relse til d kket R Indvendig ringende LISTE OVER KOMPONENTER Figur Beskrivelse Symbo l Anta l Frontramme A 2 Bagramme B...

Page 93: ...Tv rstang C 3 Stof D 1 Vingeskrue E 2 Rammeholder fastg relse til d k F 2 Skrue G 6 Sekskantm trik H 8 Rem I 4 Stropkrog J 4 Selvsk rende skrue 2 ekstra inkluderet K 14...

Page 94: ...t ud sorter komponenterne og kontroller i forhold til listen 2 For at forbinde frontrammen A og bagrammen B sammen skal du bruge skruen G og sekskantm trikken H De to klemmer O skal vende udad som vis...

Page 95: ...st nger i stoffets rmer 5 Skub de forreste og bageste rammer ind i tv rst ngerne og s rg for at samlingerne l ser med palerne Str k stoffet og s rg for at frontrammen er placeret p siden af etiketten...

Page 96: ...6 Gentag trin 5 for at samle den anden side...

Page 97: ...7 H ft de fire stropper med bolte og sekskantm trikker 8 M l positionerne af de 2 rammeholdere og 4 stroppekroge og fastg r dem til b dd kket med de selvsk rende skruer...

Page 98: ...dele skal t rres grundigt efter hver reng ring og f r apparatet genbruges c Opbevar apparatet p et k ligt og t rt sted beskyttet mod fugt og direkte sollys d Der b r udf res regelm ssig inspektion af...

Page 99: ...CELEM JEST SATYSFAKCJA KLIENT W W PRZYPADKU PYTA PROSIMY O KONTAKT Z PRZEDSTAWICIELEM W DANYM KRAJU NA M HLAVN M C LEM JE SPOKOJENOST NA ICH Z KAZN K V P PAD OT ZEK N S PROS M KONTAKTUJTE NA NOTRE BU...

Reviews: