background image

2-12

Getting Started

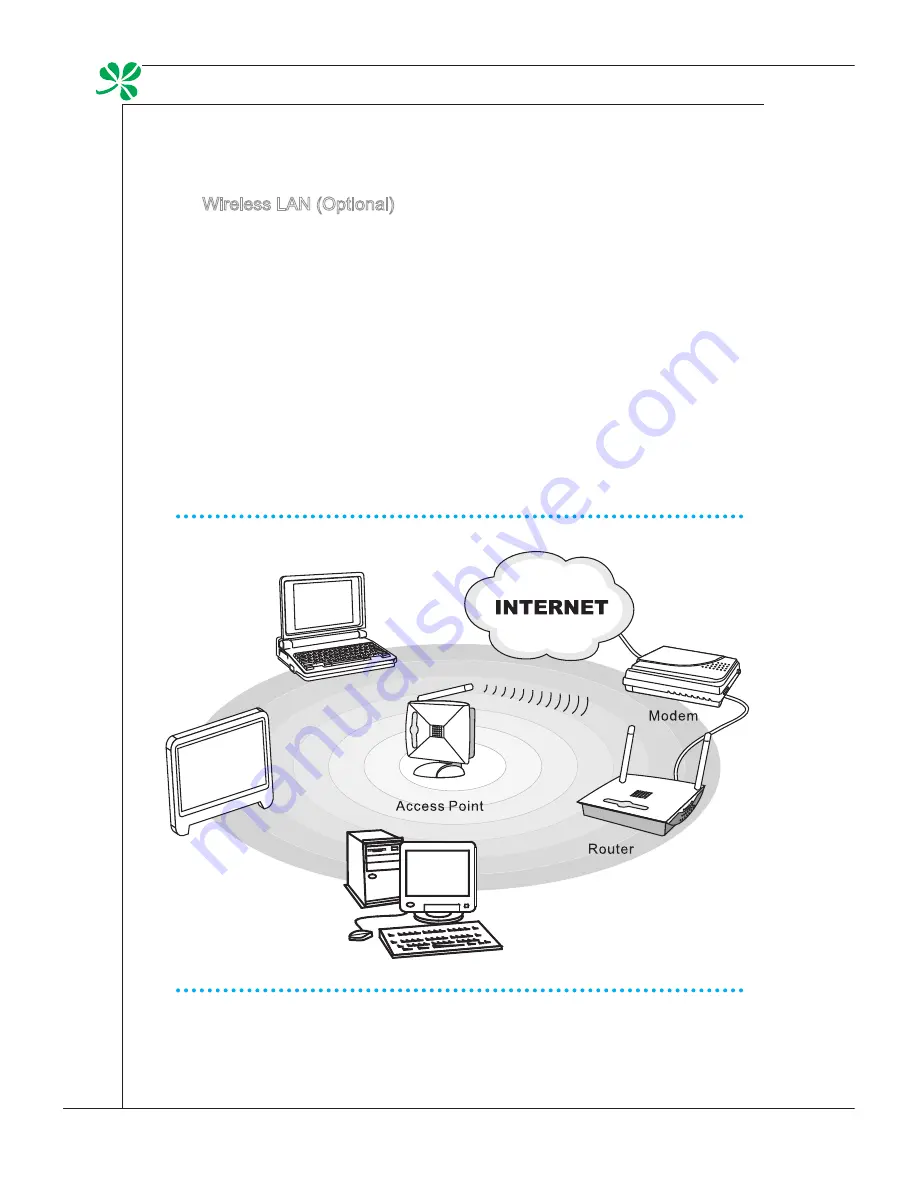
   Wireless lAn (optional)

this AIo Pc is equipped with wireless lAn module which allows users to per-

form fast data transmission with standard Ieee 802.11 technology for wireless 

lAn. this gives users the mobility to move around within a broad coverage area 

and still be connected to the network.

by using the 64-bit/128-bit Wired equivalent Privacy (WeP) encryption technol-

ogy and Wi-fi Protected Access feature, the optional built-in wirelesses lAn is 

capable to achieve a more efficient and a more secure solution to the wireless 

communication.

for more instructions or detailed steps on connecting to the Wireless lAn, please 

ask your MIS staff or network manager for help.

Summary of Contents for AE2040

Page 1: ...Wind Top AE2040 All in One AIO PC MS AA16 V1 X System G52 AA161X1 ...

Page 2: ...1 3 System Specifications 1 9 Component Replacement Upgrade 1 10 2 Getting Started 2 1 Safety Comfort Tips 2 2 Having Good Working Habits 2 3 Knowing the Keyboard Optional 2 4 Positioning your System 2 6 Connecting Peripheral Devices 2 7 Connecting Power 2 13 3 System Operations 3 1 System Booting Setup for the first time 3 2 Creating System Recovery Disk 3 3 Touch Panel Calibration Only for singl...

Page 3: ...gistered trademark of Intel Corporation Realtek is a registered trademark of Realtek Semiconductor Corporation Windows is a registered trademark of Microsoft Corporation U S Patent Numbers 4 631 603 4 819 098 4 907 093 5 315 448 and 6 516 132 This product incorporates copyright protection technology that is protected by U S patents and other intellectual property rights Use of this copyright prote...

Page 4: ...iced that the acquisition of replaceable parts or compatible ones of the product users purchased in certain countries or territories may be fulfilled by the manufacturer within 5 years at most since the product has been discontinued depending on the official regulations declared at the time Please contact the manufacturer via http www msicomputer com msi_user msi_rma for the detailed information a...

Page 5: ...mental Policy The product has been designed to enable proper reuse of parts and recycling and should not be thrown away at its end of life Users should contact the local authorized point of collection for recycling and disposing of their end of life products Visit the MSI website and locate a nearby distributor for further recycling information http www msi com index php func html name service_ wo...

Page 6: ...outlet Do not disable the protective earth pin from the plug The equipment must be connected to an earthed mains socket outlet Always unplug the AC power cord before installing any add on card or module to the equipment Always disconnect the AC power cord or switch the wall socket off if the equipment would be left unused for a certain time to achieve zero energy consumption The ventilator on the ...

Page 7: ...eld is reliably connected to protective earthing system of the building Cable distribution system should be grounded earthed in accordance with ANSI NFPA 70 the National Electrical Code NEC in particular Section 820 93 Grounding of Outer Conductive Shield of a Coaxial Cable Always keep the strong magnetic or electrical objects away from the equip ment If any of the following situations arises get ...

Page 8: ...levision reception which can be determined by turning the equipment off and on the user is encouraged to try to correct the interference by one or more of the measures listed below Reorient or relocate the receiving antenna Increase the separation between the equipment and receiver Connect the equipment into an outlet on a circuit different from that to which the receiver is connected Consult the ...

Page 9: ...ctos clasifi cados como eléctricos y equipos electrónicos no pueden ser depositados en los contenedores habituales de su municipio los fabricantes de equipos electrónicos están obligados a hacerse cargo de dichos productos al termino de su período de vida Italian Italiano In base alla Direttiva dell Unione Europea EU sullo Smaltimento dei Materiali Elettrici ed Elettronici Direttiva 2002 96 EC in ...

Page 10: ...002 96 EC platné od 13 srpna 2005 je zakázáno likvidovat elektrické a elektronické výrobky v běžném komunálním odpadu a výrobci elektronických výrobků na které se tato směrnice vztahuje budou povinni odebírat takové výrobky zpět po skončení jejich životnosti Traditional Chinese 繁體中文 歐盟已制訂有關廢電機電子設備法令 亦即自2005年8月13日 生效的2002 96 EC 明文規定 電機電子設備產品 不可再以都市廢棄物處理 且所有相關電 子設備製造商 均須在產品使用壽命結束後進行回收 Simplified Chi...

Page 11: ...Electrónicos da União Europeia UE efectiva desde o 13 de Agosto do ano 2005 os produtos de equipamento eléctrico e electrónico não podem ser descartados como resíduo municipal e os fabricantes do equipamento electrónico sujeitos a esta legislação estarão obligados a recolhar estes produtos ao finalizar sua vida útil Swedish Svenska Under Europeiska unionens EU Weee direktiv Waste Electrical and El...

Page 12: ...кия съюз относно отпадъците от електрическо и електронно оборудване директива 2002 96 EC важаща от 13 август 2005 г електрическо и електронно оборудване не може да се изхвърля заедно с битовите отпадъци и производителите на такова оборудване са задължени да приемат обратно съответните продукти в края на експлоатационния им период Croatian Hrvatski U okviru Direktive Europske Unije EU o Otpadnim el...

Page 13: ...lassy frame which displays the simplicity of modern individualism and the comfort of home Furthermore it is accompanied with the best computer features such as instant message low acoustics energy saving and 802 11 b g n wire less internet capability so you may roam freely in the realm of cyberspace ...

Page 14: ...ged or missing The picture is for your reference only and your packing contents may slightly vary depending on the model you purchased Wind Top Series AC DC Adapter AC Power Cord User Manual Quick Guide Driver Utility Disk LCD Display Wiper Mouse Optional Keyboard Optional Stylus Optional ...

Page 15: ...am with the microphone can be used for picture taking video recoding online conferencing and any other interactive applications 3 IR Receiver Optional This infrared receiver is provided for remote control 4 LCD Display The 20 inch TFT LCD display is with an optimal resolution of 1600 X 900 and standard proportion of 16 9 widescreen 1 3 4 2 ...

Page 16: ...view Rear View Important We suggest that you connect the AC DC adapter to your AIO PC first and then con nect the AC power cord to the socket outlet for safety concerns 1 1 2 3 4 5 1 10 12 9 7 8 6 8 11 13 15 14 ...

Page 17: ...Contact the local dealer for further information and please be noted that the supported memory cards may vary without notice 4 Stand Use this stand to position your system on a flat and stable surface 5 Cable Routing Hole Route the cables through the cable routing hole to avoid cable spa ghetti when connecting devices 6 Power Jack The AC DC adapter converts AC power to DC power for this jack Power...

Page 18: ...Condition Left Yellow Off LAN link is not established On steady state LAN link is established On brighter pulsing The computer is communicating with another computer on the LAN Right Green Off 10 Mbit sec data rate is selected On 100 Mbit sec data rate is selected Orange On 1000 Mbit sec data rate is selected 12 Headphone Jack Green This connector is provided for headphones or speakers 13 Micropho...

Page 19: ...ical disk drive manually if the eject button does not work 4 Card Reader Drive The built in card reader may support various types of memory card such as XD eXtreme Digital SD Secure Digital SDHC SD High Capacity MS Memory Stick MS Pro Memory Stick Pro or MMC Multi Media Card cards that usually used in devices like digital cameras MP3 players mobile phones and PDAs Contact the local dealer for furt...

Page 20: ... and goes off when the system is shut down In terms of power saving the LED blinks in S3 Suspend to RAM mode and goes off in S4 Suspend to Disk mode Pressing the sys tem power button will wake the system up from power saving mode 8 MENU Button Press this button to view the OSD menu or enter into the submenu 9 Right Button This button indicates the cursor movement or OSD manual selection in increme...

Page 21: ...optimal resolution of 1600 X 900 and standard proportion of 16 9 widescreen Rear Panel I O 1 DC power jack 1 VGA In port optional 4 USB ports 1 HDMI Out port optional 1 eSATA port optional 1 RJ 45 LAN jack 1 microphone jack 1 headphone speaker jack 1 optical S PDIF Out jack optional Storage Hard Disk Drive 3 5 SATAII Optical Disk Drive Slim DVD Super Multi Blu ray is optional Card Reader 4 in 1 XD...

Page 22: ...w Component Replacement Upgrade Please note that certain components preinstalled in the product may be up gradable or replaceable by user s request depending on the models users pur chased 1 CPU 2 Memory 1 2 3 5 4 ...

Page 23: ...horized service center closest to your location for as sistance To learn more about upgrade limitation please refer to the specifications in the User s Manual For any further information on the product users purchased please contact the local dealer Do not attempt to upgrade or replace any component of the product if you are not an authorized dealer or service center since it may cause the warrant...

Page 24: ......

Page 25: ...ng Started This chapter provides you with the information on hardware set up procedures While connecting peripheral devices be careful in holding the devices and use a grounded wrist strap to avoid static electricity ...

Page 26: ... back comfortably Place you feet flat and naturally on the floor so that your knees and el bows have the proper position about 90 degree when operating Put your hands on the desk naturally to support your wrists Adjust the angle position of the AIO PC to have an optimal view Avoid using your PC in a place where discomfort may occur such as on the bed The AIO PC is an electrical device Please treat...

Page 27: ...ve to work with your AIO PC for long periods of time otherwise it may cause discomfort or injury to you Please keep the following tips in mind when operating Change your posture frequently Stretch and exercise your body regularly Remember to take a break after working for a period of time ...

Page 28: ...ght 440g Features Multimedia function keys with AIO PC New isolated keycap for easy typing Soft touch and tactile feedback for comfortable typing New concept elegant and slim keyboard in streamline shape Compact size for space saving Especially fit for MSI LCD display Compatible with Windows 2000 ME XP Vista 7 Built in function hot keys Access favorite websites and applications with one touch hot ...

Page 29: ...e function Fn F11 Volume down Fn F12 Volume up Hot Keys Fn F1 Launch the default E Mail applications Fn F2 Lanuch the default internet browser and go to the de fault home page Fn F3 Back to the previous web page Fn F4 Forward to the next web page Fn C Calculator Fn Z Sleep mode energy saving Fn W Wireless LAN Fn K Camera ...

Page 30: ... Step 1 Place your AIO PC on a flat and steady surface such as a table or desk Step 2 Pull the stand open and tilt the LCD display to an angle of between 10 and 20 degrees to suit your preference This helps to reduce your eye strain and muscle fatigue 0 o 10 o 0 o 20 o ...

Page 31: ...us USB devices such as mouse keyboard digital camera webcam printer external optical storage de vice and etc To connect these devices install the drivers for each device first if necessary and then connect the device to the AIO PC This AIO PC is capable of auto detecting the USB devices installed and if there is no detection of the de vices please manually enable the USB devices by going to Start ...

Page 32: ...cameras etc VGA Video Graphics Array is a graphics display system for PCs VGA connec tors and their associated cabling are always used solely to carry analog video signals along with digital clock and data HDMI High Definition Multimedia Interface is a new interface standard for PCs displays and consumer electronics devices that supports standard enhanced and high definition video plus multi chann...

Page 33: ...2 9 MS AA16 To connect the VGA HDMI device first make sure the AIO PC and the targeted device are both powered off and then connect the cable of the device to the VGA HDMI port of your AIO PC ...

Page 34: ... connect an external Serial ATA hard disk device The eSATA standard interface supports plug and play technology so that you can connect and remove the eSATA devices without turning off the AIO PC To connect the eSATA hard disk device simply connect the cable of the device to the eSATA Connector of your AIO PC ...

Page 35: ... 45 connector of the AIO PC allows you to connect the LAN local area network devices such as a hub switch and gateway to build a network con nection For more instructions or detailed steps on connecting to the LAN please ask your MIS staff or network manager for help ...

Page 36: ...d within a broad coverage area and still be connected to the network By using the 64 bit 128 bit Wired Equivalent Privacy WEP encryption technol ogy and Wi Fi Protected Access feature the optional built in wirelesses LAN is capable to achieve a more efficient and a more secure solution to the wireless communication For more instructions or detailed steps on connecting to the Wireless LAN please as...

Page 37: ...cal outlet Important We suggest that you connect the AC DC adapter to your AIO PC first and then connect the AC power cord to the socket outlet for safety concerns Disconnecting the AC Power Step 4 Unplug the AC power cord from the electrical outlet first Step 5 Unplug the connector from the AIO PC Step 6 Disassemble the AC power cord and the AC DC adapter Important When unplugging the AC power co...

Page 38: ......

Page 39: ...as system boot setup recovery disk creation network connection SRS Premium Sound and so on Important It is highly recommended that you create a system recovery disk as the backup solution in the event of a catastrophic disk failure or other accidents All information is subject to change without prior notice ...

Page 40: ...se terms box and click Next to continue Step 7 Select Use recommended settings for Help protect your computer and improve Windows automatically Step 8 Review your time and date settings Click Next to continue Step 9 Please choose a wireless network you intend to join from the provided WLAN list Click Next to continue You may also click Skip to skip this step and set up the WLAN later Step 10 Follo...

Page 41: ... other ac cidents Before moving forward please make sure your system booting setup is complete and go over the following procedures to get it done Step 1 Double click the BurnRecovery icon on the desktop to launch the Recovery Disc Creation Tool Please note that it may take a while for the operating system to prepare recovery files Step 2 Click Next to start the image creation of the recovery disk...

Page 42: ...m Operations Step 3 Select Create and burn a recovery disk and click Next to continue Alternatively choose Advanced to bring forth advanced options Choose between the provided options and click Next to continue ...

Page 43: ...ng to create the image of recovery disk It takes some time to finish the processing Step 5 Follow the on screen instructions to prepare enough number of blank DVD disks Insert the blank DVD disk into the optical disk drive and click Next to continue ...

Page 44: ...3 6 System Operations Step 6 The Windows Disc Image Burner pops up Click Burn to start the burn ing progress It takes a while to finish the processing ...

Page 45: ...he disk creation click Close to exit and take out the disk Follow the on screen instructions to create all recovery disks Step 8 All recovery disks have been successfully created Please store the disks carefully and click Next to continue ...

Page 46: ...3 8 System Operations Step 9 Check the following box if you want to remove the temporary files Click Finish to complete recovery disk creation ...

Page 47: ...e users could use the IdeaCom TSC tool installed in system to adjust the accuracy of the touch panel Please go over the following steps to get it done Step 1 Locate the IdeaCom TSC tool at Start All Programs IdeaCom TSC Step 2 Click Calibration to bring forth the default 9 point calibration Follow the on screen instructions to calibrate the touch panel ...

Page 48: ...points We suggest that users choose 9 points to adjust the touch panel If users desire the best precision then choose 25 points instead Click Calibra tion to proceed and follow the on screen instructions to calibrate the touch panel Important Do not touch the screen directly with any sharp pointed object Actual product specifications may vary with territories ...

Page 49: ...3 11 MS AA16 Network Connection under Windows Wired LAN Step 1 Go to Start Control Panel Step 2 Select Connect to the Internet under Network and Internet ...

Page 50: ...ons Step 3 Select Broadband PPPoE to connect using DSL or cable that requires a user name and password Step 4 Type the information from your Internet Service Provider ISP and click Connect to establish your LAN connection ...

Page 51: ...3 13 MS AA16 Wireless LAN Step 1 Go to Start Control Panel Step 2 Select Connect to the Internet under Network and Internet ...

Page 52: ...wireless net work Step 4 A list of available WLAN connections pops up Choose a connection from the list or click Open Network and Sharing Center to establish a new connection Step 5 To establish a new WLAN connection select Set up a new connection or network in Network and Sharing Center ...

Page 53: ...ireless network and click Next to continue Step 7 Enter information for the wireless network you intend to add and click Next to proceed Step 8 A new WLAN connection has been made Click Close to exit or select Change connection settings to modify the WLAN settings ...

Page 54: ... Connection Optional Step 1 Right click the Ralink Wireless LAN Card status icon in the lower right corner and then click Launch Config Utility Step 2 The window displays some available wireless networks Choose a net work and then click Connect ...

Page 55: ...3 17 MS AA16 Step 3 There may prompt you to enter a key Type the network key and then click OK Step 4 Now you re ready to browse the Web wirelessly ...

Page 56: ...per bass clearer dialog and outstanding surround sound Features Premium audio experience for music video and games on the PC Immersive surround sound experience from internal or external speakers and even headphones Greater volume without degrading audio quality Crystal clear dialog Deep rich bass Using the SRS Premium Sound Step 1 Double click the Realtek HD Audio tray icon at the lower right cor...

Page 57: ...s and are provided for External Speakers and Headphones SRS Center adjusts the center channel sound SRS Space adjusts the amount and width of the sound stage TruBass Level adjusts the bass or low frequencies TruBass Speaker Size should be used to select the size of the speakers Focus Level adjusts the frequencies that include vocals voice SRS Definition adjusts the high frequencies CAUTION These s...

Page 58: ...s at the right side of the monitor Step 1 Press the MENU button to bring up the OSD main menu Use the Right and Left arrow buttons to select the desired function menu and press the MENU button to enter Use the Right and Left arrow buttons to select or tune the values to suit your personal preferences After the settings are done press the AUTO button to exit Adjusting contrast and brightness Adjust...

Page 59: ...3 21 MS AA16 Adjusting signal source Adjusting positioning timeout Specifying language Resetting system Reading system information Adjusting wide screen mode ...

Page 60: ...eo mode menu Use the Right Left arrow buttons to select a desired mode and press the AUTO button to exit after the selection is made Important Whenever any error takes place and incurs abnormal display or volume malfunc tion enter the OSD menu and reset your monitor to restore all settings to manu facturer default for optimal performance ...

Page 61: ...ur display or set your PC to sleep mode after a period of user inactivity Power Management in Windows OS Power Options in Windows OS allow you to control the power man agement features of your display hard drive and battery Go to Start Control Panel System and Security Then click on the Power Options link Select a power plan that suits your personal needs You may also fine tune the settings by cli...

Page 62: ...he mouse the keyboard Energy Saving Tips Turn off the monitor by pressing the LCD power button after a period of user inactivity Utilize the Fn Z sleep mode keys to turn into power saving mode Tune the settings in Power Options under Windows OS to optimize your PC s power management Install power saving software to manage your PC s energy consumption Always disconnect the AC power cord or switch t...

Page 63: ... normally Before using the System Recovery Function please backup the important data saved on your system drive to other storage devices If the following solution fails to recover your system please contact the autho rized local distributor or service center for further assistance Recovering the System with the F3 Hotkey If the system encounters non recoverable problems it is always recommend ed t...

Page 64: ...MSI Recovery Manager to start the System Recovery Function or select EXIT to restart the system 5 The System Recovery Function will get your system back to default settings Press OK to confirm 6 Press OK to reconfirm and start the System Recovery Function Alterna tively press Cancel to stop ...

Page 65: ...perating system as usual Recovering the System with the Recovery Disks If the F3 hotkey recovery cannot work try recovering your system with the recovery disks that you created beforehand Follow the instructions below to continue 1 Insert the recovery disk into the optical disk drive and restart the system 2 Press the F11 hotkey on the keyboard when the following image appears ...

Page 66: ...y to boot from CD or DVD 4 The Windows OS starts loading files Windows is loading files 5 The system recovery menu pops up Hard Disk Recovery will format the whole HDD All data on the HDD will be erased while all settings will be restored to manufacturer default Select Hard Disk Recovery only when your HDD is infected with fatal viruses and no solution can be found except a clear cleanup of the HD...

Page 67: ...ill not be affected It is highly recommended that users select System Partition Recovery to restore the system 6 The system recovery will format your HDD partition Make sure that the important data have been backed up Click YES to continue click NO to stop the system recovery Click YES again to reconfirm click NO to stop the system recovery ...

Page 68: ...ction or it may cause unknown damage to the system 8 The following message indicates successful system recovery Press OK to restart the system and access the Windows operating system as usual 9 If the recovery process is interrupted or failed please repeat the recovery procedures from the beginning ...

Reviews: