background image

7

5.7

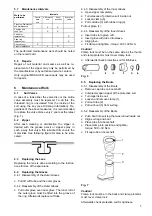
Maintenance Intervals

Work to be

Intervals

performed

Prior to

each

use

After each

use

Semi-

annually

Every two

years

Cleaning, Disinfection
and Maintenance

X

X

Function and
Leak Test

X

X

Valve disc
replacement

X

Slide ring
replacement

X

Check by user

X

Zipper maintenance

X

X

The performed maintenance work should be noted
on the record card.

5.8

Repairs

Repair of suit material and seams as well as re-
placement of the zipper may only be performed by
the manufacturer or by authorized service centers.

Only original MSA AUER spare parts may be used
for repairs.

6

Maintenance Work

6.1

Suit Valves

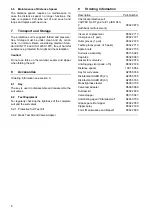
In case of a leak either the valve disc or the entire
valve assembly must be replaced. To do this, the
threaded ring is unscrewed from the inside of the
suit using the key (see Ordering Information). Re-
gardless of the above measures, it is recommended
to replace the valve discs every 2 years at the latest
(Fig. 1).

6.2

Zipper

After each cleaning or disinfection the zipper is
treated with the grease pencil or zipper spray in
such a way that only a thin lubricant film covers the
metal links. See following figure for area to be lubri-
cated:

6.3

Replacing the Lens

Replacing the lens is done according to the Instruc-
tions for Use of the spare lens.

6.4

Replacing the Gloves

6.4.1 Disassembly of the Outer Gloves

x

Pull off cuff tube and the outer gloves.

6.4.2 Reassembly of the Outer Gloves

x

Pull outer glove over inner glove. The inner roll of
the outer glove must be fitted into the groove of
the ring. Afterwards replace cuff tube.

6.4.3 Disassembly of the Inner Gloves

x

Open zipper completely.

x

Turn sleeves of protective suit inside out.

x

Loosen clamp (6).

x

Pull out tube (3) with rubber ring (2).

Pull out glove (1).

6.4.4 Reassembly of the Inner Gloves

x

Insert tube into glove cuff.

x

Insert glove with tube into sleeve.

x

Align glove.

x

Fit clamp and tighten - torque: 400 

r

 30 Ncm

Caution!

Clamp lock must be on the same side as the thumb
and clamp protector must cover clamp lock.

x

Afterwards check protective suit for tightness.

Fig. 6

6.5 

Replacing the Boots

6.5.1 Disassembly of the Boots

x

Remove cap tube on boot shaft

x

Completely open zipper of the protective suit.

x

Turn legs inside out.

x

Loosen and remove clamp (1).

x

Pull out tube (2).

x

Pull out boot (3) from suit leg.

6.5.2 Reassembly of the Boots

x

Push boot into suit leg that was turned inside out.

x

Align suit leg and boot.

x

Place tube into boot shaft.

x

Place clamp into position and tighten -
torque: 500 

±

 30 Ncm.

x

Fit cap tube on boot shaft

Fig. 7

Caution!

Clamp lock must be in the back and clamp protector
must cover clamp lock.

Afterwards check protective suit for tightness.

Summary of Contents for VAUTEX SL-S

Page 1: ...MSA AUER VAUTEX SL S Type 1a ET pr EN 943 2 Chemikalienschutzanzug D3020039 05 SL ...

Page 2: ...zw verwenden pflegen warten und kontrollieren Dieses Produkt kann seine Aufgaben für die es bestimmt ist nur dann erfüllen wenn es entsprechend den An gaben der MSA AUER GmbH eingesetzt verwendet gepflegt und kontrolliert wird Die von der MSA AUER GmbH für dieses Produkt übernommene Garantie verfällt wenn es nicht entsprechend den Angaben der MSA AUER GmbH eingesetzt verwendet gepflegt und kontrol...

Page 3: ...zanzughülle 11 Gleitring 2 Klemmprofil 12 Ventilgehäuse 3 Sichtscheibe 13 Ventilscheibe 4 Füllerprofil 14 Vorkammer 5 Handschuhe 15 Schraubschelle 6 Gummiring 16 Rohrstück 7 Rohrstück 17 Schaftstiefel 8 Schellenschutz 18 Außenhandschuh 9 Schraubschelle 19 Schlauchmanschette ...

Page 4: ...mgrößen ist ein verstellbarer Raffzug zwischen den beiden Auslaßventilen montiert Der Reißverschluß verläuft auf der Vorderseite vom rechten Bein bis in das Kopfteil 3 2 Funktionsprinzip Die Atemluft wird dem Geräteträger von einem Preßluftatmer zugeführt der auf dem Rücken getra gen wird Die Ausatemluft entweicht durch das Ausatemventil der Vollmaske in das Innere des Schutzanzuges und anschließe...

Page 5: ... x einteiliger Arbeitsanzug mit eng einstellbaren Bundverschlüssen an Ärmeln und Hosenbeinen bzw Feuerwehrschutzanzug x Schutzhelm z B Feuerwehrhelm Hinweis Beim Einsatz in kälterer Umgebungstem peratur wird empfohlen zusätzlich wärmeisolierende Kleidung zu tragen 4 2 Anlegen des Schutzanzuges Beim Anlegen der Schutzausrüstung ist die Unter stützung durch eine zweite Person empfehlenswert Abb 2 Pr...

Page 6: ...ind gesondert zu reinigen und erst nach dem Trockenen wieder ein zusetzen Bei normaler Verschmutzung wird der Schutzanzug einmal unter Zusatz eines milden Feinwaschmittels bei 30 C gewaschen Bei starker Verschmutzung wird der Waschvorgang wiederholt Anschließend ist zweimal mit klarem Wasser zu spülen Sollten andere Reinigungsmittel oder Verfahren verwendet werden so ist die Eignung von dem Her st...

Page 7: ... Bestel langaben zu geben Bei Reparaturen dürfen nur MSA AUER Ersatzteile verwendet werden 6 Wartungsarbeiten 6 1 Anzugventile Wird eine Undichtheit festgestellt ist entweder die Ventilscheibe zu ersetzen oder das komplette An zugventil auszutauschen Dazu wird mit dem Schlüssel siehe Bestellangaben der Gewindering vom Anzuginneren her abgeschraubt Unabhängig von den o a Maßnahmen wird empfohlen di...

Page 8: ...f fen geschützt vor direktem Sonnenlicht und Erwär mung erfolgen Achtung Kein gewaltsames Knicken von Material Nähten und Reißverschluß beim Zusammenlegen 8 Zubehör Bestellangaben unter Punkt 9 8 1 Schlüssel Der Schlüssel dient gleichzeitig zum Aus und Ein bau der Anzugventile 8 2 Prüfgeräte Zum regelmäßigen Prüfen der Dichtheit des kom pletten Schutzanzuges und der Anzugventile 8 2 1 Schutzanzugs...

Page 9: ...9 ...

Page 10: ...m Tenhagen Strasse 25 D 46240 Bottrop Telefon 020 41 7 09 58 0 Telefax 020 41 7 09 58 20 Verkaufsregion II Gröbenzeller Strasse 40 D 80997 München Telefon 089 140 71 46 Telefax 089 141 38 70 Technische Änderungen vorbehalten Österreich MSA AUER Austria Vertriebs GmbH Absberger Strasse 9 A 3462 Absdorf Telefon 43 22 78 31 11 Telefax 43 22 78 311 12 E Mail msaaustria auer de MSA Schweiz Telefon 41 3...

Page 11: ...MSA AUER VAUTEX SL S Type 1a ET pr EN 943 2 Protective Suit D3020039 05 SL ...

Page 12: ...s manual must be carefully read by all individuals who have or will have responsibility for using or servicing this product The warranties made by MSA AUER GmbH with respect to this product are voided if the product is not used and serviced in accordance with the instructions in this manual Please protect yourself and your employees by following them Before choosing and using this product it is re...

Page 13: ... valve 10 Threaded ring 1 Suit shell 11 Slide ring 2 Profiled lens seat 12 Valve housing 3 Lens 13 Valve disc 4 Lens arrestor 14 Valve cover 5 Gloves 15 Clamp 6 Rubber ring 16 Tube 7 Tube 17 Boot 8 Clamp protector 18 Outer glove 9 Clamp 19 Cuff tube ...

Page 14: ... air is supplied from the compressed air breathing apparatus that is worn on the back The exhalation air passes through the exhalation valve of the facepiece into the inside of the suit and then through the suit valves into the ambient atmosphere 3 3 Technical Data Protective suit complete but without compressed air breathing apparatus and full facepiece Weight approx 9 0 kg Size according to EN 3...

Page 15: ...ective suit x cotton underwear and socks x overall or similar with legs and sleeves that can be closed tightly x protective cap or helmet Note When the protective suit is worn in cold ambi ent temperatures additional thermal underwear is recommended 4 2 Donning the Protective Suit When donning the protective equipment assistance from a second person is recommended Fig 2 Don compressed air breathin...

Page 16: ...ts or processes are to be used their suitability must be confirmed by the de tergent manufacturer Afterwards the opened suit is hung up by the boots The protective suit and the removed parts must not be dried in radiant heat sun light radiator When using a drying cabinet the temperature must not exceed 40 C After the protective suit has been cleaned the zipper must be cleaned separately with water...

Page 17: ...c tions for Use of the spare lens 6 4 Replacing the Gloves 6 4 1 Disassembly of the Outer Gloves x Pull off cuff tube and the outer gloves 6 4 2 Reassembly of the Outer Gloves x Pull outer glove over inner glove The inner roll of the outer glove must be fitted into the groove of the ring Afterwards replace cuff tube 6 4 3 Disassembly of the Inner Gloves x Open zipper completely x Turn sleeves of p...

Page 18: ...cking the tightness of the complete suit and the suit valves 8 2 1 Protective Suit Test Kit 8 2 2 Mask Test Kit and Valve Adapter 9 Ordering Information Description Part Number Chemical protective suit VAUTEX SL S Type 1a ET prEN 943 2 with back reinforcement D3020 870 Visor set replacement D3022 713 Inner gloves 1 pair D3022 721 Outer gloves 1 pair D3022 720 Textile gloves pack of 5 pairs D3022 7...

Page 19: ...9 ...

Page 20: ...I du Vert Galant F 95310 Saint Ouen L Aumône GB GREAT BRITAIN MSA Britain Limited East Shawhead Coatbridge ML5 4TD U K Scotland H HUNGARY MSA AUER Hungária Biztonságtechnika Kft Francia út 10 H 1143 Budapest I ITALY MSA Italiana S p A Via Po 13 17 I 20089 Rozzano MI NL THE NETHERLANDS MSA Nederland B V Kernweg 20 NL 1627 LH Hoorn PL POLAND MSA AUER Polska Sp z o o ul Wschodnia 5A PL 05 090 Raszyn ...

Reviews: