background image

Studiobot TX90 Quick Start Guide

13

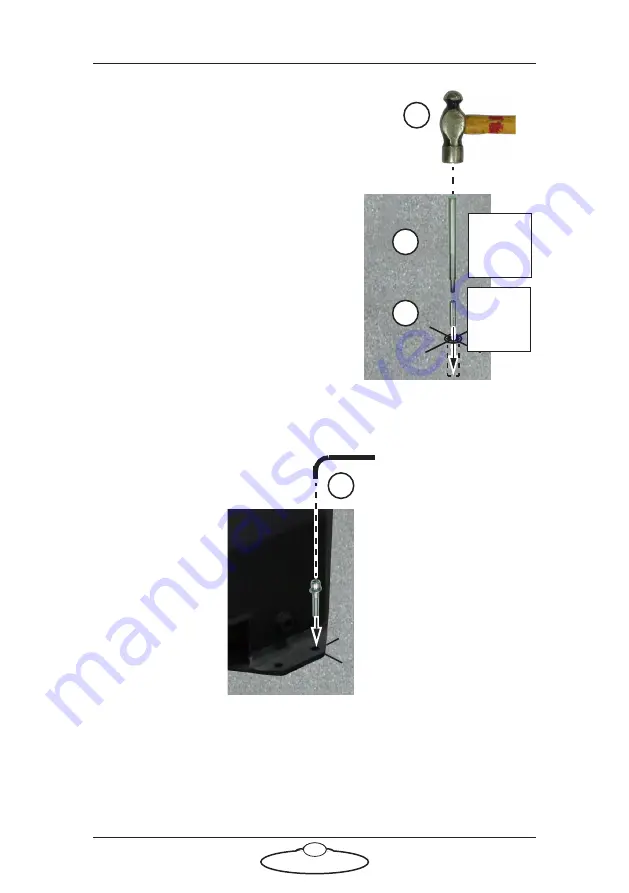
7.

At one of the holes insert the drop-in 
anchor insert, threads upward, all 
the way to the bottom. 

8.

Insert the anchor spreader tool into 
the drop-in anchor insert. 

9.

Hit the top of the anchor spreader 
tool with a hammer until the anchor 
is fully spread in the concrete. 

10. Remove the anchor spreader tool. 

11. Repeat steps 7 to 10 for the other 

three corners. 

12. Put Studiobot TX90 on Pedestal in 

place over the holes. 

13. Insert the four retaining bolts 

through the corners of the base and 
into the drop-in anchor inserts, and 
tighten. 

7

Anchor 
spreader 
tool

8

9

Drop-in 
anchor 
insert

× 4 corners

13

Summary of Contents for MRMC-2000-00-JB-0053

Page 1: ...CRANES AND RIGS BROADCAST HEADS DSLR PRODUCT PHOTOGRAPHY RENTALS STUDIOBOT TX90 Quick Start Guide QSG Product Code MRMC 2267 00 Products Covered MRMC 2000 00 JB 0053 MRMC 2000 00 JB 0054...

Page 2: ...e information in this document is accurate and up to date Mark Roberts Motion Control continuously strives to improve their products and may make changes to the hardware firmware and software describe...

Page 3: ...er 11 Anchoring Studiobot TX90 on Pedestal to the floor 11 Mounting the Staubli Arm 14 Connecting the cables Studiobot On Pedestal 16 Connecting the cables Studiobot On Track 18 Starting up the Studio...

Page 4: ...Move 44 Running a Move 45 Modifying a Move 45 Changing the duration of the move 45 Modifying one of the Waypoints in the Move 46 Adding a Waypoint in the Move 46 Moving the Studiobot TX90 arm by hand...

Page 5: ...ronments It has a small lightweight robotic arm which can be used either as camera rig or model mover There are two versions of Studiobot TX90 Studiobot TX90 on Pedestal has a stationary base which yo...

Page 6: ...nlike traditional motion control equipment Studiobot TX90 can get to maximum speed in the blink of an eye too fast for someone to be able to quickly move out of the way If you are using Studiobot TX90...

Page 7: ...ase power supply via 2x16amps power connectors Studiobot TX90 on Pedestal requires a 240 Volts single phase power supply via a 16amps power connector The computer stack that controls Studiobot TX90 ar...

Page 8: ...missiles Ensure all safety accessories are securely attached and in working order including emergency stops safety sensors etc Clearly mark the area around the robot in which no persons are allowed to...

Page 9: ...ble are closed off and that any person having to stand within reach of the robot is located as far away as possible for the shot Never let anyone cross the robot s track when the track motor is powere...

Page 10: ...e sparks that can ignite flammable gas Keep the equipment dry The system has not been made weatherproof Do not use with wet hands Always run moves only when standing within easy reach of the emergency...

Page 11: ...efed on the safety requirements and that they know not to change their position or do anything other than the rehearsed moves without fully warning the operator Any such person is to have a clear esca...

Page 12: ...Studiobot TX90 Quick Start Guide 8 2 Slide one castor wheel into the base ensuring that edge of the plate in the wheel assembly is inserted in the slot in the base Castor wheel Base Bottom XXXX X X...

Page 13: ...rt all the castors into the base ensuring the plates are inserted into the slots 4 Stand the base on the wheels and tighten the four screws to secure the castor wheels on the base Do not use the jack...

Page 14: ...it close enough for the two retaining bolts to reach the wings through the base 3 Secure the weight plates using the 2xM10 screws on either plate 4 Lower the base completely so it is resting on both...

Page 15: ...p Studiobot TX90 on Pedestal in a permanent or semi permanent location you can anchor the pedestal to the floor as an Note If you are using the 300mm riser anchor the Studiobot TX90 on Pedestal down t...

Page 16: ...he pedestal 3 Temporarily remove Studiobot TX90 on Pedestal and at one of the four circles that you have drawn draw a cross centred on the circle to help you precisely locate the drill bit Repeat for...

Page 17: ...f the anchor spreader tool with a hammer until the anchor is fully spread in the concrete 10 Remove the anchor spreader tool 11 Repeat steps 7 to 10 for the other three corners 12 Put Studiobot TX90 o...

Page 18: ...Studiobot TX90 Quick Start Guide 14 Mounting the Staubli Arm 1 Lower the TX90 Staubli arm on the Studiobot TX90 on Pedestal aligning the sides and screw cavities 2 Tighten the three screws...

Page 19: ...Studiobot TX90 Quick Start Guide 15 Notes...

Page 20: ...On Pedestal J1201 Power Supply ideally 240V Volt 1 phase 3 wire including Ground St ubli CS8 J110 J113 Teach Pendant J109 Umbilical going up the arm E STOP ROBOT ONLY Serial Lens Ethernet for camera...

Page 21: ...17 Power Supply 120 240 Volts 24 V DC 24V IN 5V Ethernet Hub E STOP ROBOT ONLY INtime dongle cable in USB port Power Supply 120 240 Volts 5V DC Uni box FreeD box SDI to USB convertor From customer ge...

Page 22: ...Umbilical going up the arm E STOP ROBOT ONLY Serial Lens Ethernet for camera Video Video or sync Camera Power Tally Power Tally HDMI Cable wrap Track Eth to Hub 240 Volt POWER Studiobot TX90 Quick St...

Page 23: ...DC 24V IN 5V Ethernet Hub E STOP ROBOT ONLY INtime dongle cable in USB port Power Supply 120 240 Volts 5V DC Uni box FreeD box SDI to USB convertor From customer genlock To customer monitor Video Stud...

Page 24: ...tell others on the set that you are now powering up the rig 2 Release the E stop on the Studiobot TX90 Base by turning the red button clockwise until the button pops up Also make sure the key is in t...

Page 25: ...ous diagram If the cifX board lights do not show as above after about three minutes then close Flair and restart INtime as follows Hint The St ubli CS8 is housed inside the Studiobot TX90 Base which y...

Page 26: ...the button clockwise until the red button pops up and then pressing the Reset button Once all E stop buttons on the system are up the St ubli CS8 display shows U 8 Zero the axes as required in Flair...

Page 27: ...needed 6 Start Flair 7 Release the E stop on the computer stack Hint You use the Track button in Flair to toggle the track on and off independently of the Engage Robot Disengage Robot button that you...

Page 28: ...Studiobot TX90 Quick Start Guide 24 In Flair 8 Zero the track and Lens Control Motor axes 9 Engage Robot 10 Home the arm carefully 11 Set the soft limits The rig is now ready to use...

Page 29: ...button 3 In the Flair software disengage the track by toggling off the Track button 4 Press down all E stop buttons On the computer stack On the Studiobot TX90 Base 5 Close the Flair software 6 Shut d...

Page 30: ...Studiobot TX90 shut down summary 1 Move Studiobot TX90 to the Home or Transport position 2 In Flair Disengage Robot 3 In Flair Toggle off the Track 4 Press down all E stops 5 Close Flair 6 Shut down...

Page 31: ...ore first use normally configured at the factory 1 Connect the FreeD box via Ethernet to the same network as that of the Flair PC of the Studiobot TX90 rig USB to Serial used to set IP address and Por...

Page 32: ...ck Start Guide 28 2 Power up the FreeD box by supply 5VDC IN 3 Install TeraTerm and set it up free application You can download it here https ttssh2 osdn jp index html en 4 Launch TeraTerm and select...

Page 33: ...ide 29 5 The Serial Port Setup and Connection dialog box will show the following information Click Cancel to close the dialog box 6 Select Setup Terminal In the Terminal Setup dialog box select the fo...

Page 34: ...tup Save Setup to save the setup 8 Type AT and press Enter AT Attention If you get an OK message as response your setup was successful If you don t get any response check your physical connection USB...

Page 35: ...Studiobot TX90 Quick Start Guide 31 9 Type AT to get a menu of commands...

Page 36: ...0 Quick Start Guide 32 10 AT will respond with system information Changing the IP address of the FreeD box To change the IP address of the FreeD box enter AT LIP 192 168 1 88 To change the port to X e...

Page 37: ...g the FreeD box in Flair Setup 1 In Flair select Setups Serial Devices Setup The External Devices Setup window appears In the Data Output line ensure that FreeD is selected and assigned to the same IP...

Page 38: ...Studiobot TX90 Quick Start Guide 34 2 AT Debug 2 command gives you the following information...

Page 39: ...gets printed every time the box receives a FreeD message from Flair Freq determined by the Sync Generator Genlock signal Disconnecting the genlock signal will change the frequency to 0 Plug it back an...

Page 40: ...s range of the local area network and should normally be set to the value shown in the next table Gateway GW address This is the address of the device used when talking between local area networks Thi...

Page 41: ...of the nodes in NetworkDirect These are the IP address of the nodes in Flair such as the Unibox for lens motors and the Quad board in the track 3 The IP address of the FreeD box This is IP address th...

Page 42: ...Studiobot TX90 Quick Start Guide 38 1 Right click on INtime Status Monitor and select INtime Configuration 2 Double click on Node Management 3 Select the Network tab INtime Status Monitor...

Page 43: ...X90 Quick Start Guide 39 4 Hover the mouse over the network card in the NIC list to display the ellipses on the right side Click on the ellipses to see the cards should be only 1 5 Select the NIC and...

Page 44: ...lude any lens boxes and track board Ensure that you have the IP address of the Flair PC in the same subnet 1 Select Setups Network Setup in Flair to open the Network Setup in Flair 2 Make sure that th...

Page 45: ...rminal 3 Type AR setting to display current IP address 4 To change the IP address of the board type AT LIP new address 5 To change the port number type AT LP new port number 6 The same IP address and...

Page 46: ...represent by one of 16 icons on the left hand side of the screen The right hand side of the screen shows the live feed and has buttons allowing you to read in a job from the icon save the job and als...

Page 47: ...on in Flair 1 2 In Flair enable the motors by selecting Motors Enable 2 Ensure that the lens is set up as Canon Select Setups Lens Setup and then select Canon Click Apply and then click Exit 3 From th...

Page 48: ...k Save and specify a name for the preset position 7 Click Capture Icon to save an icon for the position on the screen Running a Goto to the Preset Position 1 Double click on the icon of the preset pos...

Page 49: ...irmation message 5 Again by using the Capture Icon button you can specify an icon for the move Running a Move 1 Double click on the icon of the move on the Iconic screen to load the move 2 Click to go...

Page 50: ...e move 5 If you want to modify the second position click to move to the second waypoint 6 Ensuring that you are in Carts View mode move the robot to the new position and click Update 7 Click Save to s...

Page 51: ...art of the arm the motors might not be able to back off from this position without tripping out Putting the arm into transport position to make the Studiobot TX90 volume as small as possible so it wil...

Page 52: ...Release Switch to select which Studiobot TX90 axis you want to move 4 Person 2 By hand securely hold the portion of the arm that you want to move so it does not fall when you release the brake 5 Pers...

Page 53: ...Studiobot TX90 Quick Start Guide 49 Notes...

Page 54: ...heck the order in which you are powering up the devices page 18 Make sure you have allowed enough time for the Studiobot TX90 St ubli CS8 unit to completely power up with the cifX board lights display...

Page 55: ...ture using the pendant The robots efficiency might suffer if the temperature inside the cabinet is too high To check the temperature 1 Replace the bypass jumper from the Pendant connector in the Studi...

Page 56: ...Studiobot TX90 Quick Start Guide 52 2 Select Main Menu Control Panel Press Enter 3 Select Controller Status and press...

Page 57: ...Studiobot TX90 Quick Start Guide 53 4 The Cabinet Temperature is shown on the pendant screen...

Page 58: ...Studiobot TX90 Quick Start Guide 54 Notes...

Page 59: ...nit 50kg 110 2lbs 50kg 110 2lbs Weight anchor weights for track when track is not bolted to the ground 100kg on each corner Nominal robot payload 5 9kg 22lbs 5 9kg 22lbs Axis Travel MaxSpeed Rotate Ax...

Page 60: ...20A for the Track Unit and 6A for the Robot This is the absolute theoretical maximum peak current with the track and all axis of the robot at max acceleration and would occur over a period no more tha...

Page 61: ...Start Guide 57 Studiobot TX90 On Pedestal can be configured to run on less with a proportionate drop in performance Transformer requirement Two 3kW 110 230V step up transformers Optional power generat...

Page 62: ...Studiobot TX90 Quick Start Guide 58 Notes...

Page 63: ...Studiobot TX90 Quick Start Guide 59 Notes...

Page 64: ...Mark Roberts Motion Control Ltd Unit 3 South East Studios Blindley Heath Surrey RH7 6JP United Kingdom Telephone 44 0 1342 838000 info mrmoco com www mrmoco com...

Reviews: