23
EN
16.
If foam starts flowing from the container (B1) switch off the device immediately and empty
the container from dirty water. Also, check a quantity of washing liquid in a liquid container
(C1). To reduce the foaming add to the container (B1) a few drops of antifoam (H4).
WARNING! Never add antifoam agent to container (C1)
17.
When the container is full of dirty water, the float will automatically block suction and the
engine will start to work louder. In such case, switch off the vacuum cleaner and the pump
immediately, take a plug from a socket, take a sucking hose (E5) from a handle (B8), and wash-
ing liquid hose (E3). Take an engine’s set off and empty the container.
18.
If you want to clean hard floors, for example covered with tiles, marble etc put hard floors
attachment (F2) on a washing tip (F1). With the use of tip (F1) you can suck for example water
which has leaked from a dishwasher or washing machine or water left after fridge or freezer
defrosting.
ATTENTION! Use of the vacuum cleaner that will be not-compliant with the instructions above, may cause pro-
duction of too big quantity of froth, which will overflow through HEPA filter. If such thing happens, switch the
device off, take the plug from a socket, empty the water container, clean water filter tank and dry it. Next take
also HEPA filter out and dry it. Wash a foam filter located in float section and leave it to dry. Wait about 2 hours
to let froth from the engine dry off.
CLEANING AND MAINTENANCE
1.
Before each cleaning, make sure that the device is disconnected from mains.
2.
After every use, empty the water in the transparent water tank and clean and dry the tank.
Do not ever leave your vacuum cleaner with liquid and dirt in it for hygienic purposes and
extending the life of your vacuum cleaner.
3.
Pull and remove the water filter body. It can be washed with warm and soapy water or under
tap water. Let filter dry before replacing it.
4.
Filter (A8) and (B3) can be washed in warm water with some soap or in running water. It
should be dried properly before it is put on float chamber again.
ATTETION! Filters must not be cleaned in hot water or washed in a washing machine.
5.
Check if a valve in float chamber can be moved easily. If necessary, clean it. In order to check
if the float works properly lift the engine’s set and shake it.
6.
The cleanness of HEPA 13 filter should be checked periodically. It should be replaced after a
certain time of usage when it looses its qualities.
7.
Zmontowane rury ssące wraz z wyposażeniem możesz parkować na odkurzaczu umieszcza-
jąc zaczep do parkowania (H8) w gnieździe do parkowania (A9). Przystawkę szczelinową
możesz umieścić w drugim końcu zaczepu (H8).
Summary of Contents for MOD-22
Page 5: ...5 P L OPIS URZ DZENIA...
Page 8: ...8 P L MONTA ODKURZACZA PIOR CEGO Z FILTREM WODNYM...
Page 9: ...9 P L...
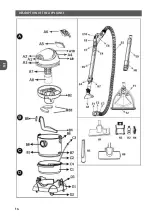
Page 16: ...16 E N DESCRIPTION OF THE APPLIANCE...
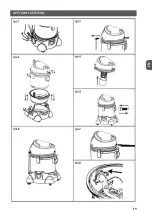
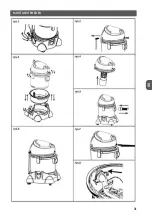
Page 19: ...19 E N APPLIANCE ASSEMBLY...
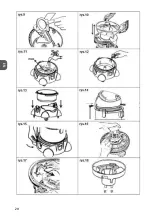
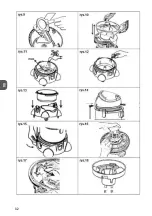
Page 20: ...20 E N...
Page 25: ...25 R U...
Page 26: ...26 R U 600C 8 8...
Page 27: ...27 R U...
Page 28: ...28 R U...
Page 31: ...31 R U...
Page 32: ...32 R U...
Page 35: ...35 R U 12 E6 E10 13 A1 14 A2 15 B1 C1 H4 B1 16 E5 E8 E3 17 F1 F2 F1 HEPA HEPA 2 1 2 3 B1 C1...
Page 39: ...39 D E GER TEBESCHREIBUNG...
Page 42: ...42 D E MONTAGE DES NASS STAUBSAUGERS MIT WASSERFILTER...
Page 43: ...43 D E...
Page 50: ...50 E S DESCRIPCI N DEL EQUIPO...
Page 53: ...53 E S MONTAJE DE LA ASPIRADORA LAVA ALFOMBRAS CON FILTRO DE AGUA...
Page 54: ...54 E S...
Page 59: ......


