background image

EN

EN

10

11

WARNING SYMBOLS

GENERAL SAFETY INSTRUCTIONS

GENERAL INSTRUCTIONS

No-one, and in particular no child, must be in the vicinity of the workplace. Check that 

the electrical specifications of this miroir are compatible with your installation.

!


WARNING:


When using electrical appliances, comply with basic safety 

precautions in order to reduce the risk of fire, electric shocks and personal injury. 

If the external flexible cord of this luminaire is damaged, it must be replaced by the 

manufacturer, or his after sale service, or any person of equivalent qualification 

only to avoid any risk. The external flexible cord must only be replaced by a cord 

having the same characteristic : H05VV-F 2 x 1 mm²

Read this user manual carefully before using the appliance, and keep it for future 

reference and pass it on to a third party if necessary.

!


WARNING:

-  The  power  supply  must  be  switched  off  before  installation,  maintenance  or 

cleaning. Remove the fuse or de-activate it, and make sure that it cannot be re-

activated.

- Before drilling a hole, make sure that there is no risk of drilling through an existing 

non-visible cable or pipe.

The miroir must be installed by a qualified electrician in accordance with the 

wiring standards in force in the country where the installation takes place.

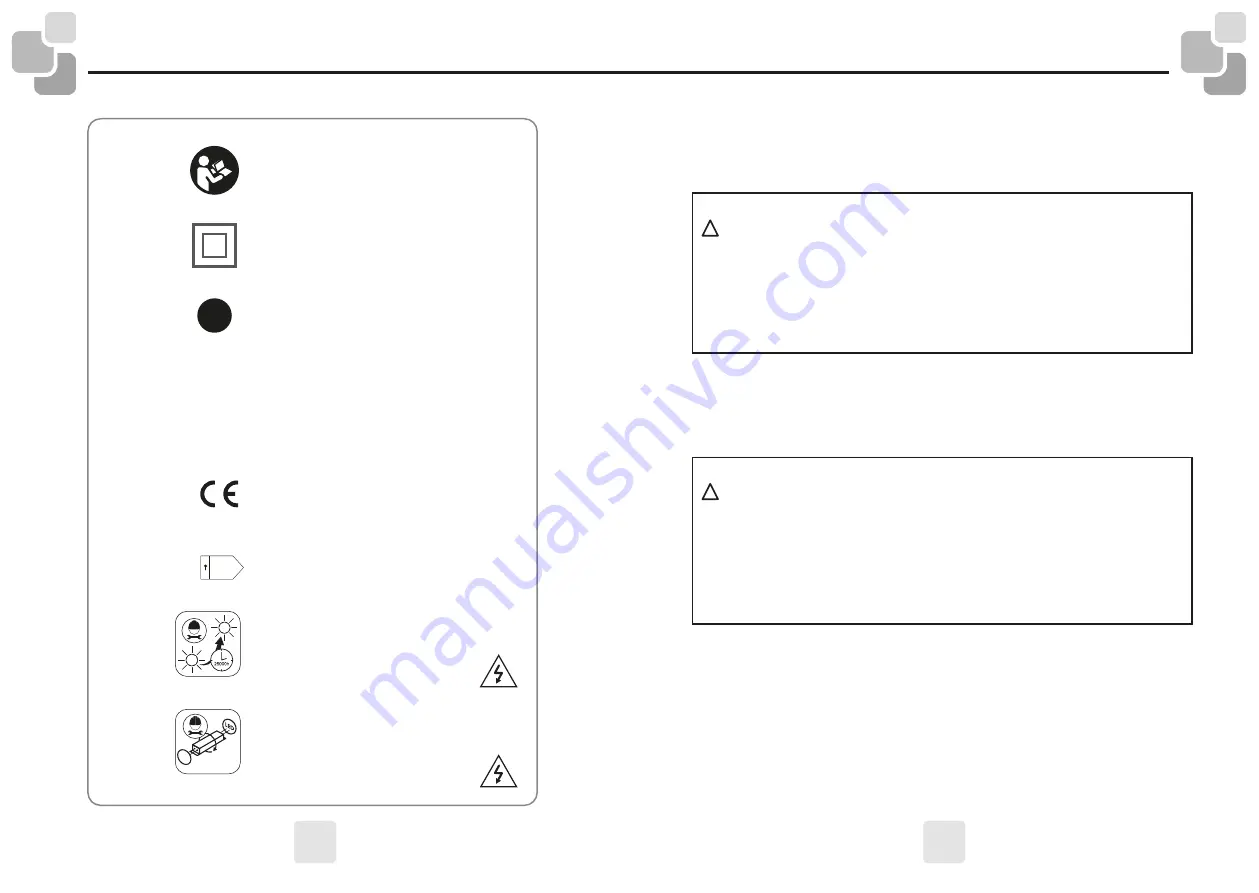
IP44

Read the instructions

carefully.

Class II. Double insulation.

This miroir cannot be

earthed.

LED 220-240 V

CRI 80 3000°K - 4500°K - 6500°K

Protection rating:

Protected against solid objects

greater than 1 mm.

Protected against splashing

water from all directions.

Compliance with European

Regulatory Requirements.

This product contains a light 

source of energy efficiency 

class "F"

The light source contained in this luminaire 
may only be replaced by the manufacturer 
or his service agent or a person of equiva-

lent qualification.

 Danger, risk of electric 

shock.

The driver contained in this luminaire 
should only be replaced by the manu-
facturer or his service agent or a person 

of equivalent qualification.

 Danger of 

electric shock.

230

V

NEW

F

A

G

LED

LED

Summary of Contents for SWANN 0

Page 1: ...u PL Характеристики монтажу RU Характеристикa кладання UK Specificaţii Montare RO Garantie 2 ans 2 year guarantee 2 años de garantía Garantia de 2 anos Garanzia 2 Anni 2 Jahre Garantie 2 jaar garantie Εγγύηση 2 ετών Gwarancja 2 letnia Гарантия 2 года Гарантія 2 років 2 ani de garantie MP GLASS SAS au capital de 1 000 000 26 rue Berjon 69009 Lyon RCS Lyon 519 598 817 000 20 N TVA FR 61 519 598 817 ...

Page 2: ... lm SWANN Ø120 Max 84W LED 29W 2755 lm SWANN Ø75 Max 38W LED 21W 1880 lm MIR LED 75 60 Max 35 5W LED 22 5W 2115 lm MIR LED 75 90 Max 55W LED 27W 2679 lm MIR LED 75 120 Max 63W LED 30W 3243 lm MIR LED 75 75 Max 43W LED 25 5W 2295 lm MIR LED 75 100 Max 58W LED 28W 2867 lm ...

Page 3: ...he p 22 DE Spezifikationen p 26 NL Kenmerken p 30 EL Χαρακτηριστικά p 34 PL Charakterystyki p 38 RU Характеристики p 42 UK Характеристикa p 46 RO Specificaţii p 50 P 55 66 FR Montage NL Montage EN Assembly EL Συνέλευση ES Montaje PL Montażu PT Montagem RU монтаж IT Montaggio UK кладання DE Montage RO Montare SWANN ...

Page 4: ...u le cordon extérieur souple de ce luminaire est endommagé il doit être remplacé exclusivement par le fabricant ou son agent de maintenance ou toute personne de qualification équivalente cela afin d évi ter tout risque Le câble ou le cordon extérieur souple ne doit être remplacé que par un câble ou un cordon souple ayant les mêmes caractéristiques H05VV F 2 x 1 mm Ce miroir doit être installé uniq...

Page 5: ...onner Réenclenchez le réseau électrique et allumez le miroir ATTENTION Ce produit porte un symbole relatif à la mise au rebut des déchets de produits électriques et électroniques Cela signifie que ce produit ne doit pas être jeté avec les ordures ménagères mais doit être remis à un système de récupération conforme à la directive européenne 2012 19 UE Il signifie que ce produit doit être recyclé ou...

Page 6: ...nce or cleaning Remove the fuse or de activate it and make sure that it cannot be re activated Before drilling a hole make sure that there is no risk of drilling through an existing non visible cable or pipe The miroir must be installed by a qualified electrician in accordance with the wiring standards in force in the country where the installation takes place IP44 Read the instructions carefully ...

Page 7: ...ed this product Information for the external connection box Connect the electricity supply to the terminal block respecting the following connection colour code Connect the Brown Wire Live to the corresponding terminal marked L on the terminal block Connect the blue wire Neutral to the corresponding terminal marked N on the terminal block Attach the mirror to the wall Turn the electricity supply b...

Page 8: ...esgo El cable flexible externo debe ser sustituido únicamente por un cable con las mismas características H05VV F 2 x 1 mm Leer atentamente estas instrucciones antes de usar el aparato y conservarlas para consulta ulterior y comunicarlas a un tercero si se necesita ADVERTENCIA Antes de proceder al montaje o a operaciones de mantenimiento o de limpieza se debe cortar la alimentación eléctrica Retir...

Page 9: ...el luminario El luminario ahora puede funcionar ESPECIFICACIONES TÉCNICAS PROTECCIÓN DEL MEDIO AMBIENTE CUIDADO Este producto lleva un símbolo que alude a la retirada de equipos eléctricos y electrónicos al final de su vida útil Significa que el producto no se debe desechar con la basura doméstica sino entregarse en un punto limpio de conformidad con la directiva europea 2012 19 UE El producto se ...

Page 10: ...desenganche o e certifique se que ele não pode voltar a enganchar se Antes de perfurar um buraco assegure se de que não há risco de perfuração de cablagem ou de tubo não visíveis INSTRUÇÕES GERAIS A luminária deve ser instalada por um eletricista qualificado de acordo com as normas de instalação elétrica em vigor no país de instalação IP44 Leia atentamente as instruções Duplo isolamento Duplo V2 i...

Page 11: ...stituição de origem Todo e qualquer incumprimento destas instruções pode ser particularmente perigoso para os utilizadores Se for caso disso contacte o serviço pós venda da loja onde adquiriu o produto As informações respeitantes à caixa de terminais externa Ligue a corrente de rede elétrica ao bloco de terminais respeitando o seguinte código de cores de conexão Conectar o fio Castanho Fase ao ter...

Page 12: ...one o alla pulizia Ritirare il fusi bile o staccare il salvavita assicurarsi che non venga riattaccato Prima di procedere al foraggio verificare l assenza di cablaggio o tubi preesistenti e non visibili per evitare danni ISTRUZIONI GENERALI La lampada deve essere installata da un elettricista qualificato secondo le norme sul cablaggio in vigore nel paese d installazione IP44 Leggere attentamente l...

Page 13: ...e rivelarsi particolarmente pericoloso per l utente In questo caso contattare il servizio d assistenza clienti del negozio in cui avete e ettuato l acquisto di questo prodotto Le informazioni che riguardano l armadietto di raccordo esterno Collegare la rete elettrica alla scatola dei raccordi rispettando il seguente codice colore Collegare il lo Marrone Fase al raccordo corrispondente e segnato da...

Page 14: ...lexible Leitung darf nur durch eine Leitung mit den gleichen Eigenschaften ersetzt werden H05VV F 2 x 1 mm Lesen Sie diese Anweisungen sorgfältig durch bevor Sie das Gerät verwenden und bewahren Sie sie auf weitere Beratung und Kommunikation an Dritte bei Bedarf WARNUNG Vor der Montage oder bei Wartungs oder Reinigungsarbeiten muss die Stromversorgung unterbrochen werden Entfernen Sie die Sicherun...

Page 15: ...z ein und schalten Sie die Leuchte ein Ihre Leuchte ist jetzt betriebsbereit TECHNISCHE DATEN SCHUTZ DER UMWELT ACHTUNG Dieses Produkt trägt ein Symbol für die Entsorgung von Elektro und Elektronik Altgeräten Dies bedeutet dass dieses Produkt nicht mit dem Hausmüll entsorgt werden darf sondern zu einem Rückgewinnungssystem zurückgegeben werden muss das der europäischen Richtlinie 2012 19 EU entspr...

Page 16: ...gen door een snoer met dezelfde karakteristiek H05VV F 2 x 1 mm Lees deze instructies zorgvuldig door voordat u het apparaat gebruikt en bewaar ze Verder overleg en communicatie met een derde partij indien nodig WAARSCHUWING Voordat u doorgaat met de montage of voor onderhouds of reinigingswerkzaamheden moet de voeding worden afgesneden Verwijder de zekering of koppel deze los en controleer of dez...

Page 17: ... nu klaar voor gebruik TECHNISCHE SPECIFICATIES BESCHERMING VAN HET MILIEU ATTENTIE Dit product heeft een symbool voor de verwijdering van afgedankte elektrische en elektronische producten Dit betekent dat dit product niet met huishoudelijk afval mag worden weggegooid maar moet worden teruggestuurd naar een terugwinningssysteem dat voldoet aan de Europese richtlijn 2012 19 EU Dit betekent dat dit ...

Page 18: ...ν τοποθέτηση τη συντήρηση ή τον καθαρισμό Αφαιρέστε την ασφάλεια ή απενεργοποιήστε την και βεβαιωθείτε ότι δεν μπορεί να ενεργοποιηθεί πάλι Προτού ανοίξετε τρύπα βεβαιωθείτε ότι δεν πρόκειται να τρυπήσετε κάποιο μη ορατό καλώδιο ή σωλήνα Γενικές Οδηγίες Το φωτιστικό πρέπει να τοποθετηθεί από εξειδικευμένο ηλεκτρολόγο σύμφωνα με τα πρότυπα καλωδίωσης που ισχύουν στη χώρα εγκατάστασης IP44 ιαβάστε π...

Page 19: ...ωση με την ανωτέρω οδηγία μπορεί να αποβεί ιδιαίτερα επικίνδυνη για τους χρήστες Εάν είναι απαραίτητο μετά την αγορά επικοινωνήστε με το κατάστημα όπου αγοράσατε το προϊόν Πληροφορίες σχετικά με το κουτί εξωτερικής σύνδεσης Συνδέστε το ηλεκτρικό δίκτυο στο μπλοκ ακροδεκτών σύμφωνα με τον παρακάτω χρωματικό κώδικα απολήξεων Συνδέστε το Καφέ καλώδιο Φάση στον ακροδέκτη με την ένδειξη L στο μπλοκ Συν...

Page 20: ...łącznie przewodem o takich samych parametrach H05VV F 2 x 1 mm Przeczytać poniższą instrukcję przed rozpoczęciem korzystania z urządzenia i zachować ją do wykorzystania w przyszłości a w razie potrzeby przekazać ją osobie trzeciej OSTRZEŻENIE Przed przystąpieniem do wykonywania jakichkolwiek prac dotyczących montażu konserwacji lub czyszczenia należy odłączyć zasilanie elektryczne Wyjąć bezpieczni...

Page 21: ...ryginalnych części zamiennych Niezastosowanie się do tego zalecenia może być szczególnie niebezpieczne dla użytkowników W razie potrzeby skontaktować się z obsługą klienta sklepu w którym zakupiono dany produkt Informacje dotyczące zewnętrznej skrzynki połączeniowej Podłączyć zasilanie do zacisków według następującego kodu kolorów połączeń Podłączyć Brązowy przewód Faza do odpowiedniego gniazda z ...

Page 22: ... предохранитель или выключите механизмы и убедитесь что он не может включится обратно Прежде чем сверлить отверстие убедитесь что вы не рискуете просверлить электропроводку или неприметную существующую трубу Общие указания Прибор должен быть установлен квалифицированным электриком в соответствии со стандартами проводки действующего в стране установки IP44 Пожалуйста внимательно прочитайте инструкц...

Page 23: ...дините Коричневый провод Фаза к соответствующим выводам отмеченной буквой L на клеммной коробке Подключить Синий провод Нейтральный к соответствующим выводам отмеченной буквой N на клеммной коробке Закрепите зеркало на стене Восстановить контакты с электрической сетью и включите светильник Ваш светильник готов к работе ТЕХНИЧЕСКИЕ ХАРАКТЕРИСТИКИ Номинальное напряжение 220 240V Номинальная частота ...

Page 24: ... запобіжник та переконайтеся в тому що він не може випадково увімкнутися Перед тим як свердлити дірку переконайтеся в тому що немає ризику зачепити прихований провід або трубу ЗАГАЛЬНІ ВКАЗІВКИ Освітлювальний пристрій повинен встановлюватися кваліфікованим електриком згідно з чинними в країні нормами електропроводки IP44 Будь ласка уважно прочитайте інструкцію Клас захисту II Подвійна ізоляція Цей...

Page 25: ...льорів Під єднайте коричневий провід Фаза до відповідного виходу позначеного на перехіднику літерою L Під єднайте синій провід Нейтраль до відповідного виходу позначеного на перехіднику літерою N Зафіксувати дзеркало на стіні Під єднайте до електромережі та ввімкніть світильник Він тепер готовий до використання Номінальна напруга 220 240V Номінальна частота 50 60Hz Номінальна потужність SWANN Ø60 ...

Page 26: ...ă înainte de montaj întreţinere sau curăţare Scoateţi siguranţa sau dezactivaţi o şi asiguraţi vă că nu se poate reactiva Înainte de a face o gaură verificaţi dacă nu riscaţi să găuriţi vreun cablu sau tub existent ascuns INSTRUCŢIUNI GENERALE Corpul de iluminat trebuie instalat de un electrician calificat conform normelor de cablare în vigoare din ţara respectivă IP44 Citiţi instrucţiunile cu ate...

Page 27: ...t de periculoasă pentru utilizatori Dacă este cazul luaţi legătura cu departamentul post vânzare al magazinului de unde aţi achiziţionat produsul Informaţii privind cutia de conexiuni externă Conectaţi reţeaua electrică la terminal respectând următorul cod de culori de conexiune Conectaţi cablul maro Faza la borna marcată cu L de pe terminal Conectaţi cablul albastru Neutru la borna corespunzătoar...

Page 28: ...54 55 SWANN P 55 66 FR Montage NL Montage EN Assembly EL Συνέλευση ES Montaje PL Montażu PT Montagem RU монтаж IT Montaggio UK кладання DE Montage RO Montare ...

Page 29: ...56 57 SWANN Ø60 Max 27W LED 17W 1615 lm SWANN Ø90 Max 50 5W LED 25 5W 2423 lm SWANN Ø75 Max 38W LED 21W 1880 lm SWANN Ø120 Max 84W LED 29W 2755 lm mm mm ...

Page 30: ...58 59 SWANN 60 Max 35 5W LED 22 5W 2115 lm SWANN 90 Max 55W LED 27W 2679 lm SWANN 75 Max 43W LED 25 5W 2295 lm SWANN 100 Max 58W LED 28W 2867 lm mm mm x Y x Y x Y x Y ...

Page 31: ...gnen sich für Massivbauwände Für alle ande ren Wandtypen verwenden Sie bitte geeignete Schrauben und Dübel NL De meegeleverde schroeven en pluggen zijn geschikt voor massieve beugels Gebruik voor elk ander type beugel geschikte schroeven en pluggen EL Οι παρεχόμενες βίδες και τα βύσματα είναι τα κατάλληλα για σταθερή στήριξη Για οποιονδήποτε άλλο τύπο στήριξης χρησιμοποιήστε τις αντιστοίχως κατάλλ...

Page 32: ...62 63 3 8 mm 2 4 x2 1 X cm Y cm X cm 62 63 ...

Page 33: ...64 65 5 2 1 220 240V x2 64 4500 K 6500 K 6500 K 4500 K 3000 K ON OFF 6500 K 4500 K 3000 K 6 6 1 7 ON OFF ON OFF ON OFF 9 8 10 65 ...

Page 34: ...11 66 OFF ON OFF ...

Reviews: