background image

3-22


Industio CP-132 Series User’s Manual

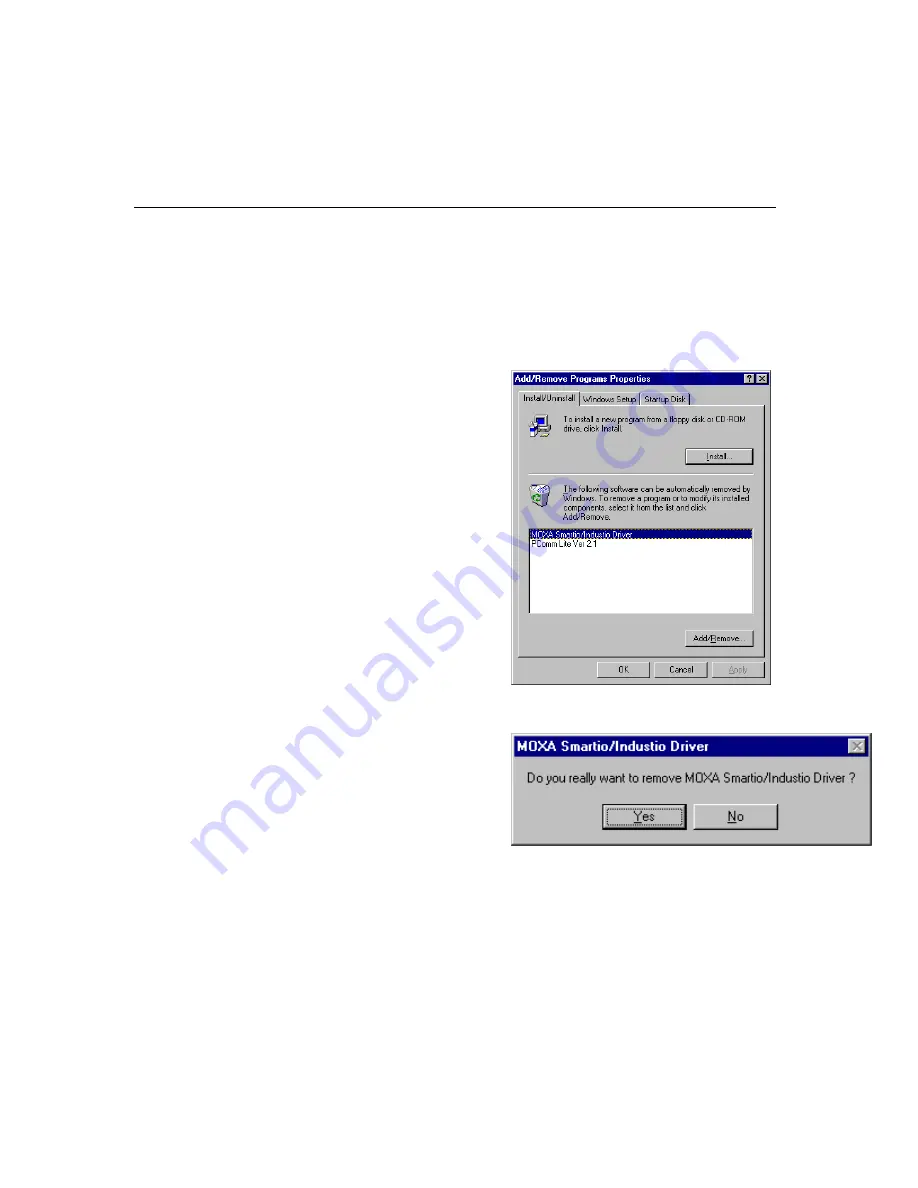
Removing Driver

This section explains how to remove the Industio CP-132 Series board driver.
1.


Open [Control Panel] icon, double click [Add/Remove Programs] icon, and then

select [Install/Uninstall] tab.

2.


Click on MOXA Smartio/Industio Driver option and then click [Add/Remove]

button to start the driver removal.

3.


Click [Yes] button in the following shown message box to confirm the driver

removal.

4.


Click [OK] button in Add/Remove Programs Properties dialog box.

Summary of Contents for CP-132

Page 1: ...Industrial 2 Port RS 422 RS 485 Serial Board for PCI Bus Dec 1999 1st Edition The content of this manual is also available at Moxa Web Site Moxa Technologies Co Ltd Tel 866 2 8665 6373 Fax 886 2 8665...

Page 2: ...otice and does not represent a commitment on the part of Moxa Moxa provides this document as is without warranty of any kind either expressed or implied including but not limited to the particular pur...

Page 3: ...ilt for technical support product inquiry new driver update user s manual update etc The followings are the services we provide E mail for technical support address support moxa com tw FTP site for fr...

Page 4: ...Industio CP 132 Series boards list of items and overall installation guide Chapter 2 Hardware Installation Hardware installation for the Industio CP 132 Series boards and connection cable Chapter 3 So...

Page 5: ...talling Driver 3 2 Configuring Board and Port 3 7 Updating Driver 3 9 Removing Driver 3 9 Windows 95 98 3 10 Installing Driver 3 10 Configuring Board and Port 3 18 Updating Driver 3 20 Removing Driver...

Page 6: ...4 9 Connection Cable and Cable Wiring 5 1 RS 422 Cable Wiring 5 1 RS 485 Cable Wiring 5 3 Impedance Matching and Termination Resistors 5 4 Troubleshooting 6 1 General Troubleshooting 6 1 Windows NT 6...

Page 7: ...trial environment Connections with point to point full duplex or multidrop half duplex are available to meet user s needs Each port can control up to 32 devices in a multidrop environment Automatic Da...

Page 8: ...in some models to protect the board An optical isolation option 2000V and surge protection option ESD max 25KV EFT max 2KV is available in this series This is critical to harsh environment such as fa...

Page 9: ...own applications using Microsoft C Turbo C Assembly QuickBASIC Turbo Pascal Clipper Visual Basic Visual C Borland Delphi etc Utilities such as Data Scope Monitor Terminal Emulator Diagnostics etc are...

Page 10: ...KV EFT max 2KV CP 132S CP 132IS Provide optical isolation for all signal lines max 2KV DC CP 132I CP 132IS Powerful Serial Comm tools PComm and API 232 Support drivers for most major industrial platfo...

Page 11: ...Industio CP 132 Series board See chapter 2 Install the software from the diskette See respective O S Section Configure the driver for the board and ports in chapter 3 Connect the devices with the cabl...

Page 12: ...1 6 Industio CP 132 Series User s Manual...

Page 13: ...his chapter The next chapter deals with the software installation for various operating systems The no switch no jumper Industio CP 132 Series board hardware configuration for IRQ number and I O addre...

Page 14: ...pter Software Installation Otherwise follow the instructions below First Thing to Do Interface Settings Before installing the board into the slot you should set all the jumpers and switches to what yo...

Page 15: ...Fasten the holding screw to fix the control board in place Step 6 Replace the system cover Step 7 Power on the PC and the BIOS will automatically set the IRQ and I O address Note Each board must occup...

Page 16: ...2 4 Industio CP 132 Series User s Manual...

Page 17: ...efer to the next chapter Serial Programming Tools for programming issues Windows NT Windows NT supports up to 256 serial ports from COM1 to COM256 To fully integrate the advanced features of Windows N...

Page 18: ...T 4 0 Make sure the board s has have already been plugged in the system PCI slot s 1 Please log in NT as Administrator 2 Open the Control Panel click on the Network icon and select the Adapters tab 3...

Page 19: ...y multiport board in the Select OEM Option dialog box and then click OK to enter the MOXA Smartio Industio Configuration Panel dialog box to start the installation 6 Click Add button to open Property...

Page 20: ...ged Industio CP 132 Series board from the Board Type pull down list 8 In the Property dialog box select the desired port in the port list and click Port Setting to enter the individual Port setting di...

Page 21: ...rt is mapped to COM4 sequentially If Auto Enumerating COM Number is not checked specify the COM number for individual port For instance the second port can be out of sequence say COM10 while the first...

Page 22: ...tem restarts 12 Once the system restarts you may check the event log issued by the MOXA driver to see if the ports of the board are initialized successfully Enter the Administrative group click on the...

Page 23: ...ny ready made applications such as PComm utility Terminal emulator See Serial Programming Tools chapter or HyperTerminal to transmit receive data as well as Remote Access Service to provide dial up ne...

Page 24: ...r and Tx FIFO Size Please see steps 8 to 9 in the previous section Installing Driver for more details Click Add to add one more board that is not yet configured in the system Please see steps 6 to 9 i...

Page 25: ...reinstall it as detailed in section Installing Driver Removing Driver To remove the driver for the Industio CP 132 Series board 1 Open the Control Panel click on the Network icon and select the Adapte...

Page 26: ...or delete boards please refer to the section Configuring Board and Port To upgrade or remove driver please go to the sections Updating Driver and Removing Driver Installing Driver You can easily plug...

Page 27: ...t Windows 95 98 to detect the board Driver installed before Yes No Install the driver with the diskette See Section First Time Driver Installation Stage Configure the port See Section Port Configurati...

Page 28: ...for Windows 95 or the right column for Windows 98 respectively If one MOXA CP 132 Series board had been previously installed and another MOXA CP 132 Series board was plugged the system will prompt you...

Page 29: ...and click OK button in Select Other Location dialog box The system will start reading the files from the diskette 4 Click Finish button 3 Select Other Devices and click Next button 4 Click Have Disk...

Page 30: ...3 14 Industio CP 132 Series User s Manual 6 Click Next button 7 Click Next button...

Page 31: ...rt configuration directly discussed in this section 1 Click on a specific port 2 Click Port Setting button to open Port X dialog box 3 Select a COM number for the specific port from Port Number pull d...

Page 32: ...from Tx FIFO Size pull down list Tx FIFO sizes from 1 to 16 bytes are available and the default value is 16 bytes 8 Check Set the change to all ports check box then the if desire to apply Tx FIFO Siz...

Page 33: ...ows 95 98 will automatically detect the newly plugged board and skip to Port Configuration stage to do port setting Up to now the driver installation of the Industio CP 132 Series is complete and succ...

Page 34: ...dures listed below For this is a PCI board once the board is added or unplugged the configuration will be automatically added or removed by the system Thus it saves your effort to do add or remove act...

Page 35: ...1 then COM 4 will be automatically assigned to Port 2 Note Step 6 and 7 are optional if the system doesn t require a special performance tuning 6 Re assign the Rx FIFO Trigger by selecting a number f...

Page 36: ...ies Properties dialog box 10 Click OK button in Device Manager tab 11 Restart the system to activate the latest configuration Updating Driver This section will discuss how to update the Windows 95 98...

Page 37: ...pdate Driver button 5 Click Have Disk button and type the path of the new driver 6 Insert the source diskette in the floppy drive if there is any 7 Click OK button in Install from Disk dialog box 8 Th...

Page 38: ...rol Panel icon double click Add Remove Programs icon and then select Install Uninstall tab 2 Click on MOXA Smartio Industio Driver option and then click Add Remove button to start the driver removal 3...

Page 39: ...to install the package how to setup up the driver and how to load or unload driver For details of the serial programming API 232 Library and utilities please refer to the next chapter Serial Programm...

Page 40: ...Series driver Note that it is not intended to illustrate all the convenient functions of the setup programs when configuring the boards 1 Run the setup program BIN SETUP EXE in the API 232 directory...

Page 41: ...o CP 132 Series User s Manual 3 25 Note Up to now you have completed the setup for Industio CP 132 Series board You may skip this step and go directly to the next step 5 if you need not change any set...

Page 42: ...s referred to as port number in terms of serial programming You may map the port number range to the one you prefer between 0 and 255 as long as no port number overlapping condition or port number und...

Page 43: ...Installation Industio CP 132 Series User s Manual 3 27 4 To setup more boards please follow the same instructions 2 to 3 described above 5 Press F10 to save the latest configuration and exit the SETUP...

Page 44: ...ly At this point you are ready to execute application that supports API 232 functions or start developing applications using API 232 library If something went wrong for instance the board does not mat...

Page 45: ...consists of powerful serial communication library for easy programming in most popular languages useful utilities such as diagnostic monitor and terminal emulator illustrative example programs and com...

Page 46: ...tes the implementation of multi process and multi thread serial communication programs and hence greatly reduces developing time For a complete library function description and sample programs for Vis...

Page 47: ...3 Diagnostic for MOXA boards only A convenient diagnostic program that provides internal and external testing such as IRQ TxD RxD UART CTS RTS DTR DSR DTR DCD testing etc for the MOXA boards and ports...

Page 48: ...that allows you to watch the selected MOXA COM ports data transmitting receiving throughput and communication line status which are updated and displayed on the screen at time intervals You can also...

Page 49: ...Manual 4 5 Terminal Emulator The Terminal Emulator features multi windows and supports terminal types of VT100 and ANSI You can transfer data interactively send pattern periodically or transfer file...

Page 50: ...lipper etc Sample programs for each supported language are included and placed in the sub directory EXAMPLE language of the API 232 directory In addition for DOS C language only there are also Modem C...

Page 51: ...fers transparent monitoring of serial communication lines and allows data to be streamed to disk storage for later analysis 2 The TTY terminal emulation utility allows user to view the signal status a...

Page 52: ...stio CP 132 Series User s Manual Diagnose The Diagnose BIN DIAGNOSE EXE is a utility that can help users to diagnose the hardware condition of each port of the selected board See on line help for more...

Page 53: ...Control Mode Under this mode no extra code is required to control the data transferring data transmitting and receiving which is automatically managed with the intelligent hardware mechanism That is R...

Page 54: ...locks until last character transmitted sio_RTS port 0 Turn off RTS signal The RS 485 port is ready for receiving data sio_read port buff 10 Read 10 bytes Solution 2 There is a dedicated RS 485 functio...

Page 55: ...rinters and terminals The term DCE is for Data Communication Equipment like modems RS 422 Cable Wiring The RS 422 standard uses a balanced voltage digital interface to allow communications of 10M bps...

Page 56: ...RxD B 2 TxD B RxD B 1 TxD A RxD A 3 RxD B TxD B 3 RxD B TxD B 1 TxD A RxD A 4 RxD A TxD A 4 RxD A TxD A 5 GND GND 5 GND GND RS 422 Device N RxD B TxD B RxD A TxD A GND CP 132 with Handshaking CP 132 R...

Page 57: ...drop system The CP 132 Series supports only 2 wire half duplex RS 485 communication Data pins are served for both data transmitting and receiving depending on the RTS signal RS 485 pin outs for CP 132...

Page 58: ...establish the same impedance at the line ends as in the line itself by terminating them with resistors Industio CP 132 already installs the resistors on board for your convenience indicated as follow...

Page 59: ...cannot be detected by the MOXA driver while installing the driver Hardware causes and solutions a The board is not installed or missing absent Please install it b The board is not properly plugged in...

Page 60: ...ostic LED indicators on the mini tester g The board controlling application might not be correctly written according to the corresponding API of the operating system To verify the problem please run a...

Page 61: ...ns Windows 95 98 This section is specific for troubleshooting under Windows 95 98 For general problems and solutions please see the previous section General Troubleshooting 1 The system fails to find...

Page 62: ...6 4 Industio CP 132 Series User s Manual...

Page 63: ...e Speed bps 50 921 6K Data bits 5 6 7 8 Stop bits 1 1 5 2 Parity none even odd space mark Data signals RS 422 TxD RxD RTS CTS GND RS 485 Data GND Connectors 2 DB9 male Optical isolation max 2000V CP 1...

Page 64: ...slot dependent This may also apply to PCI slots in PC with different motherboard which may use different device number sets For example some use 17 18 19 and 20 for identifying the respective PCI slot...

Page 65: ...ws 95 Windows 98 Windows NT 3 51 Windows NT 4 0 DOS Others 5 PC Host Make _________ Model _________ 6 CPU Speed _____MHz Make ______ Model ______ 7 BIOS Make __________________ Version _______ 8 PCI I...

Page 66: ...oduct repair time Obtain a Return Merchandise Authorization RMA number from the sales representative or dealer Carefully pack the product in an anti static package and send it pre paid to the dealer T...

Reviews: