background image

9/19

NT 1003-E00 09.12 AK O - AK I  e

4. OPENING THE PUMP TO INSPECT 

THE CYLINDER/PISTON AND BUSHINGS (continued)

Bypass fastening 

For the SEALS refer to

the specified drawing

Serial Nbr 

4.1 Necessary tools

• 7 - 13 - 17 - 30 open-end spanner
• 10 - 13 - 19 socket spanner
• adjustable spanner
• 1 plastic mallet
• 1 flat screwdriver
• 1 tube for assembling the bearings

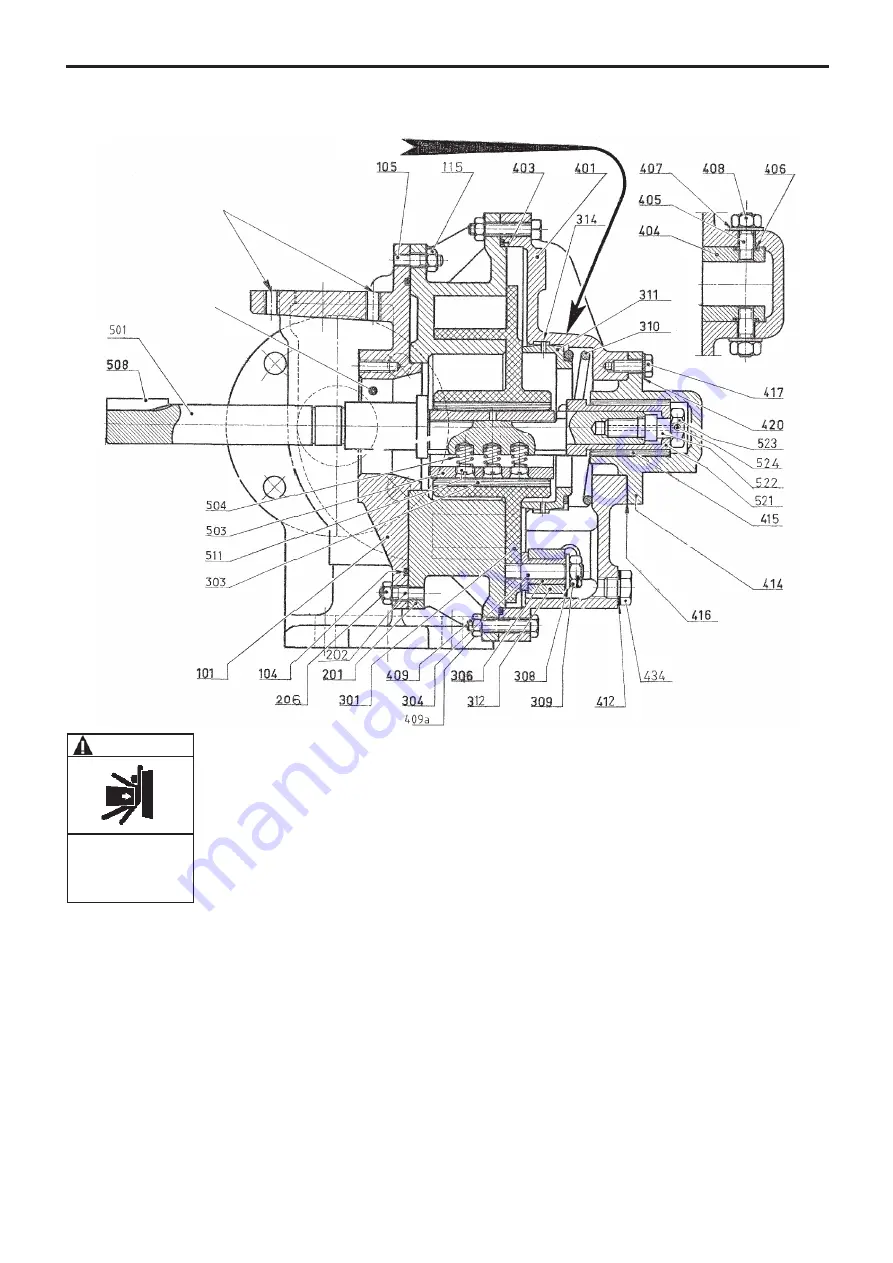
4.2 Removing the front cover

Unscrew the bolts 

409

and nuts 

409a

securing the front cover.

Remove the front cover 

401

by progressively separating

it from the pump body. Remove the seal 

403

and check its

condition. Be prepared to replace it if necessary. Check
the condition of the bushing 

415

. Replace it if the wear

limits have been reached (see Instructions 1003-P00).

4.3 Removing the piston and cylinder

Remove the sleeve 

521

by using the nut 

523

to release it.

Extract the piston 

301

from the cylinder 

201

(you may

have to use a lever to separate the piston from the cylin-
der. Be very cautious not damaging the piston or the cylin-
der). Examine the condition of the piston 

301

and replace

it if the wear limits have been reached (see § MAINTE-
NANCE). Examine the condition of the piston bushing 

303

and replace it if the wear limits have been reached (see
Instructions 1003-P00).

To dismantle the cylinder, remove the nuts 

115

. Separate

the cylinder from the main body 

101

and remove the seal

104

to check its condition. Replace it if necessary.

Examine the condition of the cylinder and replace it if its
wear limits have been reached (see § MAINTENANCE).

The pumping characteristics demand a cylinder/piston
with matching dimensions. Consequently, changing the
cylinder or piston requires the replacement of both the
cylinder and the piston.

4.4 Assembly of the cylinder, piston and

front cover

Assembly is done in the reverse order to the dismantling.

BE CAREFUL WITH THE WEIGHT OF
THE PARTS WHEN THEY ARE BEING
REMOVED.

WARNING

The weight ot the parts can

be dangerous and may

provoke bodily injuries or

material damages.

Summary of Contents for AK I

Page 1: ...NANCE INSTRUCTIONS 1003 E00 e Section 1003 Effective September 2012 Replaces September 2011 Original instructions Your distributor Z I La Plaine des Isles F 89000 AUXERRE FRANCE Tel 33 0 3 86 49 86 30 Fax 33 0 3 86 49 87 17 contact mouvex com www mouvex com ...

Page 2: ...4 2 3 Piping assembly 4 2 4 Direction of rotation 4 2 5 Single bypass 5 2 6 Double bypass 5 2 7 Cleaning 5 2 8 Anchoring the pump units 5 2 9 Alignment of motor pump and reduction gearbox pump shafts 5 2 10 Electric motors 6 2 11 Diesel engine drive 6 3 USE 7 3 1 Storage 7 3 2 Pumping hot products 7 3 3 Pump with heating jacket 7 3 4 Pump filled with product at shutdown 7 3 5 Starting up the pump ...

Page 3: ... 520 rpm product viscosity of 1 cSt The sound level reached for the AK pump in good conditions ignoring the motor and gearbox noise is less than 80 dB A Lifting points E Bypass valve I Space required for removing front cover O Draining port for heating jacket 2 threaded holes G1 B S P P Pump plate S Mounting point for probe M6 threaded width max 8 mm U1 Inlet outlet depending of heating fluid 2 th...

Page 4: ...5 diameters is recommended between the pump flange and any pipe fitting elbow valve The stresses exerted by the piping on the pump can deform the pump parts increase wear misalign the bea rings and even cause parts to break The pipes must be designed to allow thermal expansion and contraction and be firmly secured the use of flexi ble hoses and expansion loops is recommended We recommend placing i...

Page 5: ...fastened by anchor lugs or bolts it must be carefully wedged to prevent any defor mation of the chassis when tightening the bolts Deformation of the chassis will cause stress prejudicial to the pump and the drive device and put the coupling out of true thereby causing vibrations noise and prema ture wear Care must be taken so that the chassis is clear of the ground apart from the base plates The c...

Page 6: ...onnections and check that the direction of rotation corresponds to installation s inlet and outlet direction Follow the instructions below if necessary to change the direction of rotation Three phase motor switch any two wires or two phases of the current supply Two phase motor switch the two wires of the same phase Single phase motor comply with the instructions of the manual supplied with the mo...

Page 7: ...ducts including particles that settle at shutdown it is necessary to ensure that the consistency of the deposited products will not affect the start up of the pump 3 5 Starting up the pump Before starting up the pump always ensure that the pumping conditions are correct with the corresponding valves open especially the inlet valve For products requiring heating they must be brought to their pumpin...

Page 8: ...HED PRIOR TO PERFORMING ANY SERVICE OPERATION WARNING Hazardous or toxic fluids can cause serious injury DISCONNECT THE ELECTRICITY SUPPLY BEFOREANYMAINTENANCEOPERATION WARNING Dangerous voltage Can cause injury and death DISCONNECTING THE FLUID OR PRES SURE CONTAINMENT COMPONENTS DURING PUMP OPERATION CAN CAUSE SERIOUS PERSONAL INJURY DEATH OR MAJOR PROPERTY DAMAGE WARNING Hazardous pressure can ...

Page 9: ...ever to separate the piston from the cylin der Be very cautious not damaging the piston or the cylin der Examine the condition of the piston 301 and replace it if the wear limits have been reached see MAINTE NANCE Examine the condition of the piston bushing 303 and replace it if the wear limits have been reached see Instructions 1003 P00 To dismantle the cylinder remove the nuts 115 Separate the c...

Page 10: ... of the condition of these contact surfaces and the seals 5 2 Dismantling Before opening the pump you must always drain it and release the pressure it may contain Make sure that the isolation valves if any are closed or drain the installation before pulling out the drain plug 434 and its seal 412 DISCONNECTING THE FLUID OR PRES SURE CONTAINMENT COMPONENTS DURING PUMP OPERATION CAN CAUSE SERIOUS PE...

Page 11: ... assembly of FEP O rings Check the condition of the shaft surface rub it down with emery paper No320 if scratched Align the 2 lugs of the rotating part 697 with the 2 grooves on the shaft 501 2 Clean the seal surface on the rotating part with a soft cloth if it is dirty Be careful not to scratch the surface of the seal To assemble the complete stationary part 610 of the mechanical seal 1 Clean the...

Page 12: ...posed of an assembly of two single bypasses in opposition This protects the pump in both directions of rotation Operation in each direction is the same as for a single bypass Adjustment of this bypass requires adjustment for both directions of opera tion refer to 2 10 for the electric motors protection 6 2 Orientation The double bypass is designed to protect the pump in both directions the single ...

Page 13: ...to the overpressure seen upon closing the discharge This is how the bypasses of our pump units are adjusted as a function of the infor mation provided by our Technical Services The pumps supplied bare shaft are delivered with a stan dard bypass setting which needs to be adjusted with the exact working conditions and installation as per the above described procedure PUMPS OPERATINGAGAINSTACLOSED VA...

Page 14: ...e discharge valve as it was befo re adjustment If consumption is high close the discharge piping and slacken the adjustment nut until the correct power consumption level is reached Then open the discharge valve as it was before adjustment PUMPS OPERATINGAGAINSTACLOSED VALVE CAN CAUSE SYSTEM FAILURE PERSONAL INJURY AND PROPERTY DAMAGE WARNING Hazardous pressure can cause personal injury or property...

Page 15: ... the screw from the hole which will the more frequently be on the suction side Loctite is a registered trademark Dimension and position of holes Ø A C 0 2 B 0 2 M5 5 8 65 5 The jacketed front cover 461 permits the circulation of steam or liquid The plug 462 permits the draining of the heating jacket CAUTION When draining the heating jacket make sure that the fluid in the jacket is not under pressu...

Page 16: ...g that the electric motor is suitably protected 2 1 2 The bypass valve is not closed either the plunger has not returned to its initial position or there is dirt on the valve seat 2 1 3 The pump is worn this will also affect the suction capacity of the pump cf 3 2 2 c 2 2 If the pressure complies with the equipment data pump speed and motor output it is possible that 2 2 1 The pressure required fo...

Page 17: ...e liquid vapour pressure is or has become too elevated due to a change of temperature cf 3 1 3 3 2 2 If the vacuum is low or non existent the reason could be a that the bypass valve is not closing properly due to dirt on the valve seat b air is entering the pump check the front cover seals flanges etc c the pump is worn and the internal tightness is out of specification the piston bushings are wor...

Page 18: ... stress on the pump the transmission is pulling on the shaft pulling on the flanges by the piping 8 3 a broken part or foreign body has entered the pump EXCESS POWER CONSUMPTION 9 The most spectacular event occurs when a diesel engine stalls or the power to an electric motor is shut off 9 1 If this incident occurs when closing the discharge line the cause may be a the bypass is assembled back to f...

Page 19: ...elektrische Risiken die für rotierende Maschinen gelten NF EN 809 2009 NF EN 1672 2 2009 NF EN ISO 13857 2008 NF EN 12162 2009 ATEX Richtlinie 94 9 EG 23 März 1994 wie umgesetzt im nationalen Recht in Bezug auf Ausrüstungen für den Einsatz in explosionsgefährdeter Atmosphäre Die Konformität hat Geltung durch Anwendung folgender Normen NF EN 1127 1 1997 NF EN 13463 1 2009 NF EN 13463 5 2009 Die ATE...

Reviews: