background image

BF-Series (BF060, BF080 & BF120 models) Operation Instructions

Corporate Headquarters: 

1080 North 11th Street, San Jose, CA 95112    Phone: (408) 292-2214   Fax: (408) 292-2733

www.mountztorque.com

Page 3

General Operation for BF-Series models

1. Attach power tool cable to the BF-Series screwdriver and the transformer. Make sure notch at the 

cable end aligns with the notch on the driver connector. Tighten knurled ground ring.

2. Plug in power cord to the back of the transformer and power outlet. Flip power switch to 

“ON” position located on the back of transformer. 

3. Select a bit. Slide the bit collar forward. Insert the bit and release the collar. To avoid damaging 

fasteners, make sure the proper bit is suitable for the head of the fastener.

4. The torque limit is determined by the tension of the coil spring housed in the tool. The tighter the coil 

spring is wound the higher the torque limit is raised. See Torque Charts on pages 14 & 15 to determine the 

appropriate torque adjustment setting.

5. Rotate the torque adjustment nut to set the torque limit. Turn clockwise to increase torque and counter 

clockwise to decrease torque. The scale adjacent to the Torque Adjustment Nut is a reference guide. The 

torque output from the driver can change depending on various fastening factors like friction, type of 

joint, and the type material being used like a washer. Verify torque setting with a torque testing system.

7. Turn driver on and check for proper rotation. FOR-clockwise, REV-counterclockwise.

8. To apply torque, squeeze the lever (Push-to-Start models - place light downward pressure on the nose 

of the driver). The driver will automatically stop when the preset torque has been reached. 

9. To remove the screw, turn the FOR/REV switch to REV position.

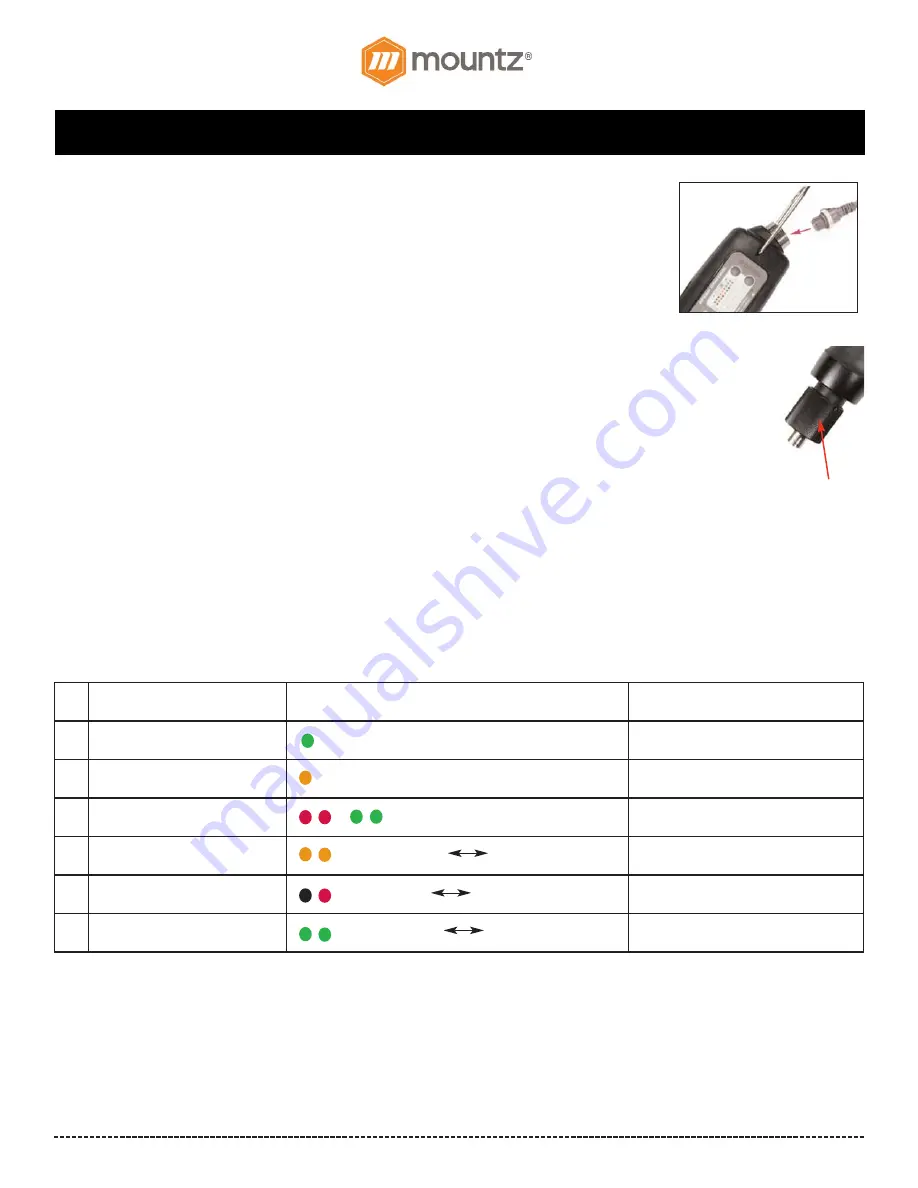
Information by Color LED for BF brushless screwdriver

The LED display signals the tool status for the operator. It’s located on the side of the tool. Below is the LED display indicator for ref-
erence.

torque 

adjustment nut

No.

Description

Display

Reset

1

START (Before torque up)

Green (left one) Synchronized with start

START OFF

2

START (After torque up)

Orange (left one) Synchronized with start

START OFF

3

Over voltage input (over 32V)

R/G change two colors in 0.5s

Automatically resets when it’s below 

DC32V.

4

Over load (over 1.5A/0.5s)

Orange color ON            OFF in 0.5s

Automatically resets after 5 seconds.

5

Over temperature (over 80ºC)

Red color ON            OFF in 0.5s

Automatically resets when it’s below 

80ºC.

6

Driver Lock (Remote)

Green color ON            OFF in 0.5s

By remote

Summary of Contents for BF-Series

Page 1: ...BF060 BF080 BF120 models Operation Instructions Corporate Headquarters 1080 North 11th Street San Jose CA 95112 Phone 408 292 2214 Fax 408 292 2733 www mountztorque com Page 1 Rev 2 2 4 13 17 for V3 M...

Page 2: ...lds manufacturing costs product quality product reliability reputation and profitability Four style of brushless screwdriver models Standard models Adjustable RPM setting on the tool A selectable Soft...

Page 3: ...orque Adjustment Nut is a reference guide The torque output from the driver can change depending on various fastening factors like friction type of joint and the type material being used like a washer...

Page 4: ...lide switch to R position to increase speed Slide switch to F to decrease speed Then press the Speed button until the target speed is selected The two LEDs will display colors that show the current sp...

Page 5: ...Soft Start mode which are 0 2 0 4 0 6 seconds The default setting is OFF 1 Press and hold the Soft Start button for 2 seconds 2 Two LEDs will display colors that show the current soft start selection...

Page 6: ...tics or spongy material which collapses under the clamping force created in a torque condition For Hard Joint applications there is no need to use the Double Hit mode The clutch of the electric driver...

Page 7: ...or a set time B then auto run for Forward fastening by set torque 1 Start forward rotation 2 Stop at the target torque or set time 3 Auto reverse rotation and stop at releasing the lever or set time 1...

Page 8: ...g BF Series Angle Control Auto Reverse models Angle Setting for the first RUN 1 Keep the first Run button pressed for over 2 seconds for angle setting Then press first Run button one by one for the de...

Page 9: ...sired stop holding time 2 Select the R position of F R switch for increasing set time or F position for decreasing set time 3 Keep the stop time button pressed over 2 sec for Lock operating mode Rotat...

Page 10: ...ock Then click stop time button one by one for the desired angle 2 Select the R position of F R switch for increasing set angle or F position for decreasing set angle 3 Keep the stop time button press...

Page 11: ...BF Series BF060 BF080 BF120 models Operation Instructions Corporate Headquarters 1080 North 11th Street San Jose CA 95112 Phone 408 292 2214 Fax 408 292 2733 www mountztorque com Page 11...

Page 12: ...with BF Series and NF Series STC40 transformer is power supply designed for operating the BF Series NF Series brushless electric screwdrivers Only use this transformer when operating any BF Series NF...

Page 13: ...ified The following items are required for Mountz to design a mouthpiece to fit your application Modification Requirements 1 Electric screwdriver model 2 Torque Setting 3 Drive Size 4 Bit style and le...

Page 14: ...o the charts to determine the reference number setting for your torque requirement How to Read the Torque Charts Torque ranges lbf in approximate tightening torque operated on 30V Figures below each c...

Page 15: ...Fax 408 292 2733 www mountztorque com Page 15 Torque Charts Continued BF120 BFT120 1 2 3 4 5 6 Torque Scale 1 2 3 4 5 6 7 8 lbf in 7 K Black Torque Range 2 10 4 lbf in 9 10 11 G Gold Torque Range 1 7...

Page 16: ...ng etc can become tangled in the rotating bit 4 Keep away from moisture Never use in high humid moist or damp environment Mountz Calibration Repair Services Mountz Inc features an experienced calibrat...

Reviews: