6
3. Attaching The Mount to Your Wall:
Once the four holes are pre-drilled, afx the
wall plate to the wall with all four lag bolts and
washers into the wall. The included plastic
anchors DO NOT need to be used for wood
stud installation.
Note on locating hardware to mount arms
to your display:
If your display does not
come with the mounting screws in the back of
the display, check the original desk stand as in
some cases the same screws to hold the desk
stand are used also to mount your display. If
neither of these options work, the hardware
p a c k i n c l u d e d w i t h y o u r m o u n t c o n t a i n s
several of the most common sized screws for
mounting your arm brackets to your display.
4. Installing Arm Brackets Onto The Back
o f Yo u r D i s p l a y :
O n c e y o u l o c a t e t h e
a p p r o p r i a t e s c r e w s , a t t a c h t h e t w o a r m
brackets to the back of the display. To attach
the arms use the proper bolt and lock washer
for each of the four mounting holes. In the
event your display has recessed holes or a
curved back, your hardware pack includes
plastic spacers to ll the gaps. These plastic
s p a c e r s a r e n o t n e c e s s a r y f o r m o s t
installations.
5. Attaching Your Display to The Wall Plate:
After
installing the wall plate and testing to ensure that it is
attached securely and attaching the arms to the back of
the display, it is time to attach your display to the wall. This
step may require two people, attach the hook to the top lip
of the wall plate. Once the hooks are securely set onto the
wall plate you can now let the bottom of the display rotate
back and it will simply hang on the mount.
6. Securing Your Display:
The all mount utilizes a set
screw attached to the bottom of each one of the arm
brackets. To secure the arm bracket to the TV plate, locate
the set screw on the bottom of the arm then tighten in a
clockwise motion until tight. This screw ensures that your
display will not lift off of the mount.
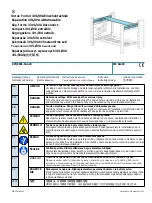
Part
A
Part
C
TV
Tilt Knob
Safety Screw
D
/
E
/
F
H
G
I/J/K/L/M/N/O/P