Page 5
A-Series Digital Game Cameras
Page 4
A-Series Digital Game Cameras
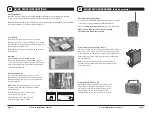
Setting Time and Date
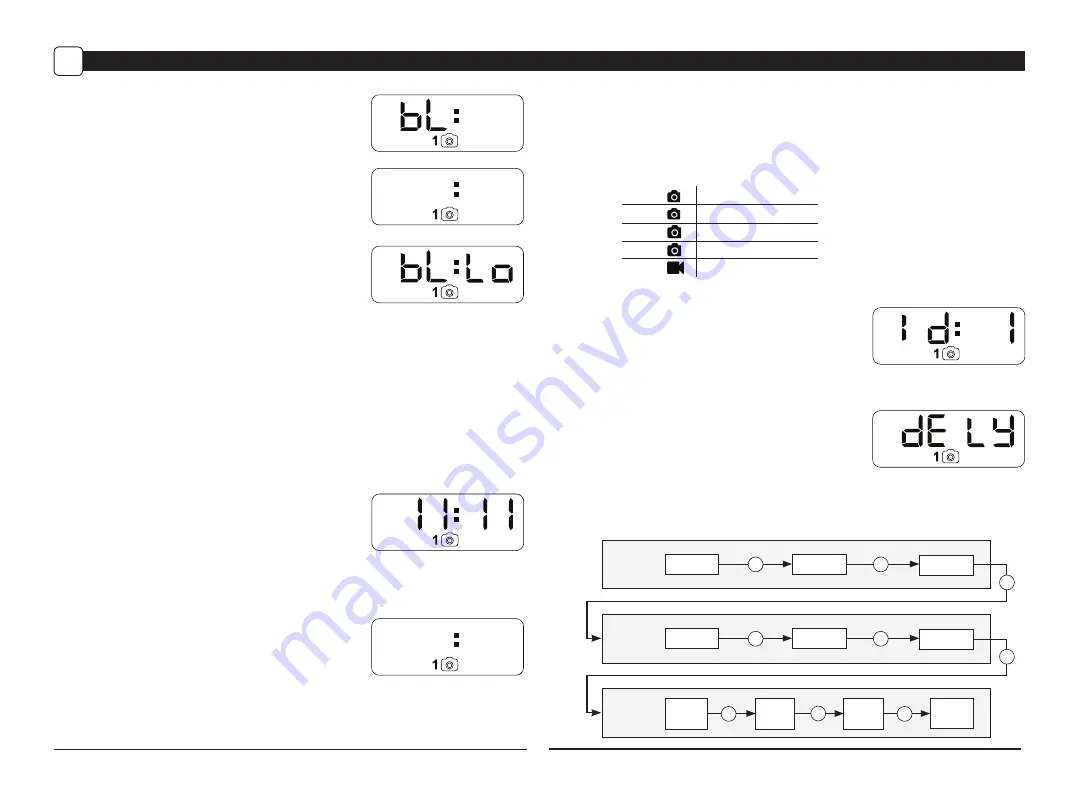
While the camera is in the Setup mode, the LCD display will show
the time. Press the
OK
button and the selection will flash. Use
the
UP/Down
buttons to change the selection. Press the
OK
button to lock in the selection and move to the next selection.
Repeat the process to set the year, month and day.
CAMERA SETUP
D
Power ON
Slide the power switch to the ON position. The battery level
will appear on the LCD Display for 2 seconds.
Setting Capture Mode
Use the
Up/Down
buttons to choose between 5 different modes: 1 Photo/Low Resolution,
1 Photo/High Resolution, 3 Photos/Low Resolution, 3 Photos/High Resolution and Video.
Press
OK
to lock in your selection and move to the next selection.
The on-screen icons for each mode are shown below:
Detection Delay Setting
Detection Delay determines the number of minutes between
pictures when an animal is detected and remains in range.
Press the
OK
button. Use the
Up/Down
buttons to choose
between (0, 15, 30 sec, 1 or 5 min). Press
OK
to lock in your
selection and move to the next selection.
1
Hi
Hi
1
L o
L o
3
3
1 Photo, Low Resolution
1 Photo, High Resolution
3 Photos, Low Resolution
3 Photos, High Resolution
Video
99
Hi
To begin modifying the camera settings, slide the switch to the SETUP position. The camera will
display the currently set time. Use the UP and DOWN arrow Keys to change the currently flashing
option. Once setting is adjusted to the desired option, press OK to lock in the setting and move to
the next field/option.
Note: while in SETUP mode, the motion sensor will detect movement and illuminate the
STATUS LED on the front of the camera for ~1 second. You can use this feature to ensure
camera is properly aimed to detect movement in the desired target area.
Hi
If the camera detects that the battery level is 15% or below,
the Low Battery screen will appear and the unit will turn off.
After 2 seconds, the camera will display the countdown.
When the countdown timer reaches “00”, the display will
turn off and the camera will OK Capture Mode.
09
Hi
AM
Hi
05
AM
Hi
Setting Camera ID
Use the
Up/Down
buttons to choose between nine
different numbers (1-9) to help identify your cameras
(i.e. “CAMERA 3” will be marked on the info strip given
3 was selected). Press
OK
to lock in your selection and move
to the next selection.
Hi
Reset Picture Count/Erase Images/Format Card
You can reset the picture count on the camera. Use the
Up/Down
buttons to choose between Yes or No. Press
the
OK
button to confirm the selection. “Yes” will reset
file number to start from 0001 and
erase all images stored
on the SD card.
NOTE: This will also format your SD card for use in your camera.
Hi
SET
TIME
SET
DATE
SET
OPTIONS
HOUR
MONTH
MINUTE
DAY
AM/PM
YEAR
DELETE/
FORMAT SD
OK
DETECTION
DELAY
CAPTURE
MODE
CAMERA
ID
OK
OK
OK
OK
OK
OK
OK
OK


