


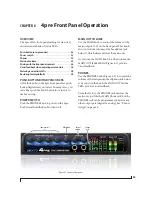


4 P R E F R O N T P A N E L O P E R A T I O N
37
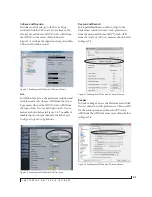
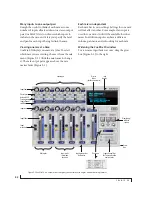
Controlling pan
If a mix is selected and the
pan
LED is dark, as
shown in (Figure 6-3), this indicates that the front-
panel knobs are currently controlling each input’s
mix volume. If you wish to control the left-right
panning of the input, push
and hold
the MIX/VOL
knob. Doing so causes the
pan
LED (Figure 6-3) to
illuminate. You can now use the knobs to pan each
mono input left or right. Like volume, the pan
setting for the input can be different for each of the
four mixes. Push the knob to toggle between pan-
center or pan-left/right.
Use the following gestures for controlling pan for
any inputs that are configured as a stereo pair by
the CueMix FX software (see the next section):
To go back to controlling volume, push and hold
the MIX/VOL knob again. The
pan
LED once
again becomes dark.
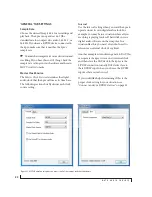
Stereo pairs
From the factory, the four mic/instrument inputs
are configured as individual mono inputs, each
with its own knob. However, the CueMix FX
software gives you the option of controlling them
as stereo pairs. (See “Mono/stereo pairing” on
page 53.) If you do so, the two front panel knobs
that correspond to the pair will each affect both
channels in identical fashion.
For example, if mic inputs 1-2 are configured as a
stereo pair, you could use either the INPUT 1 knob
or the INPUT 2 knob to control the volume of the
pair. Panning can also be controlled using either
knob, as explained in the previous section for
stereo pairs.
The S/PDIF input is, by default, grouped as a stereo
pair. In addition, there is no knob on the front
panel for S/PDIF volume control. Use the included
CueMix FX software to control the S/DIF input
level, panning, and mono/stereo grouping. See
chapter 9, “CueMix FX” (page 51).
Trim, pad, and phantom power controls are always
independent, regardless of stereo pairing.
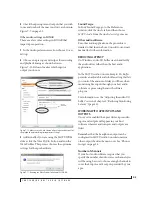
Adjusting input trim
When you push the
Mix Volume
knob (Figure 6-3)
repeatedly to cycle among the four different mixes,
there is a fifth choice: the
trim
LED (Figure 6-3).
When it is illuminated, the input volume knobs
(Figure 6-1) control the trim level for each input.
The trim level adjustment occurs before the signal
enters the 4pre mixer, so it applies to all mixes.
Trim is useful for adjusting the overall level of the
input. For example, if you plug in a mic, and the
signal is so strong (loud) that it distorts the input,
use trim to reduce the volume until it no longer
overdrives the input.
Toggling pad and 48V phantom power
When adjusting trim (the trim LED is
illuminated), you can toggle the -20 dB pad and
48-volt phantom power for each mic input as
follows:
■
Push the knob to toggle the -20 dB pad
■
Push
and hold
the knob to toggle 48V power
When enabled, the corresponding
48V
or
pad
LED
(Figure 6-3) will illuminate.
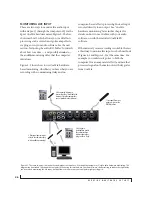
Using the 4pre as a monitor mixer while
recording tracks on the computer
You can use the 4pre front-panel mixer while
connected to a computer. This allows you to create
monitor mixes that are independent of what’s going
Do this
To do this
Turn
To adjust balance or width
Push and hold
To toggle between balance and width
In balance mode, push
To set balance to center
In width mode, push
To toggle between 100% (full stereo)
and 0% (full mono)
Summary of Contents for 4pre
Page 4: ...4 ...
Page 5: ...Part1 GettingStarted ...
Page 6: ......
Page 10: ...10 ...
Page 16: ...P A C K I N G L I S T A N D S Y S T E M R E Q U I R E M E N T S 16 ...
Page 28: ...I N S T A L L I N G T H E 4 P R E H A R D W A R E 28 ...
Page 29: ...Part2 Usingthe4pre ...
Page 30: ......
Page 50: ...R E D U C I N G M O N I T O R I N G L A T E N C Y 50 ...


