background image

Introduction

Installation

Troubleshooting

Glossary

License


SBV5220 VoIP Cable Modem User Guide

14

4

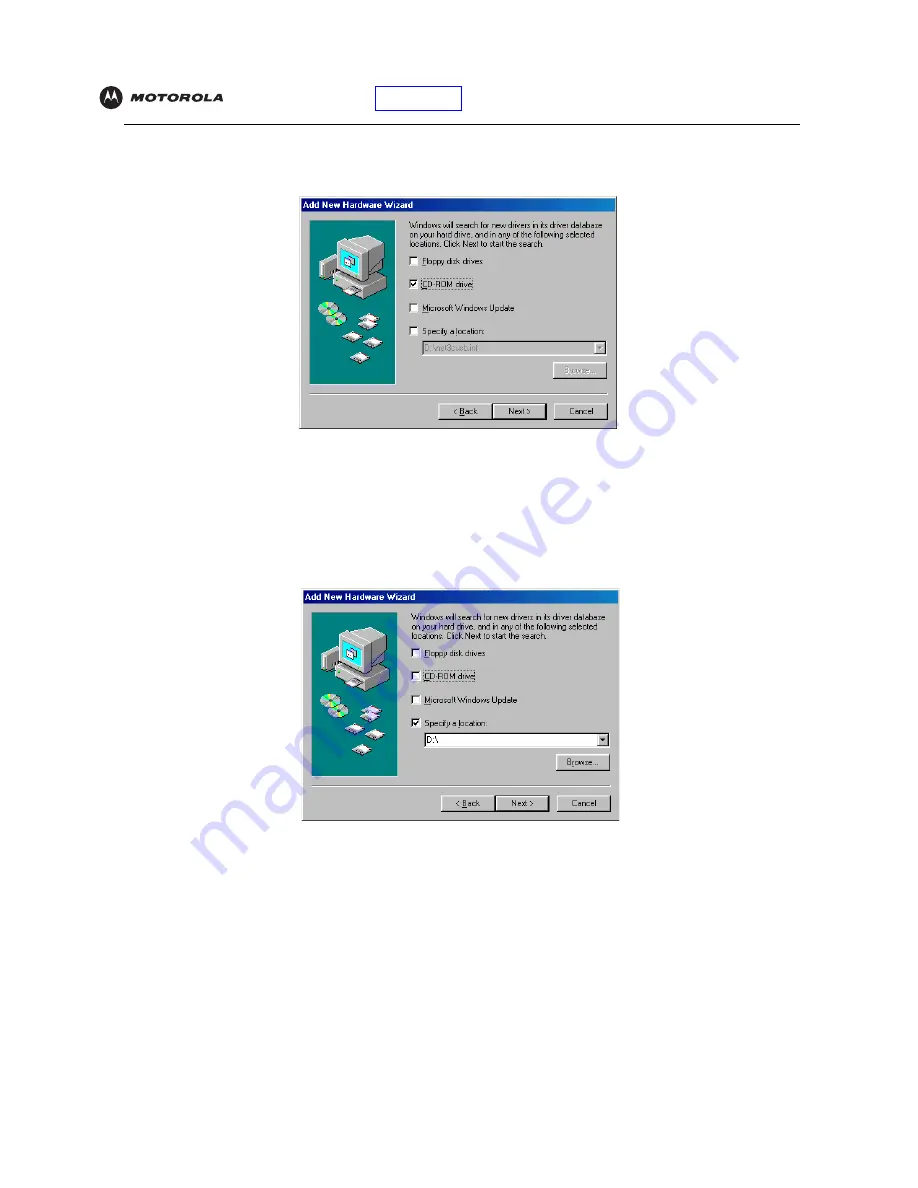
Be sure “Search for the best driver for your device” is selected and click 

Next

. The following window is 

displayed:

5

Be sure “CD-ROM drive” is the only box selected. Click 

Next

.

The message “Please wait while Windows searches for a new driver for this device” is displayed.

If your computer successfully locates the driver, skip to step 8.

If your computer does not locate the driver, the previous window


is displayed again. 

6

Select 

Specify a location

 and type the location of your CD-ROM drive.

To load the driver successfully, you may need to click 

Browse

 to manually select the 

NetMotCM.sys

 file from 

the CD-ROM.

Summary of Contents for SBV5220

Page 1: ...User Guide SBV5220 VoIP Cable Modem ...

Page 2: ...s should always be followed to reduce the risk of fire electric shock and injury to persons including the following Read all of the instructions listed here and or in the user manual before you operate this equipment Give particular attention to all safety precautions Retain the instructions for future reference This device must be installed and used in strict accordance with manufacturer s instru...

Page 3: ...is product only from the type of power source indicated on the product s marking label If you are not sure of the type of power supplied to your home consult your dealer or local power company Use only the power cord and batteries indicated in this manual Do not dispose of batteries in a fire They may explode Check with local codes for possible special disposal instructions Disconnect the phone wi...

Page 4: ...als The battery should be stored out of the reach of children Do not store the battery close to metal objects If the battery leaks fluid and you touch it immediately wash your hands If the fluid gets into your eye do not rub the eye Rinse with water and immediately seek medical care Left untreated the battery fluid could cause damage to the eye Ensure that the battery does not receive any strong i...

Page 5: ...ceiver is connected Consult the dealer or an experienced radio TV technician for help Canada Industry Canada IC This Class B digital device complies with Canadian ICES 003 Cet appareil numérique de la classe B est conforme à la norme NMB 003 du Canada Any services provided through this equipment Are not intended to replace or be a substitute for primary line voice services or Plain Old Telephone S...

Page 6: ...ng two conditions 1 this device may not cause harmful interference and 2 this device must accept any interference received including interference that may cause undesired operation The above named party is responsible for ensuring that the equipment complies with the standards of 47CFR Paragraph 15 101 to 15 109 International Declaration of Conformity We Motorola Inc Connected Home Solutions Busin...

Page 7: ...t obligation on the part of Motorola to provide notification of such revision or change Motorola provides this guide without warranty of any kind either implied or expressed including but not limited to the implied warranties of merchantability and fitness for a particular purpose Motorola may make improvements or changes in the product s described in this manual at any time MOTOROLA and the Styli...

Page 8: ...ents 8 Ethernet Card 8 USB Connection 8 Battery Installation 9 Installation and Configuration 10 Cabling and Startup for a Single User 10 Setting Up a USB Driver 12 Setting Up a USB Driver in Windows 98 Second Edition 13 Setting Up a USB Driver in Windows 2000 17 Setting Up a USB Driver in Windows Me 20 Setting Up a USB Driver in Windows XP 21 Configuring TCP IP 22 Configuring TCP IP in Windows 98...

Page 9: ...ide ix Removing the USB Driver from Windows 98 Second Edition or Windows Me 42 Removing the USB Driver from Windows 2000 43 Removing the USB Driver from Windows XP 45 Running the Motorola USB Driver Removal Utility 48 Contact Us 50 Frequently Asked Questions 50 Glossary 52 Software License 54 ...

Page 10: ...th an Ethernet adapter directly to the Ethernet port on the SBV5220 VoIP cable modem Two computers one to the USB port and one to the Ethernet port Up to 31 computers to a single SBV5220 VoIP cable modem using an Ethernet hub as shown in Cabling for Multiple Users on page 35 For easiest set up use the Installation Assistant on the SBV5220 VoIP Cable Modem CD ROM SBV5220 VoIP Telephone Service The ...

Page 11: ...r Standard two wire telephone connection for voice fax and telephone modem operation The connection to the telephone equipment is made with a standard RJ 11 jack and plug Re dial number Speed dial Call forwarding Call hold and mute Call return Call waiting Caller ID Caller ID block Three way calling Voice mail Telephony Devices for the Disabled TDD On hook off hook detection Operator barge in Stan...

Page 12: ...tream channel connected 4 US upstream Scanning for a send upstream channel connection Upstream channel connected 5 Online Scanning for a network connection Startup process completed 6 Link Transmitting or receiving data A device such as a computer or hub is connected to the USB or Ethernet connectors on the back panel 7 Tel 1 Connected and activated telephone is off hook in use Connected and activ...

Page 13: ...VoIP cable modem 4 ETHERNET Provides the connection to Ethernet equipped computers using a cable terminated with an RJ 45 connector 5 USB Provides the connection to USB equipped computers 6 Reset If you experience a problem you can push this recessed button to reset the VoIP cable modem see Troubleshooting on page 40 Resetting may take some time 5 to 30 minutes because the VoIP cable modem must fi...

Page 14: ...b see the network description in Cabling for Multiple Users on page 35 Check the documentation provided with your hub Caution Item Description Power adapter or cable Connects to the AC power outlet 10 100Base T Ethernet cable Connects to the Ethernet port USB cable Connects to the USB port Phone wire Connects the telephone to the cable system to provide telephone service SBV5220 VoIP Cable Modem C...

Page 15: ...charges To prevent overheating the VoIP cable modem do not block the ventilation holes Do not open the VoIP cable modem Refer all service to your cable provider Wipe the VoIP cable modem with a clean dry cloth Never use cleaning fluid or similar chemicals Do not spray cleaners directly on the unit or use forced air to remove dust Caution Contact your cable provider before connecting your VoIP cabl...

Page 16: ...on the back of the cable modem You can record it here 00 ______ ______ ______ ______ ______ To receive telephone service you need to provide the MAC address printed on the bar code label marked MTA MAC ID on the back of the cable modem You can record it here 00 ______ ______ ______ ______ ______ You should ask your cable provider the following questions Do you have any special system requirements ...

Page 17: ... current service packs and patches Ethernet Card You can use the Ethernet connection with any Windows Macintosh UNIX or Linux computer equipped with a 10Base T or 10 100Base T Ethernet card The original version of Windows 98 Windows NT UNIX Linux or Macintosh computers must use the Ethernet connection If you use an Ethernet card it must be installed in your computer before you install your SBV5220...

Page 18: ...battery cover on the bottom Battery Installation 2 Slide the battery into the battery compartment until it is fully seated The battery is keyed so that it cannot be installed incorrectly Make sure that the pull tab on the battery is accessible and does not prevent the battery cover from closing properly 3 Re install the battery cover with the locking tabs seated downward and then push the cover fo...

Page 19: ...bed for your situation For Windows computers see Configuring TCP IP on page 22 Refer to your Macintosh or UNIX user manual for information regarding TCP IP and IP address configuration Cabling and Startup for a Single User Allow some time 5 to 30 minutes to power up the first time because the Motorola VoIP cable modem must find and lock on the appropriate channels for communications 1 Be sure your...

Page 20: ... the Motorola VoIP cable modem downloads configuration data and changes to solid green when the download is complete 6 Connect your computer to the Motorola VoIP cable modem using USB or Ethernet USB Be sure the SBV5220 VoIP Cable Modem CD ROM is inserted in your CD ROM drive Perform the appropriate procedure for Setting Up a USB Driver for your Windows version Connect the USB cable to the USB por...

Page 21: ...USB driver you can continue with Configuring TCP IP on page 22 The Motorola VoIP cable modem USB driver does not support Macintosh or UNIX computers For those systems you can connect through Ethernet only Caution To reduce the risk of fire use only No 26 or larger UL Listed or CSA Certified Telecommunication Line Cord or national equivalent to connect a telephone line to your Motorola VoIP cable m...

Page 22: ...D contains the USB drivers and must be inserted and read by the PC before you connect the Motorola VoIP cable modem to the PC 2 Connect the Motorola VoIP cable modem to your computer with a USB cable For further instructions see Cabling and Startup for a Single User on page 10 A few seconds after you complete the USB connection the Add New Hardware Wizard window is displayed 3 Click Next The follo...

Page 23: ...x selected Click Next The message Please wait while Windows searches for a new driver for this device is displayed If your computer successfully locates the driver skip to step 8 If your computer does not locate the driver the previous window is displayed again 6 Select Specify a location and type the location of your CD ROM drive To load the driver successfully you may need to click Browse to man...

Page 24: ... the SBV5220 VoIP Cable Modem CD ROM is properly inserted in the CD ROM drive If you still cannot find the correct driver file click Cancel to cancel the installation and perform the procedure for Removing the USB Driver from Windows 98 Second Edition or Windows Me on page 42 Then repeat this procedure Although your Motorola VoIP cable modem model number may be different than in the images in this...

Page 25: ...er all the necessary files are loaded the following window is displayed confirming a successful installation 10 Click Finish The Systems Settings Change window is displayed 11 Click Yes to restart your computer When you finish setting up the USB driver you can continue with Configuring TCP IP in Windows 98 Windows 98 Second Edition or Windows Me on page 22 If you have difficulties setting up the U...

Page 26: ...cable modem to the PC 2 Connect the Motorola VoIP cable modem to your computer with a USB cable For further instructions see Cabling and Startup for a Single User on page 10 A few seconds after you complete the USB connection the Found New Hardware Wizard window is displayed 3 Click Next The following window is displayed Be sure Search for a suitable driver for my device is selected Although your ...

Page 27: ...played Be sure CD ROM drives is the only box selected 5 Click Next The following window is displayed 6 Click Next If the Insert Disk window is displayed be sure the SBV5220 VoIP Cable Modem CD ROM is in the CD ROM drive and follow steps 7 to 11 Otherwise if the Completing the Found New Hardware window is displayed you can skip to step 12 ...

Page 28: ...Double click the NetMotCM sys file in the CD ROM root directory The Files Needed window is displayed 11 Click OK The Found New Hardware Wizard window is displayed 12 Click Finish to complete the installation When you finish setting up the USB driver you can continue with Configuring TCP IP in Windows 2000 on page 25 If you have any difficulties setting up the USB driver perform Removing the USB Dr...

Page 29: ...ge 10 A few seconds after you complete the USB connection the Add New Hardware Wizard window is displayed 3 Click Next Windows automatically searches for the correct USB drivers and installs them If the installation is successful the following window is displayed Otherwise be sure the SBV5220 VoIP Cable Modem CD ROM is correctly inserted in your CD ROM drive 4 Click Finish to complete the installa...

Page 30: ...w seconds after you complete the USB connection the Found New Hardware Wizard window is displayed 3 Be sure Install the software automatically is selected 4 Click Next Windows automatically searches for the correct USB drivers and installs them If the installation is successful the following window is displayed 5 Click Finish to complete the installation Otherwise be sure the SBV5220 VoIP Cable Mo...

Page 31: ...ing to verify the IP address Verifying the IP Address in Windows 98 Windows 98 Second Edition or Windows Me on page 32 Verifying the IP Address in Windows 2000 or Windows XP on page 33 Follow the instructions in your Macintosh or UNIX user manual Your cable provider may provide additional instructions to set up your computer Configuring TCP IP in Windows 98 Windows 98 Second Edition or Windows Me ...

Page 32: ...ype window is displayed 7 Select the Protocol option and click Add The Select Network Protocol window is displayed 8 Click Microsoft in the Manufacturers section and click TCP IP in the Network Protocol section of Select Network Protocol window 9 Click OK 10 Click TCP IP on the Network window If there is more than one TCP IP entry choose the one for the Ethernet card or USB port connected to the M...

Page 33: ...d 12 Click the IP Address tab 13 Click Obtain an IP address automatically 14 Click OK to accept the TCP IP settings 15 Click OK to close the Network window 16 Click OK when prompted to restart your computer and click OK again When you complete TCP IP configuration go to Verifying the IP Address in Windows 98 Windows 98 Second Edition or Windows Me on page 32 ...

Page 34: ... follow a connection number such as 1 2 or 3 is a reference displayed on PCs with multiple network interfaces PCs having only one network interface may display only the label Local Area Connection 3 Double click the Network and Dial up Connections icon on the Control Panel window The Network and Dial up Connections window is displayed 4 Double click Local Area Connection number The value of number...

Page 35: ...n the list of components TCP IP is installed You can skip to step 10 If Internet Protocol TCP IP is not in the list click Install The Select Network Component Type window is displayed 7 Click Protocol on the Select Network Component Type window and click Add The Select Network Protocol window is displayed 8 Click Internet Protocol TCP IP in the Network Protocol section on the Select Network Protoc...

Page 36: ... selected 11 Click Properties The Internet Protocol TCP IP Properties window is displayed 12 Be sure Obtain IP address automatically and Obtain DNS server address automatically are selected Click OK to accept the TCP IP settings 13 Click OK to close the Local Area Connection number Properties window 14 Click OK when prompted to restart your computer and click OK again When you complete the TCP IP ...

Page 37: ...ng TCP IP in Windows XP 1 On the Windows desktop click Start to display the Start window shown 2 Click Control Panel to display the Control Panel window The display varies depending on your Windows XP view options If the display is a Category view as shown below continue with step 3 Otherwise skip to step 5 ...

Page 38: ...ions The Network and Internet Connections window is displayed 4 On the Network and Internet Connections window click Network Connections to display the LAN or high speed Internet connections Skip to step 6 5 If a Classic view similar to below is displayed click Network Connections to display the LAN or high speed Internet connections ...

Page 39: ...220 VoIP Cable Modem User Guide 30 6 Right click your network connection If more than one connection is displayed be sure to select the one for your network interface 7 Select Properties from the pop up menu The Local Area Connection Properties window is displayed ...

Page 40: ...Internet Protocol TCP IP Properties window 9 On the Internet Protocol TCP IP Properties window verify that the settings are correct as shown 10 Click OK to close the TCP IP Properties window 11 Click OK to close the Local Area Connection Properties window When you complete the TCP IP configuration go to Verifying the IP Address in Windows 2000 or Windows XP on page 33 ...

Page 41: ...8 Second Edition or Windows Me To check the IP address 1 On the Windows Desktop click Start 2 Select Run The Run window is displayed 3 Type winipcfg exe and click OK A window similar to the example is displayed The example values for Adapter Address IP Address Subnet Mask and Default Gateway on your PC will be different than in the image above In Windows 98 Second Edition if IP Autoconfiguration A...

Page 42: ...ig and press ENTER to display your IP configuration A display like below indicates a normal configuration If an Autoconfiguration IP Address is displayed as in the window below there is an incorrect connection between your PC and the Motorola VoIP cable modem or there are cable network problems Check Your cable connections Whether you can see cable TV channels on your television After successfully...

Page 43: ...ws Desktop click Start 2 Select Run The Run window is displayed 3 Type cmd and click OK 4 Type ipconfig renew and press ENTER If a valid IP address is displayed as shown Internet access should be available 5 Type exit and press ENTER to return to Windows If after performing this procedure your computer cannot access the Internet call your cable provider for help ...

Page 44: ...t the USB port on one computer and the Ethernet port on another computer directly to the Motorola VoIP cable modem as shown You can connect a single computer to the USB port and from one to 31 remaining users to an Ethernet hub as shown You cannot connect more than one computer to the Motorola VoIP cable modem through the USB port Cable outlet Coaxial cable Computer USB cable Ethernet cable Comput...

Page 45: ...le Modem User Guide 36 Ethernet You can connect up to 31 computers to an Ethernet hub connected to a SBV5220 Motorola VoIP cable modem as shown Cable outlet Coaxial cable Ethernet cable Ethernet hub or switch Computer Computer Computer Ethernet cable Motorola VoIP cable modem ...

Page 46: ...er very solid wall material Use anchors if necessary for example if you must mount the unit on drywall To mount your SBV5220 on the wall 1 If present remove the four rubber chassis feet on the bottom of the SBV5220 as indicated 2 Print the Wall Mounting Template on page 39 While viewing the Wall Mounting Template click the Print icon or choose Print from the File menu to display the Print dialog b...

Page 47: ...M3 5 x 38 mm 6 x 1 1 2 inch screws with a flat underside and maximum screw head diameter of 9 0 mm 35 inches to mount the SBV5220 8 Using a screwdriver turn each screw until the head protrudes from the wall as shown There must be at least 2 5 mm 10 inches between the wall and the underside of the screw head The maximum distance from the wall to the top of the screw head is 6 0 mm 24 in Note Exampl...

Page 48: ...0 VoIP Cable Modem User Guide 39 Wall Mounting Template You can print this page to use as a wall mounting template Be sure you print it at 100 scale Page scaling should be set to None 100 Measure the printed template with a ruler to ensure that it is the correct size ...

Page 49: ...rking and the picture is clear If you cannot receive your regular TV channels your telephone service will not function Cannot send or receive data Check the lights on the front panel Note the first light from top to bottom that is off This light indicates where the error occurred as described in Front Panel Lights and Error Conditions on page 41 If all lights are off except the Standby and Tel 1 T...

Page 50: ...ration If Power The VoIP cable modem is not properly plugged into the power outlet The VoIP cable modem is unplugged or is in standby mode Plug it in or press the Standby button Battery AC power is not present AC power is not present DS Receive The receive channel cannot be acquired The receive channel is lost US Send The send channel cannot be acquired The send channel is lost Online IP registrat...

Page 51: ...f In Windows 98 Second Edition the Network Neighborhood icon In Windows Me the My Network Places icon The Network window is displayed 2 Click the Motorola SURFboard USB Cable Modem and click Remove The Network window no longer displays Motorola SURFboard USB Cable Modem in the list Although your Motorola VoIP cable modem model number may be different than in the images in this guide the procedure ...

Page 52: ...B cable from your computer or VoIP cable modem 5 Click Yes to restart your computer 6 Perform Running the Motorola USB Driver Removal Utility on page 48 Removing the USB Driver from Windows 2000 1 On your Windows desktop click Start 2 Click Settings 3 Double click Control Panel to display the Control Panel window 4 Double click System to display the System Properties window ...

Page 53: ...rs 8 Click the Motorola SURFboard USB Cable Modem The Uninstall icon is displayed on the window near the top 9 Click Uninstall A window is displayed 10 Click OK 11 Close the Device Manager and Control Panel windows 12 Perform Running the Motorola USB Driver Removal Utility on page 48 Although your Motorola VoIP cable modem model number may be different than in the images in this guide the procedur...

Page 54: ...220 VoIP Cable Modem User Guide 45 Removing the USB Driver from Windows XP 1 On the Windows desktop click Start to display the Start window shown 2 Click Control Panel to display the Control Panel window The display varies depending on your Windows XP view options ...

Page 55: ... a Category view similar to the image under step 2 is displayed click Performance and Maintenance Otherwise skip to step 5 4 Click System to display the System Properties window Skip to step 6 5 If a Classic view similar to the following is displayed click System to display the System Properties window ...

Page 56: ...8 Double click Network adapters 9 Click the Motorola SURFboard USB Cable Modem The Uninstall icon is displayed on the window near the top Click Uninstall 10 Close the Device Manager window and Control Panel windows 11 Perform Running the Motorola USB Driver Removal Utility on page 48 Although your Motorola VoIP cable modem model number may be different than in the images in this guide the procedur...

Page 57: ... VoIP Cable Modem CD ROM in the CD ROM drive After a short time a window with language choices is displayed 2 Press the Esc key on the keyboard to exit the start up screens 3 To start Windows Explorer click Start and select Run On the Run window type explorer and click OK 4 Double click My Computer 5 Double click the Motorola CD icon D in the image 6 Double click remove or remove exe to run the Re...

Page 58: ...u can click Details to display informational messages about the files that were found and deleted similar to the ones shown If necessary scroll down to view the entire list Click OK to close the details window Re install the USB driver following one of Setting Up a USB Driver in Windows 98 Second Edition on page 13 Setting Up a USB Driver in Windows 2000 on page 17 Setting Up a USB Driver in Windo...

Page 59: ...r 1 000 Kbps Network conditions such as traffic volume and the speed of the sites you visit can affect download speeds Q Can I still watch cable TV while using my VoIP cable modem A Yes your cable TV line can carry the TV signal while you send and receive information on the Internet Q What are CableLabs Certified DOCSIS and Euro DOCSIS A CableLabs Certified DOCSIS and Euro DOCSIS are the industry ...

Page 60: ...ble Internet service Some systems require that you subscribe to basic service before you can get Internet access and or offer a discount when you use your own VoIP cable modem Check with your local cable company for specific information Q What type of technical support is available A For questions about your Internet service connection or VoIP cable modem contact your cable provider Q What do I do...

Page 61: ... address Your cable provider assigns your VoIP cable modem an IP address to provide a continuous Internet connection MAC address The Media Access Control Address uniquely identifies each device that can be connected to an Ethernet network It is permanently written to read only memory ROM at the factory and printed on the rear panel of your Motorola VoIP cable modem You need to provide the MAC addr...

Page 62: ...your Motorola VoIP cable modem to the USB port Windows 98 Second Edition and later versions automatically recognize the VoIP cable modem VoIP Voice over Internet Protocol is a method to exchange voice fax and other information over the Internet Voice and fax have traditionally been carried over traditional telephone lines using a dedicated circuit for each line VoIP enables calls to travel as disc...

Page 63: ...h above 2 Copy or translate the User Guide included with the Software other than for personal use 3 Copy alter translate decompile disassemble or reverse engineer the Software including but not limited to modifying the Software to make it operate on non compatible hardware 4 Remove alter or cause not to be displayed any copyright notices or startup message contained in the Software programs or doc...

Page 64: ...526781 001 2 06 Visit our website at www motorola com ...

Reviews: