Motorola i60c User Manual Download Page 68

66

www.motorola.com/iden

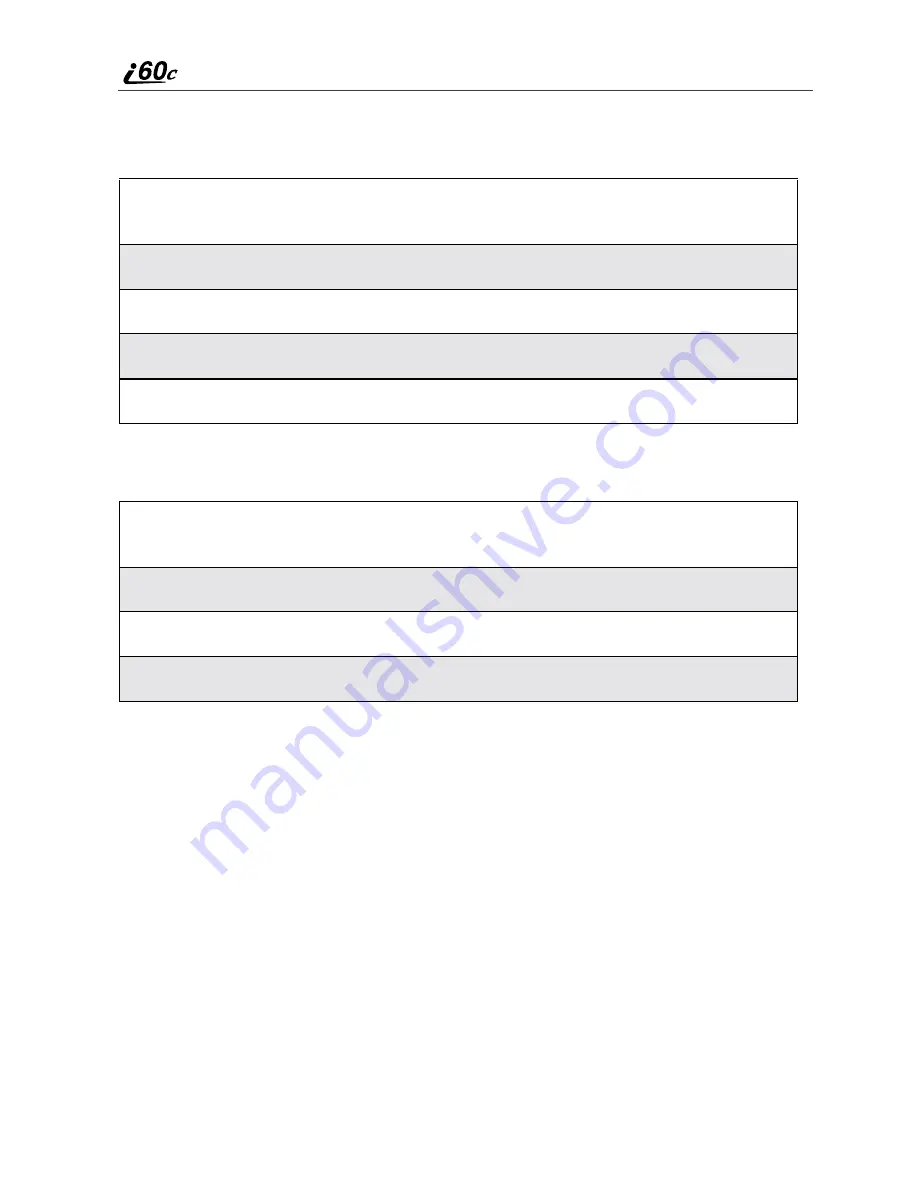
Deleting Recent Calls

To delete a recent call:

To delete all calls on the Recent Calls list:

Missed Calls

If you open the cover, the Recent Calls list appears on the display screen.

If you do not open the cover, pressing

.

dismisses the missed call message.

Pressing

.

again displays the most recent call, allowing you to call the number

(see “Using Speed Dial” on page 60).

Call Timers

Call Timers measure the duration of your phone calls, Private or Group calls,
and circuit data use, as well as the number of Kilobytes sent and received by
your phone.

The Call Timers menu displays the following options:

1

From the Recent Calls screen, press

S

to scroll to the call you want to

delete.

2

Press

q

to access the Rec. Calls Menu.

3

Press

R

to scroll to Delete.

4

Press

C

under SELECT.

5

Press

C

under YES to confirm the deletion.

1

From the Recent Calls screen, press

q

to access the Rec. Calls

Menu.

2

Press

R

to scroll to Delete All.

3

Press

C

under SELECT.

4

Press

C

under YES to confirm the deletion.

Summary of Contents for i60c

Page 1: ...Motorola iDEN Digital Multi Service Data Capable Phone i60c Phone User s Guide NNTN4294A NNTN4295A ...

Page 2: ...www motorola com iden ...

Page 3: ...urning Your i60c Phone On Off 15 Closed Cover Features 16 Enabling Security 17 Receiving Over the Air Programming 17 SIM Card 18 Keypad Lock 27 Status of Your i60c Phone 28 My Information 28 Using T9 Text Input 29 Display Essentials 35 Display Screens 35 Status Icons 37 Text Display Area 39 Call Information Icons 39 Menu Icon 39 Display Options 39 Navigating Menus and Lists 40 Main Menu Options 41...

Page 4: ... Digital Cellular 57 Making Phone Calls 57 Emergency Calling 62 Receiving a Phone Call 62 Ending a Phone Call 63 Recent Calls 63 Missed Calls 66 Call Timers 66 Hands Free Speakerphone Optional 68 Mute 68 Call Waiting 69 Call Hold 71 Three Way Calling 72 Call Forwarding 73 Private and Group Calls 79 Private Calls 79 Call Alerts 81 Group Calls 85 Messages 89 Receiving Messages 89 Message Center 92 U...

Page 5: ...izing the i60c Phone 113 Settings Menu 113 Accessories 129 Batteries 129 Travel Chargers 130 Carry Holster 132 Data Accessories 133 Other Important Information 139 Understanding Status Messages 139 Safety and General Information 141 RF Operational Characteristics 141 Electro Magnetic Interference Compatibility 144 Medical Devices 144 Operational Warnings 146 Operational Cautions 147 Accessory Safe...

Page 6: ...iv www motorola com iden Limited Warranty Motorola Communication Products International 155 Patent and Trademark Information 159 Index 161 ...

Page 7: ...tial installation This equipment generates uses and can radiate radio frequency energy and if not installed and used in accordance with the instructions may cause harmful interference to radio communications However there is no guarantee that interference will not occur in a particular installation If this equipment does cause harmful interference to radio or television reception which can be dete...

Page 8: ...vi www motorola com iden ...

Page 9: ...cuit data faxes and file transfers See Using Your Phone as a Modem on page 96 Closed Cover Features The control buttons enable you to use many of your i60c phone s features without opening the cover Customization Use the Settings feature to customize your i60c phone to meet your individual needs Speakerphone Optional You can enjoy hands free communication at the touch of a button Speakerphone is e...

Page 10: ...out removing your eyes from the road If you receive an incoming call at an inconvenient time if possible let your voice mail answer it for you 4 Let the person you are speaking with know you are driving if necessary suspend the call in heavy traffic or hazardous weather conditions Rain sleet snow ice and even heavy traffic can be hazardous 5 If you receive an incoming call at an inconvenient time ...

Page 11: ...you would want others to do for you 10 Call roadside assistance or a special non emergency wireless assistance number when necessary If you see a broken down vehicle posing no seri ous hazard a broken traffic signal a minor traffic accident where no one appears injured or a vehicle you know to be stolen call roadside assistance or other special non emergency wireless number 1 1 Wherever wireless p...

Page 12: ...10 www motorola com iden ...

Page 13: ...des i60c Phone Features Page 12 Battery Page 13 Turning Your i60c Phone On Off Page 15 Closed Cover Features Page 16 SIM Card Page 18 Keypad Lock Page 27 Status of Your i60c Phone Page 28 My Information Page 28 Using T9 Text Input Page 29 ...

Page 14: ...aNumeric Keypad Microphone Option Key 4 Way Navigation Key Punctuation Key Headset Jack Back Pause Dialing Key International Plus Dialing Key Accessory and Data Cable Connector Speaker Key Push To Talk PTT Button Status Light End Home Key Power On Off Cover Cover Volume Control Buttons SmartKey Speaker Speaker Status Light ...

Page 15: ...e shown on page 129 Remove the battery from the protective plastic safety tray provided in the original packaging When the battery is not attached to the phone store it in the original tray NOTE Use only the batteries approved for this product Attaching the Battery 1 Slide the battery cover release button away from the battery cover and remove the battery cover from the back of the phone TIP Holdi...

Page 16: ...utton away from the battery cover and remove the battery cover from the back of the phone 3 Remove the battery by pushing the battery toward the antenna and lifting it out of the phone 1 With your phone s display screen facing up plug the charger s accessory connector into the left side of the accessory connector on the bottom of the phone 2 If the charger has folding electrical prongs flip open t...

Page 17: ... time remaining When Charging Battery Turning Your i60c Phone On Off To power the phone on Icon Display a b c d Battery Strength Low Battery 11 to 40 41 to 70 Fully Charged Icon Display e f g d 1 flashing bar 1 flashing bar 1 continuous bar 1 flashing bar 2 continuous bars 3 continuous bars Battery Strength Low Battery 31 to 60 61 to 90 Fully Charged 1 Open the phone cover 2 For optimal signal str...

Page 18: ...displays enter your SIM PIN For more information see SIM Card Personal Identification Number PIN on page 18 NOTE The default SIM card PIN is 0000 It is recommended that you change your PIN to prevent fraudulent use of the SIM card see Changing the PIN on page 20 5 Press C under OK As your phone connects to the network you will see a welcome message and a connecting message When the Ready screen ap...

Page 19: ...p lists for Private Call use and your Personal Telephone Number via a Net Alert message In order to receive your programming you must have enabled security Within 24 hours of enabling security you will receive a Net Alert message containing your lists 1 When you power on your phone for the first time after the Ready screen appears you will be prompted to select OK to update your browser info NOTE ...

Page 20: ...3 for information on locating the SIM card If there is no SIM card in your phone notify your sales representative NOTE Except for making emergency calls your phone will not function without the SIM card SIM Card Personal Identification Number PIN To prevent unauthorized use of your phone your SIM card is protected by a PIN Each time the phone is powered on you must enter your PIN You can change or...

Page 21: ...y again appears on your phone s screen After three consecutive incorrect attempts the SIM card is blocked Once blocked the phone does not allow you to enter your PIN again even after powering the phone off and back on If this happens see Unblocking the PIN on page 21 IMPORTANT Incorrectly entering your PIN three times causes the SIM card to be blocked To unblock your SIM card you must contact your...

Page 22: ... screen press R to scroll to New Passwords Press C under SELECT to access the New Passwords screen 5 At the New Passwords screen press R to scroll to SIM PIN and press C under SELECT 6 At the Enter Old SIM PIN Code screen enter the current SIM PIN and press C under OK 7 At the Enter New SIM PIN Code screen enter the new 4 to 8 digit SIM PIN and press C under OK 8 At the Re enter New SIM PIN Code s...

Page 23: ...in 5 seconds of the prior key press To unblock the PIN IMPORTANT If you unsuccessfully enter the PUK code ten times the SIM card is permanently blocked and must be replaced If this happens all data will be lost You will get a message to contact your service provider If the SIM card is blocked the i60c phone only allows outgoing Emergency calls 1 Press 0 5s 2 Enter the PUK code 3 Press s 4 Enter a ...

Page 24: ...the PIN is accepted the phone registers on the network and the Ready screen displays When the PIN requirement is disabled the phone can be used without entering a PIN IMPORTANT If you disable the PIN requirement you remove protection of personal data on your SIM card Anyone can then use your phone and access your personal data 1 From the Ready screen press q and then press R to scroll to Settings ...

Page 25: ...ELECT 6 At the Verify SIM PIN Code screen enter the current SIM PIN and press C under OK IMPORTANT If you remove your SIM card and insert another SIM card into your phone the following information is erased when you use the phone with the new SIM card Recent Calls list call forwarding settings Net Alerts information stored in Memo All Phonebook information will remain stored on your original SIM c...

Page 26: ... Card 1 With the phone powered off remove the battery cover and battery See Detaching the Battery on page 14 2 With the antenna facing away from you and the back of the phone exposed and facing up locate the SIM card holder SIM card holder ...

Page 27: ...act side facing down and the cut corner in the lower left Do not touch the gold colored areas of the SIM card 4 Carefully slide the SIM card to the right and into the phone until it lies flat in the SIM card holder 1 With the phone powered off remove the battery cover and battery See Detaching the Battery on page 14 cut corner ...

Page 28: ... up insert the tip of a ballpoint pen into the slot to the right of the SIM card along the right edge of the SIM card 3 Gently press the tab to the left of the SIM card Hold this tab down 4 While holding the tab down slide the SIM card to the left by moving the ballpoint pen to the left within the slot slot tab ...

Page 29: ...orarily disabled You can respond to the incoming call message or alert When you have finished responding to the incoming call message or alert press r if the phone cover is open or if the phone cover is closed until you return to the idle screen Once you return to the idle screen Keypad Lock will automatically reactivate To unlock the phone s keypad 5 When the ballpoint pen has moved the SIM card ...

Page 30: ...splayed in these fields You can edit the phone numbers displayed on the My Information screen but this does not change your phone numbers Carrier IP this field display s your phone s carrier assigned IP address IP Addresses these fields display the IP addresses you use to access the Internet with your phone Circuit Data Number Ckt your circuit data number is in this field Viewing Editing My Inform...

Page 31: ...to your phone for example Phonebook or Datebook T9 Text Input Entry Modes Four text entry modes are available in T9 Text Input Alpha Word Symbols and Numeric When you are using T9 Text Input an icon in the top right corner of your phone s display screen next to the battery strength indicator icon indicates the T9 Text Input entry mode you are using 3 Use S to scroll through the fields 4 To edit th...

Page 32: ...ry field Press P to create a space in the text entry field Press C under DELETE to delete one character Press and hold C under DELETE to delete an entire entry Using Word Mode In Word mode T9 Text Input analyzes the letters on the keypad button you press and arranges them to create words As you type T9 Text Input matches your keystrokes to words in its database and will display the most commonly u...

Page 33: ...ce when entering text Next Word in Database If the displayed word is not the word you want to enter you can display other words Press 0 to display more words in the database that match the keystroke sequence you entered Shift and Caps Lock Press to make the next letter typed uppercase Shift to make all subsequent letters types uppercase Caps Lock or to go back to lowercase letters These icons appe...

Page 34: ...ight basic punctuation symbols Press R to accept the punctuation and continue typing 1 Choose Word as your text entry mode 2 Type a word by using one key press per desired letter For example to type test press 8 3 7 8 NOTE The displayed word may change as you type it Do not try to correct the word as you go Type to the end of the word before editing 3 If the word that appears is not the desired wo...

Page 35: ...d press the number buttons on your keypad to enter numbers 1 Change from Word text entry mode to Alpha text entry mode 2 Type the word using Alpha text entry mode 3 Return to Word text entry mode 4 Press R to add a space The word you typed in Alpha text entry mode is now in the database 1 From any screen that requires text input press q to access the Entry Method menu 2 Press S to scroll to Langua...

Page 36: ... your text entry mode A row of 32 symbols appears along the bottom of your phone s display screen just above the display option and menu icon Press T to view the complete row 2 Press T to highlight the symbol you want to enter into the text entry field 3 Press B under SELECT to enter the symbol ...

Page 37: ...side of the cover provides detailed information about all of your phone s functions Opening and Closing Phone Cover If you are viewing informaiton on the display screen closing the phone cover terminates any activity your phone is engaged in except powering up or transfering date through a cable Display Screens Page 35 Status Icons Page 37 Text Display Area Page 39 Call Information Icons Page 39 M...

Page 38: ...en The Ready screen displays any time the phone is powered on but not engaged in some activity You must start at the Ready screen to access many of your phone s features and functions USER TIP You can always access the Ready screen by pressing r NOTE There are instances where truncation of words occur in some of the menu items on the i60c phone that do not allow you to fully view the current menu ...

Page 39: ...Signal Strength icons strength of the network signal More bars next to the antenna indicate a stronger signal 01 Active Line icons currently active phone line 0 indicates Line 1 is active 1 indicates Line 2 is active GHI JKL Call Forward icons phone is set to forward calls See Call Forwarding on page 73 for more information c Phone In Use phone is connected on an active call h Private In Use numbe...

Page 40: ...s y Voice Mail you have one or more Voice Mail messages B FaxMail you have one or more FaxMail messages u Speaker Off phone s speaker is off Ring Vibe icons you have customized the way in which the phone is set to notify you when you receive calls and other types of messages See Ring Style and Notification Type on page 115 for more information w x T9 Text Input icons you are using T9 Text Input to...

Page 41: ...e menu that appears depends on the screen you access it from and the items on the menu apply to the task you are currently performing Pressing q from the Ready screen accesses the main menu Display Options On the display screen two display options appear at the bottom of most screens These options enable you to perform a wide variety of actions including changing saving and viewing information run...

Page 42: ...ers or other information These list items can be accessed the same way menu options are To access the items in a menu or list scroll using the four way navigation key at the top of your keypad Scroll down by pressing the lower portion of the navigation key R Scroll up by pressing the upper portion of the navigation key Q Holding down the appropriate part of the navigation key speeds up scrolling Y...

Page 43: ... and deleting R Messages Receive store access and manage Voice Mail FaxMail Text Messages and Net Alert Call Forward Settings for forwarding calls in various situations O Memo Input and store numbers to access later z Call Timers Display the duration of phone calls private or group calls circuit data use and Kilobytes sent and received j Recent Calls Access a list of the last 20 sent received or m...

Page 44: ...42 www motorola com iden To choose the highlighted main menu selection press C under SELECT To exit the main menu and return to the Ready screen press C under EXIT or press r or close the phone cover ...

Page 45: ...d in the phone will be lost See Inserting Removing the SIM Card on page 23 This section includes Accessing Phonebook with an i2000 i2000plus or GSM Phone Page 44 Phonebook Entries and Speed Dial Numbers Page 44 Phonebook Icons Page 44 Accessing Your Phonebook Page 45 Accessing Your Phonebook Page 45 About Phonebook Entries Page 46 Viewing Phonebook Entries Page 46 Sorting Phonebook Entries Page 47...

Page 46: ...your Phonebook once and then assign that person s home office mobile phone and fax numbers to the name You can store up to seven phone numbers a Private ID a Talkgroup ID and an IP address Each number stored in your Phonebook is automatically assigned a Speed Dial number that corresponds to its location in your Phonebook Each phone number uses one Speed Dial location even if it is assigned to the ...

Page 47: ...onebook Entries on page 48 The picker arrows appearing around the number type icon indicates multiple phone numbers stored under one name Accessing Your Phonebook If PHBK is one of your display options If PHBK is not one of your display options L Home b Pager K Fax Z Other n Talkgroup IP Address ef pickers From the Ready screen press C under PHBK 1 From the Ready screen press q 2 Press R to scroll...

Page 48: ...ssigned to the name The number to be stored Every Phonebook entry must contain a number This number may be any type of phone number Private ID or Talkgroup number or an IP address A Speed Dial number You may accept the default Speed Dial number or assign a different one Viewing Phonebook Entries Names with more than one number assigned to them appear with ef surrounding the icon to the right of th...

Page 49: ...t 3 When the icon representing the number you want to view is displayed press C under VIEW If there is a Private ID or a Talkgroup number stored for the person press q Then press R to scroll to View and press C under SELECT 4 Press S to view the other numbers stored for this name 1 From the Phonebook screen press q to view the Phonebook Menu screen 2 Press R to scroll to Sort By 3 Press C under SE...

Page 50: ... Details screen You can leave any item blank or unchanged by pressing S to scroll past it on the Entry Details screen Only a number is required for a valid Phonebook entry After you have entered a phone number and any other information you wish to include you can press C under DONE to save the Phonebook entry To cancel a Phonebook entry at any time press r to return to the Ready screen 1 From the ...

Page 51: ...ighted press C under CHANGE From the Name screen enter the name using the alphanumeric keypad See Using T9 Text Input on page 29 for information about entering text into this field When you are finished press C under OK The Entry Details screen returns with the Type field highlighted 3 With the Type field highlighted press C under CHANGE From the Type Editor screen press R to scroll to the type of...

Page 52: ...nebook NOTE The number can be up to 20 characters long When you are finished press C under OK The Entry Details screen returns with the Speed No field highlighted 5 The default Speed Dial number assigned to the Phonebook entry is displayed in the Speed field This is always the next available Speed Dial location NOTE Private IDs and Talkgroup numbers do not have associated Speed Dial numbers If you...

Page 53: ...en press C under CHANGE A new Type field appears for the additional number Enter the information for the additional phone number using step 3 through step 6 NOTE Each name in your Phonebook may have up to seven phone numbers one Private ID one Talkgroup number and one IP address associated with it 7 When you have entered all the information you wanted in this Phonebook entry press C under DONE 1 F...

Page 54: ...o the entry Once the desired entry is highlighted press C under SELECT The Phonebook information for that entry displays with the number entered in the field and the Type field highlighted 5 Press C under CHANGE Press R to scroll to the type of number you want to assign to the Phonebook entry Press C under SELECT 6 If you want to add more information to the Phonebook entry follow the applicable in...

Page 55: ...ry displays with the number entered in the field and the Type field highlighted 4 With Type highlighted press C under CHANGE Press R to scroll to the type of number you want to assign to the Phonebook entry Press C under SELECT 5 If you want to add more information to the Phonebook entry follow the applicable instructions in Adding Phonebook Entries on page 48 6 Press C under DONE 1 Press R to scr...

Page 56: ...highlighted press C under SELECT The Entry Details screen displays with the Private ID icon entered in the Type field the Private ID number entered in the field and the Name field highlighted 4 Press C under DONE 1 From the Phonebook screen press R to scroll to the entry you want to edit 2 Press q to view the Phonebook Menu 3 Press R to scroll to Edit 4 Press C under SELECT The Entry Details scree...

Page 57: ...r all of the above information for you By separating each entry with a pause The stored data would look like this 17035551234P P1234 In this example the first eleven digits represent the number that must be dialed to access your voice mail The P represents a 3 second pause The interrupts your greeting The second P represents another 3 second pause The last four digits represent your PIN 1 From the...

Page 58: ...ational call from most countries without entering the local international access code Use Plus Dialing for all Phonebook entries if you plan to travel outside the United States Begin by following the instructions for Adding Phonebook Entries on page 48 Before you type the phone number to be stored Press and hold for two seconds The pause symbol P will appear on the display screen 1 Press and hold ...

Page 59: ... provides the following features for making phone calls Direct Dial Phonebook Recent Calls Speed Dial Making Phone Calls Page 57 Emergency Calling Page 62 Receiving a Phone Call Page 62 Ending a Phone Call Page 63 Recent Calls Page 63 Missed Calls Page 66 Call Timers Page 66 Hands Free Speakerphone Optional Page 68 Mute Page 68 Call Waiting Page 69 Call Hold Page 71 Three Way Calling Page 73 Call ...

Page 60: ...der DELETE To clear all digits press and hold C under DELETE To cancel press r Making Calls from the Phonebook After you have entered phone numbers into your Phonebook you can use these numbers to make phone calls For information on entering numbers into your Phonebook see Adding Phonebook Entries on page 48 1 From the Ready screen use the keypad to enter the number you want to call 2 Press s to p...

Page 61: ...r is stored for the person you want to call ef appears around the icon to the right of the person s name Press T to scroll through the icons representing the numbers stored for that person Or Press C under VIEW to view all the numbers stored for this person Then press R to scroll to the number you want to call Or If there is a Private ID or a Talkgroup number stored for this person press q When th...

Page 62: ... q Press S to scroll to Recent Calls Press C under SELECT 2 Press S to scroll through the list received or sent recent calls until you reach the desired call 3 To view additional information about the call Press C under VIEW Or Press q to access the Rec Calls Menu Then press R to scroll to View and press C under SELECT 4 Press s to place the call 5 Press r or close phone cover to end the call 1 Fr...

Page 63: ...rom your Phonebook if you have stored the numbers with Plus Dialing See Adding Phonebook Entries on page 48 and Plus Dialing on page 56 for more information NOTE Your service default is International Calls Restricted Therefore you must contact Customer Care to obtain international dialing access To make an international call using Plus Dialing Press and hold a number key 1 through 9 Press and hold...

Page 64: ...t in the phone To place a call in an emergency dial 911s You will be connected to the nearest emergency dispatch center If you are on an active call you must end it before calling 911 NOTE If you have enabled the Keypad Lock feature you must unlock the phone s keypad before any call can be made including 911 emergency calls Receiving a Phone Call Incoming calls are indicated by a ring vibration or...

Page 65: ...ivate and group calls With the phone cover open you can access Recent Calls list to view your recent calls store numbers to the Phonebook delete recent calls call numbers on the Recent Calls list The Recent Calls list displays briefly on the display screen after you end a call Press t on the top of your phone The call will be activated with speakerphone on See Hands Free Speakerphone Optional on p...

Page 66: ...ll a indicates an outgoing call V indicates a missed call Missed calls appear on your Recent Calls list only if you have Caller ID For private calls an icon appears to the left of the name or number indicating the type of call h indicates a Private Call n indicates a Group Call Viewing Recent Calls If the number of the recent call is stored in your Phonebook the name associated with the phone numb...

Page 67: ...nt Calls List on page 60 1 From the Recent Calls screen press S to scroll to the call you want more information on 2 Press C under VIEW Or Press q to access the Rec Calls Menu Then press R to scroll to View and press C under SELECT 1 From the Recent Calls screen press S to scroll to the number you want to store 2 Press C under STORE Or Press q to access the Rec Calls Menu Press R to scroll to Stor...

Page 68: ...all Timers measure the duration of your phone calls Private or Group calls and circuit data use as well as the number of Kilobytes sent and received by your phone The Call Timers menu displays the following options 1 From the Recent Calls screen press S to scroll to the call you want to delete 2 Press q to access the Rec Calls Menu 3 Press R to scroll to Delete 4 Press C under SELECT 5 Press C und...

Page 69: ...a use Kbytes Reset keeps a running total of the number of Kilobytes sent and received by your phone until you reset it To view the Call Timers menu To view or reset a Call Timers option NOTE The values displayed by Call Timers are not intended for billing purposes Call Timers are estimates only 1 From the Ready screen press q 2 Press R to scroll to Call Timers 3 Press C under SELECT 1 From the Cal...

Page 70: ...peakerphone on While speakerphone is on Spkrphone On appears in the text display area To turn the speakerphone off Cover Closed Speakerphone is always on when you are on an active call with the cover closed If you open the cover speakerphone is turned off and the call will be heard through the earpiece Mute Use the Mute feature to listen to incoming audio without allowing sound from your phone s m...

Page 71: ...r a specific call If you re on a call and you receive a second call you will Hear a tone and See a message on your display informing you of another incoming call Cover Open If you have your phone cover open when you receive a second call the message displayed looks like this Accepting Calls To end the active call and accept the second call Press C under UNMUT Press C under YES The first call is pl...

Page 72: ...active D Declining Calls Cover Open Cover Closed Ending the Active Call NOTE If you have an active call and another call waiting closing the phone cover ends both calls Press C under SWITCH to switch between calls Press C under NO If you subscribe to Voice Mail the call will be forwarded to your Voice Mail box Press on the top of your phone If you subscribe to Voice Mail the call will be forwarded...

Page 73: ...all on hold 1 From the Ready screen press q Press R to scroll to Settings and press C under SELECT 2 Press R to scroll to In Call Setup and press C under SELECT 3 Press R to scroll to Call Waiting and press C under CHANGE 4 Press R to scroll to Off and press C under SELECT Call Waiting is now disabled for the next call It will automatically reset to On when you end the call 1 Press q to access the...

Page 74: ...onversation While on an active call you can make a second call and combine the two calls To make a three way call 1 Enter the second phone number you want to call Or select the number from your Phonebook by pressing q and selecting Phonebook 2 Press s to place the second call Press C under SWITCH Press r The call on hold becomes active 1 Place or receive a phone call 2 While on the call press q to...

Page 75: ...reachable your phone is out of coverage or powered off NOTE For you to receive Voice Mail messages the All Calls option must be set to Off and the Detailed options must be set to your Voice Mail access number You can forward Line 1 and Line 2 independently NOTE Mulitple Line Service may not be offered by your Service Provider 5 Enter the second phone number you want to call and press s to place th...

Page 76: ... being forwarded H Line 1 is active calls from Line 2 are being forwarded I Line 1 is active calls from Line 1 and Line 2 are being forwarded J Line 2 is active calls from Line 1 are being forwarded K Line 2 is active calls from Line 2 are being forwarded L Line 2 is active calls from Line 1 and Line 2 are being forwarded 1 Press q then press R to scroll to Call Forward 2 Press C under SELECT 3 At...

Page 77: ...CH to select from numbers stored in your phone Press C under OK Or If you have used Call Forwarding before the call forwarding number you last used is displayed Press C under CHANGE to access the Forward screen To forward your calls to this number press C under OK To forward your calls to a different number press and hold C under DELETE to erase the displayed number Type the new number on your pho...

Page 78: ...set to Detailed with your Voice Mail access number 3 Press R to scroll to the To field and press C under CHANGE 4 Press S to scroll to Off and press C under SELECT 1 Press q then press R to scroll to Call Forward 2 Press C under SELECT The Call Forward screen displays with the Forward field set to Detailed 3 Press R to scroll to the If Busy field and press C under CHANGE 4 The call forwarding numb...

Page 79: ...esired However it is recommended that you leave Detailed set to the Voice Mail access number and use the All Calls setting if you wish to forward your calls to another number 8 Repeat step 3 through step 7 for the If No Answer field and the If Unreachable field 9 When finished press C under EXIT ...

Page 80: ...78 www motorola com iden ...

Page 81: ...m that Private ID Whether you dial the person s Private ID directly or use a number stored in your Phonebook or Recent Calls list you must have the individual s Private ID to use Private calls To learn how to store names and numbers see Phonebook on page 43 USER TIP To find out your own Private ID number see My Information on page 28 Making a Private Call from the Keypad Private Calls Page 79 Call...

Page 82: ...press q 2 Press R to scroll to Phonebook Press C under SELECT 3 From the Phonebook screen press S to scroll through the names until the desired name is highlighted 4 Press and hold the PTT button on the side of the phone Begin talking after the phone emits a chirping sound 5 Release the PTT button to listen 1 From the Ready screen press q 2 Press R to scroll to Recent Calls Press C under SELECT 3 ...

Page 83: ...r Private ID will appear on the display Placing a Call Alert from the Keypad Placing a Call Alert from the Phonebook 1 Wait for the caller to finish speaking 2 Press and hold the PTT button Begin talking after the phone emits a chirping sound 3 Release the PTT button to listen 1 Enter the Private ID of the person you want to call 2 Press C under ALERT The Ready to Alert screen displays 3 Press and...

Page 84: ...emits a chirp and displays the name or number of the caller You can answer queue or clear the call alert To answer a call alert press the PTT button To queue a call alert press C under QUEUE To clear a call alert Cover open press C under CLEAR or close phone cover Cover closed press NOTE Until you answer queue or clear the Call Alert you will not receive any additional phone Private or Group Calls...

Page 85: ... Call Alerts To sort your call alerts by the order they were received 1 From the Ready screen press q 2 Press R to scroll to Call Alert 3 Press C under SELECT The Alert Queue screen displays 1 From the Alert Queue screen press S to scroll to the desired call alert 2 Press q to access Call Alert Menu 3 Press R to scroll to View 4 Press C under SELECT 1 From the Alert Queue screen press q to access ...

Page 86: ...vate call 2 To send a call alert press C under ALERT and then press the PTT button Or To place a Private call press the PTT button The call alert will be removed from the queue 1 From the Alert Queue screen press S to scroll to the entry you want to delete 2 Press q to access Call Alert Menu 3 Press R to scroll to Delete 4 Press C under SELECT 5 When the confirmation screen appears press C under Y...

Page 87: ...o any of the Talkgroups in your Phonebook at any time However to receive calls from a Talkgroup you must first join that Talkgroup see Making Group Calls on page 86 Storing a Talkgroup 3 Press C to SELECT 4 When the confirmation screen appears press C under YES to delete the entry 1 From the Ready screen press q 2 Press R to scroll to Phonebook 3 Press C under SELECT 4 Press S to scroll to New Ent...

Page 88: ...all members of the Talkgroup Receiving a Group Call When you receive an incoming Group call your phone emits a chirp The Talkgroup number or Talkgroup name you assigned displays on the screen To respond to a Group call Joining a Talkgroup To receive Group calls from a Talkgroup you must first join the Talkgroup You may only belong to one Talkgroup at a time When you join a new Talkgroup you no lon...

Page 89: ... to call Or If the Talkgroup you want to join is on your Recent Call list go to the Recent Call screen and press R to scroll to the name of the Talkgroup you want to call 2 Press C under JOIN 1 From the Ready screen press q 2 Press R to scroll to Settings Press C under SELECT 3 Press R to scroll to Tkgrp Settings Press C under SELECT 4 With the Silent field highlighted press C under CHANGE 5 Press...

Page 90: ...88 www motorola com iden ...

Page 91: ...ge You must open the phone cover to access delete or save messages you can view and dismiss message alerts with the cover open or closed Message Alerts If you are not on a call when you receive a message your phone sounds an alert tone every 30 seconds until you dismiss the alert If you are on a call when you receive a message your phone may sounds an alert tone during the call or after you end th...

Page 92: ...motorola com iden Your phone screens display the message alert These message alert screens appear if the new message is the only message you have Message Type Cover Open Voice Mail f Text Messages i Net Alert ...

Page 93: ... must close the cover or choose to access the message or exit the new message screen For more information on accessing messages see Using Voice Mail on page 93 Using Text and Numeric Messaging on page 94 and Using Net Alert on page 96 Cover Closed To dismiss a message alert while you are not on a call To dismiss a message alert while you are on a call After you have dismissed a message alert you m...

Page 94: ...essages you have in each message service Voice Mail Voice Mail Text Msgs Text and Numeric Messages and Net Alert Net Mail To access any message service From the Ready screen press C under MESG 1 From the Ready screen press q 2 Press R to scroll to Messages 3 Press C under SELECT 1 From the Message Ctr screen press R to scroll to the message service you want to access 2 Press C under the display op...

Page 95: ...to a Message Later Press C under NO while your phone is ringing to transfer incoming calls directly to Voice Mail Press while your phone is ringing to transfer incoming calls directly to Voice Mail Press C under CALL to log into your Carrier s Voice Mail System Calling displays as you are connected to the network Press C under EXIT The y icon will appear on the Ready screen to remind you that you ...

Page 96: ... the call Store the message if you are outside of the coverage area and deliver it as soon as you are back in a coverage area Attempt continuous delivery of messages until successful for up to 7 days Refer to text and numeric messages as Text Messages Stamp the message with the time and date the message was left Store up to 16 messages at a time that will remain until you delete them NOTE Mail Wai...

Page 97: ... one screen use S to scroll through the rest of the message 3 Press C under SAVE to save the message Or Press C under DELETE to delete the message Press C under EXIT The icon will appear on the Ready screen to remind you that you have a stored message 1 From the Message Ctr screen see Message Center on page 92 press S to scroll down to Text Msgs The number of new messages and the total number of m...

Page 98: ...tored message You can view new or stored Net Alert messages at any time by access the Message Center For more information see Message Center on page 92 Using Your Phone as a Modem NOTE Some features may be network dependent or subscription only and may not be available in all areas Contact your service provider for more information You can use your i60c phone as a modem for data transfer from your...

Page 99: ...phone cover does not interrupt packet data transfers To use these services you must install the iDEN Wireless Data Services software available separately For more information on setting up your computer and your i60c phone for Packet and Circuit Data calls see the Wireless Data Services User s Guide and contact your carrier TTY Users You can use your phone and computer in TTY mode Your computer sc...

Page 100: ...98 www motorola com iden ...

Page 101: ...lease consult with your service provider for availability This document includes Message Center The Message Center enables you to access all messaging services through one screen To access the Message Center If MESG is one of your display options Message Center Page 99 Message Icons Page 101 Text Msg Setup Page 101 Text Message Inbox Page 102 Quick Notes Page 103 Text Message Outbox Page 104 Draft...

Page 102: ...ins messages which the user has composed but not sent Fax Mail Consult your Service Provider for availability NOTE The Message Center will not display the number of Quick Notes messages that are stored NOTE Drafts Folder will only appear at the Message Center if there is at least one draft message To access any message service 1 From the idle screen press q 2 Press R to scroll to Messages 3 Press ...

Page 103: ...con Description Message Sent and Confirmed Message Sent Attempted if this doesn t change to the Message Sent Confirmed icon resend the message again Message Forwarded Message not Received by Addressee Message Received by Addressee Message Locked Message Send Failed Message Re sent 1 From the Message Center screen press S to scroll to Text Inbox then press q to access the Msg Ctr Menu screen 2 In t...

Page 104: ...ry code the message will not be sent successfully The network will return an error message to the phone Enter the phone number for the Messaging Service If you do not know the number contact your Service Provider 5 After you have entered the phone number press C under OK 6 From the Text Msg Setup screen the Expire After field will highlighted NOTE The message will only be kept by the SMS Center fo...

Page 105: ...hat you can use to send messages or replies You can store up to 20 Quick Notes Each canned text can have a maximum of 30 characters Press C under READ to open the message or your text message inbox if there are multiple messages 1 From the Message Center screen press S to scroll to Text Inbox Press C under SELECT 2 In the Text Message Inbox Create Msg is highlighted Press R to scroll to message th...

Page 106: ...d messages before sending out new messages 1 From the Message Center screen press S to scroll to Quick Notes Press C under SELECT 2 In the Quick Notes screen New Quick Note is highlighted Press C under CREATE 3 Type the note that you want to store as a Quick Note Press C under STORE Or Press C under BROWSE to access the Quick Notes screen There is a list of pre installed notes Press R to scroll to...

Page 107: ...ne number entry as desired then press C under OK when finished The New Message screen returns with the Msg field highlighted 4 With the Msg field highlighted press C under CHNGE to access the Msg screen Type the message using the alphanumeric keypad See Using T9 Text Input on page 29 for information about entering text into this field Or Press C under BROWSE to access the Quick Notes screen Press ...

Page 108: ...ant to send The default is Text To assign a different message type With the Send As field highlighted press P to scroll to the desired message type Press q to access the New Msg Menu screen The New Msg Menu screen returns with the Send field highlighted 7 Press C under SELECT if you are ready to send the message Or Press R to scroll to Save as Draft then press C under SELECT The draft will be save...

Page 109: ...ears Press C under YES to send the message 2 The message will be sent 1 From the Text Msg Outbox screen press R to scroll the message that you would like to resend press q to go to the Outbox Menu screen 2 The Outbox Menu screen appears Press R to scroll to Re send Press C under SELECT 3 A confirmation screen appears Press C under YES to confirm The message will be sent 1 From the Text Msg Outbox ...

Page 110: ...efore sending out new messages Accessing the Drafts Folder 1 From the Text Msg Outbox screen highlight the message that you would like to delete press q to go to the Outbox Menu screen 2 The Outbox Menu screen appears with Delete highlighted Press R to scroll to Delete the message or scroll to Delete All if you want to delete all your messages Press C under SELECT NOTE Deleting all messages will o...

Page 111: ...privacy of the user 2 In the Drafts Folder screen Create Msg is highlighted Press C under CREATE 3 Follow step 3 through step 6 for Creating Text Messages on page 105 4 Press R to scroll to Save as Draft Press C under SELECT A confirmation screen will appear stating the message has been stored 5 Press s to return to the idle screen 1 From the Drafts Folder screen press R to scroll to the draft tha...

Page 112: ...ess C under SELECT 3 In the Inbox Memory Meter screen you will see how much memory is available 4 Press C under BACK to go back to the Message Center screen 1 From the Message Center screen press R to scroll to Text Outbox Press q to access the Msg Center Menu screen 2 Press S to scroll to Memory Meter Press C under SELECT 3 In the Outbox Drafts Meter screen you will see how much memory is availab...

Page 113: ...ing a New Memo Page 111 Viewing a Memo Page 111 Editing a Memo Page 112 Deleting a Memo Page 112 1 From the Ready screen press q 2 Press R to scroll to Memo 3 Press C under SELECT The Memo screen displays 4 Type your numeric memo using the phone s keypad 5 Press C under STORE 1 From the Ready screen press q 2 Press R to scroll to Memo 3 Press C under SELECT ...

Page 114: ... to Memo 3 Press C under SELECT 4 Type the new number You can delete a digit by pressing C under DELETE To all the digits press and hold C under DELETE 5 Press C under STORE 1 From the Ready screen press q 2 Press R to scroll to Memo 3 Press C under SELECT 4 Press and hold C under DELETE 5 Press C under STORE ...

Page 115: ...ll answering features chooses which phone line is used and sets your network ID In Call Setup sets call timer message notification and call waiting features Security sets security features including phone lock keypad lock and SIM PIN Initial Setup sets a variety of display features including the language displayed the size of the characters on the display screen screen contrast time and date forma...

Page 116: ...n Options Ring Vibe provides these main options Ringer Vol sets ring volume Keypad Vol sets volume of sounds associated with keypad actions Mail Vol sets volume of Text Message Voice Mail and Net Alert notifications Java Data Vol sets volume of sounds made by Java applications Headset choosing the HdsetOnly option prevents sound from being emitted from the phone s speaker when the headset is being...

Page 117: ...otification for calls on Line 2 Pvt Grp sets type of notification for Private and Group calls Call Alert sets the ring style and type of notification for call alerts Text Msgs sets type of notification for Text Messages Voice Mail sets type of notification for Voice Mail messages Net Alert sets type of notification for Net Alert messages To set VibeAll to Off or On The following icons appear on yo...

Page 118: ...pe Ring Styles When you set a ring style you can choose from many pre set ring styles Vibrate Then Ring phone is set to vibrate and then ring when you receive phone calls Silent phone is set not to ring 1 From the Ring Vibrate screen ensure that VibeAll is set to Off Then press S to scroll to any of the features on the Ring Vibrate screen after VibeAll 2 Press C under SELECT 3 With the Type field ...

Page 119: ...when turned on enables you to answer calls by pressing any key on the alphanumeric keypad Phone Only when turned on prevents your phone from making or receiving Private calls or Group calls Network ID enables you to set the phone s network IDs and their roaming options In Call Setup In Call Setup sets the in call timer message notification and call waiting features The In Call Timer option turns t...

Page 120: ...e Lock sets an optional code that locks your phone Keypad Lock displays instructions for locking and unlocking your phone s keypad SIM PIN enables and disables your phone s SIM PIN requirement New Passwords enables you to change your phone s security code phone unlock code and SIM PIN Master Reset allows your service provider to reset your service in the event of a security or provisioning problem...

Page 121: ...Clear and Feature Reset features If you want to use any of these features contact your service provider for your default Unlock code Security Code this code is used to access the Master Reset feature under the direction of your service provider It can also be used to override your Unlock code under the direction of your service provider SIM PIN this code is used to access the information on your S...

Page 122: ...ts Use only under the direction of your service provider Baud Rate sets the baud rate at which your phone communicates when connected to a laptop computer PC or similar device TTY Setup sets TTY options By default your phone is set to function with a TTY device TTY Baud Rate sets the baud rate at which your phone communicates when connected to a TTY device Alert Timeout controls the amount of time...

Page 123: ...creen with Time Date Format highlighted press C under SELECT to access the Time Date Format screen 2 To change the time format With Time Format highlighted press C under CHANGE to access the Time Format screen Press S to highlight the time format you want Press C under SELECT 3 To change the date format Press S to highlight Date Format and press C under CHANGE to access the Date Format screen Pres...

Page 124: ...ng Photo Sensor To conserve battery power the photosensor will disable the backlight when you are in good lighting conditions To force the backlight to come on every time a key is pressed you can turn the photosensor off NOTE Setting the Backlight to come on continuously while the Photosensor is turned on will drain your battery power 1 From the Initial Setup screen press R to scroll to Backlight ...

Page 125: ...sts in either of two ways Up Down when you reach the bottom or top of a list or menu scrolling stops until you scroll in the other direction Wrap Around when you reach the bottom or top of a list or menu scrolling wraps around and continues at the other end of the lists of menu You can set the scrolling style from the Initial Setup screen using the Scroll option Setting Flip Activation When Flip A...

Page 126: ...s English To change the display language With the cover closed press t on the top of your phone if you have speakerphone on your phone Or Open the cover and press s or any key on the keypad Or Open the cover and press C under YES Press on the top of your phone Or Press r on the keypad Or Close the cover 1 From the Initial Setup screen press R to scroll to Language 2 Press C under CHANGE 3 Press R ...

Page 127: ... provider TTY Setup enables you to set your options for using your phone with a teletypewriter TTY device By default your phone is set to function with a TTY device in TTY mode Your phone supports the following TTY modes TTY for calls in which you type and read text on your TTY device VCO Voice Carry Over for calls in which you speak into your phone and read text replies on your TTY device HCO Hea...

Page 128: ... US set your TTY baud rate to 50 0 To change the TTY baud rate Alert Timeout Alert timeout controls the amount of time the Call Alert tone sounds The display will continue to show the alert information even though the Call Alert tone has stopped You can set your phone s alert timeout rules from the Settings Initial Setup screen Scroll to the Alert Timeout option and then choose the desired interva...

Page 129: ...the recent calls timeout Voice Volume Voice Volume sets the volume of the sound coming from your phone s earpiece or speaker 1 From the Initial Setup screen press R to scroll to Return to Home 2 Press C under CHANGE 3 Press S to scroll to the desired display option 4 Press C under SELECT 1 From the Voice Volume screen highlight Earpiece Vol to set the earpiece volume or press R to scroll to Speake...

Page 130: ...s Tkgrp Settings enables you to set certain Talkgroup options See Group Calls on page 85 for more information Service Status The Service Status screen shows the status of your phone s services This screen is for information only no options can be set ...

Page 131: ...roximate time to fully charge a battery using a Motorola iDEN Approved Lithium Ion battery charger Check the kit number on your battery and charger to determine the appropriate charging time Table 1 Battery Charging Times NOTE Charging times are based on a fully discharged battery Batteries Page 129 Travel Chargers Page 130 Carry Holster Page 132 Data Accessories Page 133 MOTOROLA BATTERIES Chargi...

Page 132: ...ged If long term storage is required store at half capacity The Motorola iDEN Approved Lithium Ion chargers will provide optimum performance Other chargers may not fully charge your iDEN Lithium Ion battery or may yield a reduced number of lifetime charge cycles When batteries are not in use always store them in the plastic safety tray Travel Chargers Using one of the Travel Chargers listed below ...

Page 133: ...its keypad facing up insert the accessory connector with the Motorola logo facing you into the bottom of the phone until you hear a click 2 If you have either the Mid Rate Multi Voltage Travel Charger or the Rapid Multi Voltage Travel Charger flip open the prongs and plug the Travel Charger transformer into an AC wall outlet Or If you have the Mid Rate Economy Travel Charger plug the Travel Charge...

Page 134: ...of the phone facing the Carry Holster slide the bottom portion of the phone into the bottom of the Carry Holster 2 Press the upper portion of the phone into the holster until the top portion snaps into the Carry Holster Make sure the back of the phone is facing away from your body when you are carrying the phone in the Carry Holster Carry Holster i60c phone W A R N I N G ...

Page 135: ...B cable has been connected to it and will utilize the appropriate protocol accordingly No other action is required by the user in order to select between USB or RS232 serial communications iDEN PC applications will support USB drivers for the following operating systems only Windows 98 Second Edition SE Windows 2000 PC Applications Supported RSS Tethered Circuit Data iDEN CompanionPro SDK Windows ...

Page 136: ...the same applications as the USB cable see Universal Serial Bus USB Cable on page 133 The cable also features a charging port Any applicable iDEN phone charger may be used to charge the phone simultaneously 1 While holding the phone with its keypad facing up insert the accessory connector with the Motorola logo facing you into the bottom of the phone until you hear a click 2 Insert the data plug d...

Page 137: ...t Adapter Cable 1 While holding the phone with its keypad facing up insert the accessory connector with the Motorola logo facing you into the bottom of the phone until you hear a click 2 Insert the data plug directly into your laptop or desktop computer or one of the many other data compatible iDEN accessories 1 Insert the flat end of the Dual Port Adapter Cable cord into the bottom connector of t...

Page 138: ...sed with your i60c phone 2 Insert the round end of the RS232 Data Cable into the receptacle on the Dual Port Adapter Cable labeled Data 3 Insert the Hands Free Car Kit into the receptacle on the Dual Port Adapter Cable labeled Car Kit Item Number Description NTN6546 Palm IIITM VIITM Cable Adapter NKN6547 Palm VTM Cable Adapter NTN8993 Generic Pocket Digital Assistant PDA Male Female Serial Adapter...

Page 139: ...you into the bottom of the phone until you hear a click 2 Connect the opposite end of the data cable to the PDA converter 3 Connect other end of PDA converter to the mating connector of the PDA device 4 If you are using the NTN8993 PDA adapter connect the other end of the adapter to the PDA s supplied data synchronization cradle and place the PDA into the cradle ...

Page 140: ...138 www motorola com iden ...

Page 141: ... is not valid User Not Available The phone that you called is either busy out of coverage or turned off Please try again later User Not Authorized The person that you called has not purchased this service Please Try Later This service is temporarily not available Please try again later User Busy in Private The phone that you called is busy in a Private call User Busy in Data The phone that you cal...

Page 142: ...r phone off and contact Customer Care PIN Blocked Call Your Provider The incorrect PIN was entered three consecutive times You will be unable to place or receive calls on your i60c phone Call your service provider to have them obtain the PIN Unblocking Key PUK code Insert SIM Your SIM Card is not being detected Please check to ensure that you have inserted the SIM Card Check SIM Card Please check ...

Page 143: ... Engineers IEEE C95 1 1992 Institute of Electrical and Electronics Engineers IEEE C95 1 1999 Edition International Commission on Non Ionizing Radiation Protection ICNIRP 1998 Ministry of Health Canada Safety Code 6 Limits of Human Exposure to Radiofrequency Electromagnetic Fields in the Frequency Range from 3 kHz to 300 GHz 1999 Australian Communications Authority Radio communications Electromagne...

Page 144: ...may exceed FCC RF exposure guidelines If you do not use a Motorola approved body worn accessory and are not using the radio product in the intended use positions along side the head in the phone mode or in front of the face in the two way radio mode then ensure the antenna and the radio product are kept the following minimum distances from the body when transmitting Phone or Two way radio mode one...

Page 145: ...the power required to reach the network In general the closer you are to a wireless base station antenna the lower the power output Before a phone model is available for sale to the public it must be tested and certified to the FCC that is does not exceed the limit established by the government adopted requirement for safe exposure The tests are performed in positions and locations e g at the ear ...

Page 146: ...a minimum separation of 6 inches 15 cm be maintained between a handheld wireless radio product and a pacemaker These recommendations are consistent with those of the U S Food and Drug Administration Persons with pacemakers should ALWAYS keep the radio product more than 6 inches 15 cm from their pacemaker when the radio product is turned ON Not carry the radio product in a breast pocket Use the ear...

Page 147: ...dio products in the area where you drive Always obey them When using the radio product while driving please Give full attention to driving and to the road Use hands free operation if available Pull off the road and park before making or answering a call if driving conditions so require ...

Page 148: ...UL approved Do not remove install or charge batteries in such areas Sparks in a potentially explosive atmosphere can cause an explosion or fire resulting in bodily injury or even death NOTE The areas with potentially explosive atmospheres referred to above include fueling areas such as below decks on boats fuel or chemical transfer or storage facilities areas where the air contains chemicals or pa...

Page 149: ...SIM card if so equipped from radio product 3 Shake excess liquid from radio product 4 Place the radio product and battery in an area that is at room temperature and has good air flow Operational Cautions Antennas Do not use any portable radio product that has a damaged antenna If a damaged antenna comes into contact with your skin a minor burn can result Batteries All batteries can cause property ...

Page 150: ...lowing the steps listed above contact your dealer for servicing information Clean the external surfaces of the radio product with a damp cloth using a mild solution of dishwashing detergent and water Some household cleaners may contain chemicals that could seriously damage the radio product Avoid the use of any petroleum based solvent cleaners Also avoid applying liquids directly on the radio prod...

Page 151: ...plug it from the power outlet immediately and discontinue its use Use of a non recommended attachment to a battery charger may result in a risk of fire electric shock or injury to persons Make sure the battery charger power cord is located so that it will not be stepped on tripped over or subjected to damage or stress An extension cord should not be used with any battery charger unless absolutely ...

Page 152: ... Maximum ambient temperature around the power supply or transformer of any battery charger should not exceed 40 C 104 F The output power from the power supply or transformer must not exceed the rating given on the Desktop Dual Pocket Charger The disconnection from the line voltage is made by unplugging the power supply from the AC receptacle To reduce risk of electric shock unplug any battery char...

Page 153: ...ts replace it with a new or reconditioned Product or refund the purchase price of the Product during the warranty period provided it is returned in accordance with the terms of this warranty Replaced parts or boards are warranted for the balance of the original applicable warranty period All replaced parts of Product shall become the property of MOTOROLA This express limited warranty is extended b...

Page 154: ...ing the Product Repair replacement or refund of the purchase price at MOTOROLA S options is the exclusive remedy THIS WARRANTY IS GIVEN IN LIEU OF ALL OTHER EXPRESS WARRANTIES IMPLIED WARRANTIES INLCUDING WITHOUT LIMITATION IMPLIED WARRANTIES OF MERCHANTABILITY AND FITNESS FOR A PARTICULAR PURPOSE ARE LIMITED TO THE DURATION OF THIS LIMITED WARRANTY IN NO EVENT SHALL MOTOROLA BE LIABLE FOR DAMAGES...

Page 155: ...o antennas unless caused directly by defects in material workmanship e A Product subjected to unauthorized Product modifications disassemblies or repairs including without limitation the audition to the Product of non MOTOROLA supplied equipment which adversely affect performance of the Product or interfere with MOTOROLA S normal warranty inspection and testing of the Product to verify any warrant...

Page 156: ... and accept its return The depreciation will be an equal amount per year over the lifetime of the Product or parts as established by MOTOROLA MOTOROLA will have no liability with respect to any claim of patent infringement which is based upon the combination of the Product or parts furnished hereunder with software apparatus or devices not furnished by MOTOROLA nor will MOTOROLA have any liability...

Page 157: ...s replace it with a new or reconditioned Product or refund the purchase price of the Product during the warranty period provided it is returned in accordance with the terms of this warranty Replaced parts or boards are warranted for the balance of the original applicable warranty period All replaced parts of Product shall become the property of MOTOROLA This express limited warranty is extended by...

Page 158: ...NG WITHOUT LIMITATION IMPLIED WARRANTIES OF MERCHANTABILITY AND FITNESS FOR A PARTICULAR PURPOSE ARE LIMITED TO THE DURATION OF THIS LIMITED WARRANTY TO THE FULL EXTENT SUCH MAY BE DISCLAIMED BY LAW IN NO EVENT SHALL MOTOROLA BE LIABLE FOR DAMAGES IN EXCESS OF THE PURCHASE PRICE OF THE PRODUCT FOR ANY LOSS OF USE LOSS OF TIME INCONVENIENCE COMMERCIAL LOSS LOST PROFITS OR SAVINGS OR OTHER INCIDENTA...

Page 159: ...nce with MOTOROLA S published specifications or the local type acceptance labeling in effect for the Product at the time the Product was initially distributed from MOTOROLA j Scratches or other cosmetic damage to Product surfaces that does not effect the operation of the Product k Normal and customary wear and tear l Exclusion for defects or damage arising from use of the products in connection wi...

Page 160: ...ich is attached to or sued in connection with the Product or any parts thereof In no event shall MOTOROLA be liable for any incidental special or consequential damages arising from any claim of patent infringement or alleged infringement Laws in the United States and other countries preserve for MOTOROLA certain exclusive rights for copyrighted MOTOROLA software such as the exclusive rights to rep...

Page 161: ...oration Netscape Navigator is a registered trademark of Netscape Communications Corporation T9 is a trademark owned by Tegic Communications T9 Text Input Patent and Trademark Information This product is covered by U S Pat 5 818 437 U S Pat 5 953 541 U S Pat 6 011 554 and other patents pending Java and all other Java based marks are trademarks or registered trademarks of Sun Microsystems Inc in the...

Page 162: ...160 www motorola com iden ...

Page 163: ...om Phonebook 81 receiving 82 Call Forwarding 73 turning off 75 turning on 74 Call Hold 71 Call Timers 66 Call Waiting 69 118 accepting calls 69 declining calls 70 ending active calls 70 switching between calls 70 turning off 71 Carry Holster 132 Charge strength 15 Circuit data 97 Circuit data number 28 CompanionPro 44 Connection status 28 Contrast 123 Customizing phone 113 D Data cable 96 134 136 ...

Page 164: ...ng 111 deleting 112 editing 112 viewing 111 Memory mobile originated text messaging 109 Menu icon 39 Menus 39 40 51 main menu 42 Settings 113 Message Center 92 99 Messages 89 alerts 89 also see mobile originated text messaging text and numeric 94 voice mail 93 Messages Net Alert receiving 96 Messages receiving 89 Messages text and numeric viewing 95 Missed calls 66 Mobile originated text messaging...

Page 165: ...etup 117 Phonebook 43 capacity 48 CompanionPro 44 making call alerts 81 making calls 58 Private calls 80 storing Recent Calls 65 with non i60c phones 44 with other i60c phones 43 Phonebook entries 46 adding 48 deleting 55 editing 54 sorting 47 viewing 46 Plus dialing 56 Power button 15 Powering phone on or off 15 Private calls 79 from Phonebook 80 from Recent Calls list 80 making 79 receiving 80 P...

Page 166: ...tatus light 28 123 Status messages 139 Status of connection 28 Symbols mode text entry 34 T T9 Text Input 29 also see Text entry Talkgroups 85 joining 86 naming 85 Text and numeric messages 94 Text display area 39 Text entry Alpha mode 30 Numeric mode 33 Symbols mode 34 Word mode 30 Three Way Calling 72 Time and date format 120 Trademark information 159 Travel Charger 130 TTY devices 97 making cal...

Reviews: