background image

EARHOOKS AND YOUR 

HEADSET

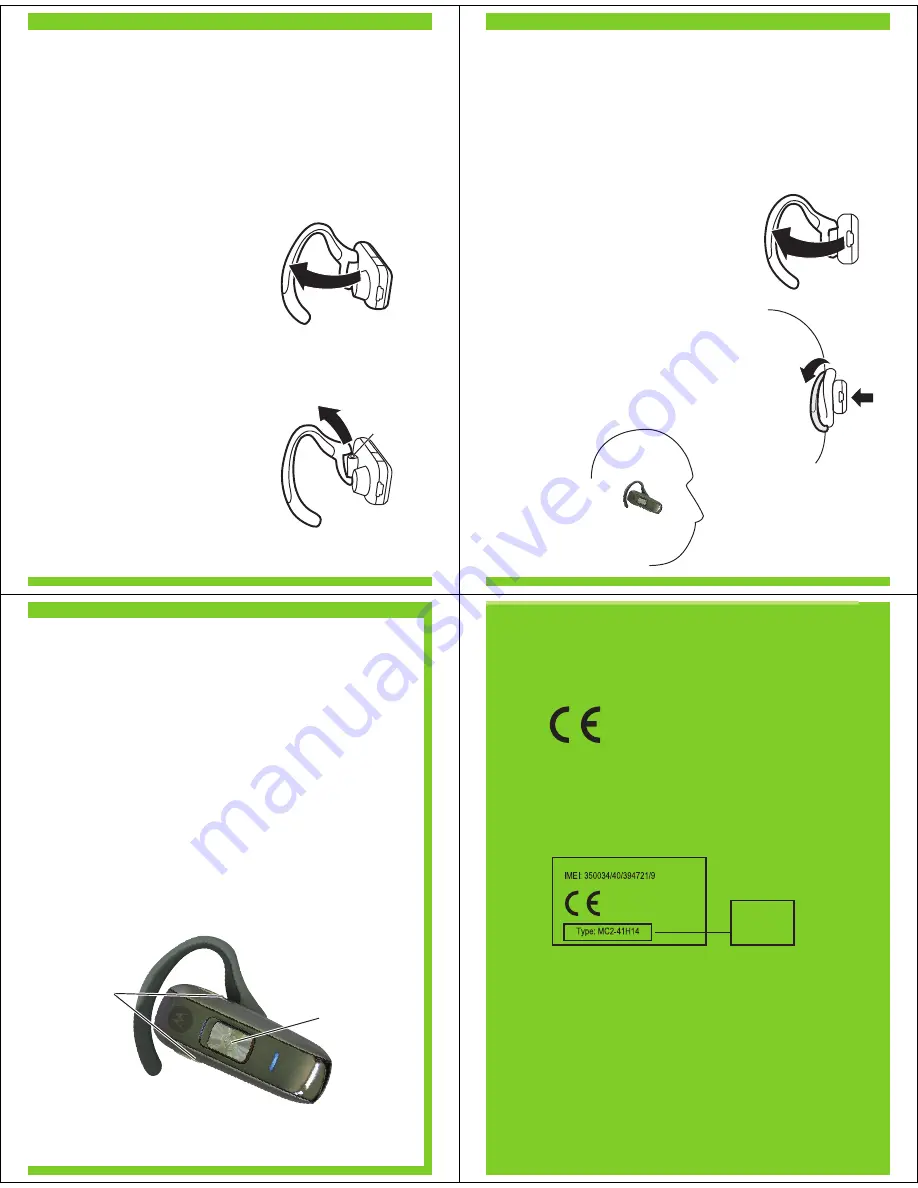
Your H550 headset is supplied with multiple 
earhooks. The earhook is attached onto a hinge pin, 
and is placed onto your ear when using your 
headset. To install an earhook on your headset: 

Open the attached 
earhook 90 degrees from 
the headset.

Gently lift and pull the
top of the earhook up
and off the upper hinge
pin. Then, pull it away to 
remove it.

Position the headset for 
right or left ear use (right 
ear use is displayed).

Hook the bottom of the 
earhook onto the lower 
hinge pin, then lift and pull 
the top of the earhook 
over the upper hinge pin.

1

2

3

4

2

 Pull Earhook Up

Hinge Pin

1

 Open Earhook

1

2

3

WEARING THE 

HEADSET

Once you have attached your desired 
earhook, follow these steps to wear your 
headset on your ear:

1

2

3

Open the attached 
earhook 45 degrees from 
the headset.

Loop the earhook over 
your ear.

Press earhook to your ear.

When worn, your headset 
will look like this on your 
head:

CHANGING VOLUME 

BUTTON ORIENTATION

You can also change the orientation of the 
volume buttons on your headset. 

Turn the headset power off.

Press and hold the Volume button you 
want to assign as the "volume up" button 
and slide the switch toward the 
microphone. The indicator light is either 
steadily lit or flashing in blue. 

1

2

Slide
Switch

Volume

Buttons

• The essential requirements and
  other relevant provisions of Directive
  1999/5/EC.

• All other relevant EU Directives.

European Union Directives 

Conformance Statement

Product

Approval

Number

The above gives an example of a typical Product 
Approval Number.

You can view your product’s Declaration of Conformity 
(DoC) to Directive 1999/5/EC (to R&TTE Directive) at 
www.motorola.com/rtte. To find your DoC, enter the 
product Approval Number from your product’s label in 
the “Search” bar on the web site.

Hereby, Motorola declares that this 
product is in compliance with:

Summary of Contents for H550

Page 1: ...ng It may take up to 1 minute for the indicator light to turn on When the headset s battery is fully charged about 2 hours the indicator light turns off Disconnect the charger 1 2 Note Headset is not functional while charging Note For optimal performance make sure that the headset is off while charging 3 2 START BLUETOOTH FEATURE Your Phone Press Menu Settings Connection Bluetooth Link Setup Scrol...

Page 2: ...ng impaired Guide Number 6809504A24 B 3 PAIR CONTINUED Your Phone Step B SETYOUR PHONETO LOOK FOR YOUR HEADSET 3 4 5 1 2 For most Motorola phones On your Motorola phone press Menu Settings Connection Bluetooth Link Handsfree Look for Devices The phone lists Bluetooth devices it finds Select Motorola H550 Select OK or Yes to pair your headset with your phone Enter the passkey 0000 Select OK When yo...

Page 3: ...your headset is on lit in blue and steady when your phone is searching for devices see step 3 My headset worked before but now it s not working Make sure your phone is on and the Bluetooth feature is turned on in your phone see step 2 If the Bluetooth feature was turned off or was turned on only temporarily you may need to restart the Bluetooth feature see step 2 and pair your phone and headset ag...

Page 4: ...he earhook over your ear Press earhook to your ear When worn your headset will look like this on your head CHANGINGVOLUME BUTTON ORIENTATION You can also change the orientation of the volume buttons on your headset Turn the headset power off Press and hold the Volume button you want to assign as the volume up button and slide the switch toward the microphone The indicator light is either steadily ...

Page 5: ...set on Note Some features are phone network dependent INDICATOR LIGHTS With the Charger Plugged In Headset Indicator Headset Status Steady red Charging Off Charging complete With No Charger Plugged In Headset Indicator Headset Status Off Power off Steady purple Powering up Steady blue Pairing connection mode 10 rapid purple flashes Connection successful Slow blue flash Standby not on call Quick bl...

Reviews: