background image

Using the phone

17

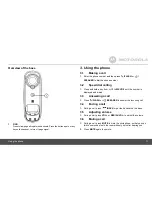
NOTE

If pulse mode is selected, press 

TONE/*

 to switch from pulse to tone dialing 

temporarily when dialing out. After the call is ended, the dial mode will 
change back to pulse.

3.16

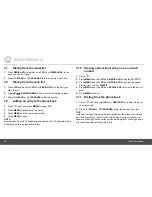
Setting the flash time

The default flash time is 

600MS

. It is unlikely that you should need to change 

this setting unless advised to do so.

1.

Press 

MENU

 and then 

VOL+ 

or

 REDIAL/VOL-

 to select 

SETUP BS

.

2.

Press 

MENU

 and then 

VOL+ 

or

 REDIAL/VOL-

 to select 

FLASH TIME

.

3.

Press 

MENU

 and then 

VOL+ 

or

 REDIAL/VOL-

 to the flash time you 

want. (8 options are available: 

90

100

110

250

300

400

600

 and 

700MS

)

4.

Press 

MENU

 to save.

3.17

Setting the area code

1.

Press 

MENU

 and then 

VOL+ 

or

 REDIAL/VOL-

 to select 

SETUP BS

.

2.

Press 

MENU

 and then 

VOL+ 

or

 REDIAL/VOL-

 to select 

AREA CODE

.

3.

Press 

MENU

 and enter the area code.

4.

Press 

MENU

 to save.

3.18

Registration

Up to 5 handsets can be registered to one base. The original handset is 
pre-registered to use. Additional handsets must be registered to the base 
before you can use them.
To register an additional handset,

1.

Press 

MENU

 and then 

VOL+

 or 

REDIAL/VOL-

 to select 

SETUP HS

.

2.

Press 

MENU

 and then 

VOL+

 or 

REDIAL/VOL-

 to select 

REGISTRATION

.

3.

Press 

MENU

 and then 

VOL+

 or 

REDIAL/VOL-

 to select 

YES

 or 

NO

.

4.

Select 

YES

 and press 

MENU

 to enter the registration procedure as 

below:

1.

 Press and hold 

FIND

 for 4 seconds on base, and then release.

2.

 Place the unregistered cordless handset on the charger.

3.

 A confirmation tone is generated if registration is successful. 

HANDSET X

 is displayed where 

X

 denotes the number of handsets and 

the phone goes back to idle.

To register an originally unregistered handset, follow steps 1 through 3 
above.

3.19

To reset all settings

1.

Press 

MENU

 and then 

VOL+

 or 

REDIAL/VOL-

 to select 

RESET 

SETTINGS

.

2.

Press 

MENU

 and then 

VOL+

 or 

REDIAL/VOL-

 to select 

ALL SETTINGS

.

3.

Press 

MENU

 to select 

YES

. Then all the personalized settings will be 

reset to default.

NOTE

All of your phonebook entries, calls list and redial list will remain 
unchanged.

3.20

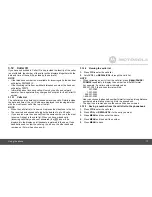
Paging/Find handset

Press 

FIND

 on the base. All handsets registered to the base will ring.

To stop the paging, press 

FIND

 again, or press any key on the handset, or 

place the handset on the base.

Summary of Contents for H101

Page 1: ...User s Guide H101 H102 H103 H104 H105 DECT 6 0 Digital Cordless Phone Warning Use only the adapter and telephone line cord provided in the box ...

Page 2: ...e arrangements should be made if emergency telephone call is necessary Welcome to your new Motorola Phone Please retain your original dated sales receipt for your records For warranty service of your Motorola product you will need to provide a copy of your dated sales receipt to confirm warranty status Registration is not required for warranty coverage For product related questions please call US ...

Page 3: ... Battery door Power adapter Telephone line cord User s Guide Quick Start Guide In multihandset packs you will find one or more additional handsets chargers with power adapter units additional rechargeable battery packs and battery doors This User s Guide provides you with all the information you need to get the most from your phone Before you make your first call you will need to set up your phone...

Page 4: ...toring a phonebook entry as a one touch number 12 3 11 Dialing from the phonebook 12 3 12 Caller ID 13 3 12 1 Calls List 13 3 12 2 Viewing the calls list 13 3 12 3 Saving a number from the calls list to the phonebook 13 3 12 4 Deleting a calls list entry 14 3 12 5 Deleting entire calls list 14 3 13 Personal Settings 15 3 14 Intercom 16 3 14 1 Calling another handset 16 3 14 2 Transferring an exter...

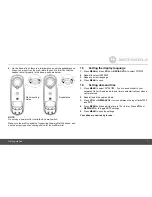
Page 5: ...ing within the range area Any obstruction between the base and handset will also reduce the range significantly SIGNAL STRENGTH When out of range of the base the screen shows SEARCHING If you are on a call the line will disconnect Move back within in range of the base The handset will automatically re connect to the base Setting up IMPORTANT The base must be plugged into an electrical outlet at al...

Page 6: ...ill indicate that the handset is fully charged IMPORTANT Use only the rechargeable battery pack provided with the product Note the alert tone to ensure the handset is charging in the base or the charger successfully Wall mounting on base This phone can be mounted on any standard wall plate 1 Plug the power adapter with smaller pin plug telephone line cord into the base 2 Plug the other end of the ...

Page 7: ...anguage 1 Press MENU and then VOL or REDIAL VOL to select SETUP HS 2 Repeat to select LANGUAGE 3 Repeat to select language 4 Press MENU to save 1 4 Setting date and time 1 Press MENU to select DATE TIME If you re a subscriber to your network s Caller ID service date and time is automatically set when a call is received 2 Repeat to edit the year and date 3 Press VOL or REDIAL VOL to move between th...

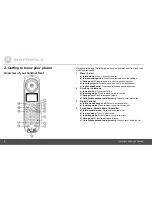
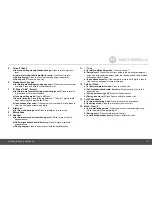
Page 8: ... phonebook editing mode 2 Scroll up Volume up a In menu mode Press to scroll up b In editing mode Press to move cursor to the left c During a call Press to increase volume d Calls list phonebook redial list entry Press to scroll up the list 3 Right Calls list a In idle mode during a call Press to access calls list b In editing mode Press to move the cursor to the right 4 Scroll down Volume down Re...

Page 9: ...g a call Press to turn on off the speakerphone b Call List phonebook redial list entry Press to make a call with speakerphone c During ringing Press to answer a call with the speakerphone 11 Tone a In idle pre dial editing mode Press to insert a b During a call Press to switch from pulse to tone dialing temporarily if pulse mode was selected before After the call has ended the dial mode will chang...

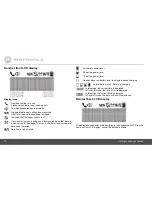
Page 10: ... The icon is off after all new voice mails have been reviewed On when a call is muted Full battery power level 2 3 battery power level 1 3 battery power level Flashes when low battery level is detected needs charging Animation in motion Battery is charging In idle mode the current time is displayed In Caller ID mode the time of call is displayed In idle mode the current date is displayed In Caller...

Page 11: ...calling 1 Press and hold a key from 1 to WXYZ 9 until the number is displayed and dialed 3 3 Answering a call 1 Press FLASH or SPEAKER to answer the incoming call 3 4 Ending a call 1 During a call press BACK or put the handset on the base 3 5 Adjusting volume 1 During a call press VOL or REDIAL VOL to adjust the volume 3 6 Muting a call 1 During a call press MUTE to mute the microphone so that you...

Page 12: ...long and names up to 16 characters long Entries are stored in alphabetical order 3 10 Storing a phonebook entry as a one touch number 1 Press 2 Press MENU and then VOL or REDIAL VOL to select SPEED DIAL 3 Press MENU and then VOL or REDIAL VOL to select the speed dial key from 1 to WXYZ 9 4 Press MENU and then VOL or REDIAL VOL to scroll to the entry to want 5 Press MENU to save 3 11 Dialing from t...

Page 13: ...ceive more than one call from the same number only the most recent call is kept in the calls list When you have missed calls incoming calls that you haven t answered the icon will be displayed in the display on all handsets registered to the base If one handset is used to view the calls log the icon on the other handsets remains on For multi pack use only 3 12 2 Viewing the calls list 1 Press CID ...

Page 14: ... entry you want 3 Press MUTE to delete the entry 3 12 5 Deleting entire calls list 1 Press CID to enter the calls list 2 Press and hold MUTE DELETE ALL CALL LOG ENTRIES is displayed 3 Press MENU to confirm All entries will be deleted NOTE You need to review the call list before you delete any entry or all entries from the call list ...

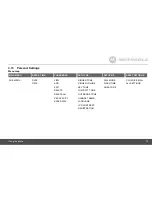
Page 15: ...OK SETUP HS SETUP BS RESET SETTINGS SUB MENU DATE TIME VIEW ADD EDIT DELETE DELETE ALL PB CAPACITY SPEED DIAL RINGER TONE RINGER VOLUME KEY TONE LOW BATT TONE OUT RANGE TONE HANDSET NAME LANGUAGE LCD CONTRAST REGISTRATION DIAL MODE FLASH TIME AREA CODE CLR VOICE MAIL ALL SETTINGS ...

Page 16: ... an external call to another handset 1 During an external home call press MENU or INT Your caller is put on hold 2 Press VOL or REDIAL VOL to select the handset you want to call 3 Press MENU to call the handset If there are only two handsets registered press INT will call the other handset directly 4 When the other handset answers by pressing FLASH or SPEAKER press BACK to transfer the call If the...

Page 17: ...ou can use them To register an additional handset 1 Press MENU and then VOL or REDIAL VOL to select SETUP HS 2 Press MENU and then VOL or REDIAL VOL to select REGISTRATION 3 Press MENU and then VOL or REDIAL VOL to select YES or NO 4 Select YES and press MENU to enter the registration procedure as below 1 Press and hold FIND for 4 seconds on base and then release 2 Place the unregistered cordless ...

Page 18: ... telephone lines you must install a DSL filter between the telephone base and the telephone wall jack The filter will prevent noise and caller ID problems caused by DSL interference Please contact your DSL service provider for more information about DSL filters A phonebook entry cannot be stored The phonebook is full Delete an entry to free some memory No display Try recharging or replacing the re...

Page 19: ... required contact the customer service helpline found in this User s Guide 8 Do not overload wall outlets and extension cords 9 Avoid using during an electrical storm Use a surge protector to protect the equipment 10 Do not use this phone to report a gas leak especially if you are in the vicinity of the gas line CAUTION To reduce the risk of fire use only No 26 AWG or larger UL Listed or CSA Certi...

Page 20: ...authorized replacement recommended by the manufacturer Keep battery packs out of the reach of children Remove battery packs if storing over 30 days Do not dispose of battery packs in fire which could result in explosion The rechargeable battery packs that power this product must be disposed of properly and may need to be recycled Refer to the battery label for battery type Contact your local recyc...

Page 21: ...OR CONDITIONS EXPRESS OF IMPLIED IN NO EVENT SHALL MOTOROLA OR BINATONE ELECTRONICS INTERNATIONAL LTD BE LIABLE WHETHER UNDER THIS LIMITED WARRANTY OR IN CONTRACT OR TORT INCLUDING NEGLIGENCE OR STRICT PRODUCT LIABILITY OR OTHERWISE FOR DAMAGES OR CLAIMS IN EXCESS OF THE PURCHASE PRICE OF THE PRODUCT OR ACCESSORY OR FOR ANY INDIRECT INCIDENTAL SPECIAL OR CONSEQUENTIAL DAMAGES OF ANY KIND OR LOSS O...

Page 22: ...d Products and Accessories Defects or damage that result from the use of Non Motorola branded or certified Products or Accessories or other peripheral equipment are excluded from coverage Unauthorized Service or Modification Defects or damages resulting from service testing adjustment installation maintenance alteration or modification in any way by someone other than Motorola Binatone Electronics...

Page 23: ...nd used in accordance with the instructions may cause harmful interference to radio communications However there is no guarantee that interference will not occur in a particular installation If this equipment does cause harmful interference to radio or television reception which can be determined by turning the equipment off and on the user is encouraged to try to correct the interference by one o...

Page 24: ...nected to your telephone line ensure the connection of this equipment does not disable your alarm equipment If you have questions about what will disable alarm equipment consult your telephone company or a qualified installer If this equipment is malfunctioning it must be unplugged from the modular jack until the problem has been corrected Repairs to this telephone equipment can only be made by th...

Page 25: ...REN is an indication of the maximum number of devices allowed to be connected to a telephone interface The termination on an interface may consist of any combination of devices subject only to the requirement that the sum of the RENs of all the devices does not exceed five This product meets the applicable Industry Canada technical specifications Technical Specifications RF frequency band 1921 536...

Page 26: ...and other Motorola trademarks and trade dress are owned by Motorola Inc and are used under license from Motorola Inc MOTOROLA and the Stylized M Logo are registered in the US Patent Trademark Office All other product or service names are the property of their respective owners Motorola Inc 2009 All rights reserved Version 1 0 Printed in China ...

Reviews: