background image

Using the Phone


88

Phone keypad. 


2

.


From the Phone keypad, tap 

Call History


3

.


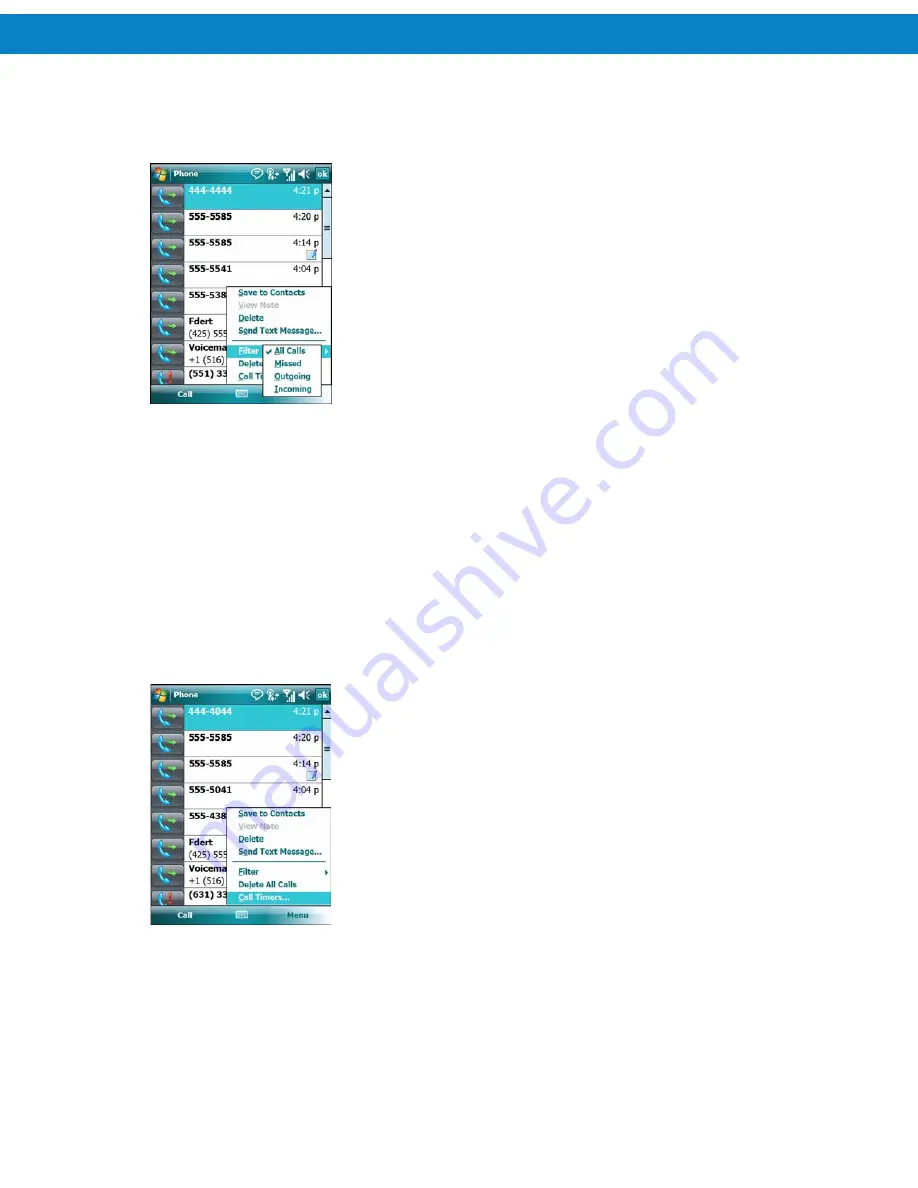
Tap 

Menu 

Filter 

to show the menu. 


Figure 6-22     

Call History - All Calls/Show Menu


4

.


Select a view type from the menu to display only missed calls, outgoing calls, incoming calls, or 
calls listed alphabetically by caller name. 


5

.


Tap 

ok 

to exit the 

Call History 

window. 


Resetting the Recent Calls Counter 


1

.


Tap 

Start 

Phone 

or press the green phone key on the FR68 Series’ keypad to display the 

Phone keypad. 


2

.


From the Phone keypad, tap 

Call History


3

.


Tap 

Menu


Figure 6-23     

Call History - Tools Menu


4

.


Select 

Call Timers... 


Summary of Contents for FR68 Series

Page 1: ...FR68 Series Mobile Computer User Guide ...

Page 2: ......

Page 3: ...FR68 Series Mobile Computer User Guide 72E 119055 01 Rev B August 2009 ...

Page 4: ...user agrees to maintain Motorola s copyright notice on the licensed programs delivered hereunder and to include the same on any authorized copies it makes in whole or in part The user agrees not to decompile disassemble decode or reverse engineer any licensed program delivered to the user or any portion thereof Motorola reserves the right to make changes to any software or product to improve relia...

Page 5: ...FR68 Series User Guide 3 Revision History Changes to the original manual are listed below Change Date Description 01 Rev A 2009 06 02 Initial release ...

Page 6: ...4 ...

Page 7: ... Unpacking 16 Accessories 16 Getting Started 17 Installing the SIM Card 17 Installing the Main Battery 18 Removing the SIM Card 18 Removing the Battery 19 Charging the Battery 19 Charging the Main Battery and Memory Backup Battery 19 Charging Spare Batteries 20 Charging Temperature 20 Powering On the FR68 Series 20 Calibrating the Screen 20 Checking Battery Status 21 Micro Secure Digital microSD C...

Page 8: ...ons 42 Stylus 43 Entering Data 43 Data Capture 43 Linear Scanning 44 Scanning Considerations 44 Camera Application 46 Settings 47 Taking Photos 48 Recording Video 49 Viewing Photos and Videos 49 Using IrDA 50 Infrared Connection 51 Using WLAN 52 Adding New Network 54 Chapter 3 Using GPS Navigation 57 Introduction 57 Software Installation 57 FR68 Series GPS Setup 57 Operation 58 GPS Maps on microSD...

Page 9: ... Adjusting Audio Volume 78 Making a Call 78 Using the Phone 79 Using Contacts 79 Using Call History 80 Making a Speed Dial Call 80 Making an Emergency Call 80 Answering a Call 81 Incoming Call Features 81 Smart Dialing 82 Muting a Call 83 Taking Notes 83 Using Speed Dial 84 Adding a Speed Dial Entry 84 Editing a Speed Dial Entry 86 Deleting a Speed Dial Entry 87 Using Call History 87 Managing Call...

Page 10: ...n 112 Chapter 8 Accessories 113 Introduction 113 Single Slot USB Serial Cradle 113 Charging the FR68 Series Battery 114 Charging the Spare Battery 114 Battery Charging Indicators 114 Charging Temperature 115 Four Slot Battery Charger 115 FR68 Series Battery Shim Installation 115 Spare Battery Charging 116 Battery Charging Indicators 116 Charging Temperature 116 Headset 117 Cables 117 Battery Charg...

Page 11: ...oubleshooting the FR68 Series 122 Bluetooth Connection 125 Single Slot USB Serial Cradle 126 Four Slot Battery Charger 127 Cables 128 Appendix A Technical Specifications 129 FR68 Series Technical Specifications 129 FR68 Series Accessory Specifications 131 Glossary 133 Index 137 ...

Page 12: ...10 ...

Page 13: ... Guide describes how to get the FR68 Series up and running z FR68 Series User Guide describes how to use the FR68 Series Configurations This guide covers the following configurations Configuration Radios Display Memory Data capture Operating system Keypads FR6876 WLAN 802 11b g WPAN Bluetooth WWAN HSDPA GPS AGPS 2 8 QVGA Color 128 MB RAM 256 MB Flash 1D laser scanner camera Windows Mobile 6 1 Prof...

Page 14: ...hapter 2 Using the FR68 Series provides basic instructions for using the FR68 Series including powering on and resetting the FR68 Series and entering and capturing data z Chapter 3 Using GPS Navigation provides information about GPS navigation with the FR68 Series z Chapter 4 Using Bluetooth explains Bluetooth functionality on the FR68 Series z Chapter 5 ActiveSync synchronizes information on the ...

Page 15: ...le at http www microsoft com For the latest version of this guide and all guides go to http www motorola com enterprisemobility manuals Service Information If you have a problem with your equipment contact Motorola Enterprise Mobility support for your region Contact information is available at http www motorola com enterprisemobility contactsupport When contacting Enterprise Mobility support pleas...

Page 16: ...14 ...

Page 17: ...nt View and Rear View 1 Scan Button 2 Up Button 15 Battery Door 16 Door Latch 3 Down Button 4 Headset Jack 17 Speaker 18 Camera Flash 5 Reset Button 6 I O connector 19 Self view Mirror 20 Camera 7 Microphone 8 Keypad 21 Tether Point 22 Scanner Exit Window 9 Touch Screen 10 Power Button 23 Stylus 24 Scan Button 11 Scan decode LED 12 Charging LED 25 Hold Key 26 IrDA Window 13 Radio Status LED 14 Rec...

Page 18: ...ard and high capacity batteries Includes Shim for MC75 Power Supply KT 14000 148R and US AC Line Cord 23844 00 00R SAC7X00 401CR 4 Slot Battery Charger Toaster for MC75 and MC3000 Charges spare standard and high capacity batteries Includes Shim for MC75 and Power Supply KT 14000 148R Must purchase 3 Wire AC line cord separately KT 14000 148R KT 14000 148R Provides power to the Single Slot Cradle C...

Page 19: ... Configure the FR68 Series Installing the SIM Card GSM phone service requires a Subscriber Identification Module SIM card or smart card Obtain this card from your service provider The card fits into the FR68 Series and can contain the following information z Mobile phone service provider account details z Information regarding service access and preferences z Contact information which can be moved...

Page 20: ...arging contacts on top of the charging contacts in the battery compartment 2 Press the battery down into the battery compartment until the battery release latch snaps into place Figure 1 3 Installing the Battery 3 With the battery door latch open insert the cover bottom first then press down on the top of the cover The latch will lock the cover automatically when the cover is installed properly Th...

Page 21: ...r the first time the backup battery requires approximately 36 hours to fully charge This is also true any time the backup battery is discharged which occurs when the main battery is removed for several hours The backup battery retains RAM data in memory for at least 15 minutes at room temperature when the FR68 Series main battery is removed When the FR68 Series reaches a very low battery state the...

Page 22: ...gently controlled by the FR68 Series To accomplish this for small periods of time the FR68 Series or accessory alternately enables and disables battery charging to keep the battery at acceptable temperatures The FR68 Series or accessory indicates when charging is disabled due to abnormal temperatures via its LED See Table 1 2 on Page 20 Powering On the FR68 Series Press the Power button to turn on...

Page 23: ...he manufacturer s recommendations for use CAUTION Follow proper ESD precautions to avoid damaging the microSD card Proper ESD precautions include but are not limited to working on an ESD mat and ensuring that the operator is properly grounded To install the microSD card 1 Power off the FR68 Series 2 Open the memory card cover on the side of the FR68 Series Figure 1 5 Card Installation 3 Insert the...

Page 24: ... number MN2800AAAPSC Replacing the MainBattery 1 Open the battery door latch on the battery door 2 Please wait for 5 seconds after the display is off 3 Lift the top of the battery door and remove 4 Press the battery release latch on the top of the battery to unlock and lift the battery out of the well 5 Insert the replacement battery bottom first into the battery compartment in the back of the FR6...

Page 25: ...o charge at a faster rate Changing the Power Settings To set the FR68 Series to turn off after a short period of non use 1 Tap Start Settings System tab Power icon Advanced tab 2 Select the On battery power Turn off device if not used for check box and select a value from the drop down list 3 Select ok Changing the Backlight Settings To change the backlight settings in order to conserve more batte...

Page 26: ...less Manager tap the Connectivity icon or tap Wireless Manager on the Today screen Figure 1 7 Opening Wireless Manager Select Wireless Manager Figure 1 8 Selecting Wireless Manager NOTE Wireless connection options vary depending upon configurations To enable or disable a wireless connection tap the specific button To enable or disable all wireless connections tap the All button To configure settin...

Page 27: ...tant information such as upcoming appointments and status indicators Tap a section on the screen to open the associated program Alternatively tap Start Today to display the Today screen Connectivity Notification WAN Status Open the Start Menu Adjust volume Battery Status Change the date and time Change the date and time set up the alarm and more Turn on or off radios Command Bar Soft Keys Figure 2...

Page 28: ... more e mail textmessageswere received Notification that one or more voice messages were received There are more notification icons than can be displayed Tap to display remaining icons Notification Indicates a reminder of an upcoming calendar event Connection is active Connection is not active Synchronization is occurring WLAN available WLAN in use HSDPA available FR6876 only 3G available FR6876 o...

Page 29: ...ng HSDPA connecting FR6876 only HSDPA in use FR6876 only 3G connecting FR6876 only 3G in use FR6876 only GPRS connecting FR6874 and FR6876 GPRS in use FR6874 and FR6876 EGPRS connecting FR6874 and FR6876 EGPRS in use FR6874 and FR6876 Roaming WAN SIM Card not installed FR6874 and FR6876 All sounds are on All sounds are off Speaker Vibrate is on Main battery is charging Battery power completely dep...

Page 30: ...e Excel Mobile Create new workbooks or view and edit Microsoft Excel workbooks OneNote Mobile Create new notes or view existing notes PowerPoint Mobile View Microsoft PowerPoint slides and presentations Word Mobile Create view and edit Microsoft Word documents Calendar Keep track of appointments and create meeting requests Contacts Keep track of friends and colleagues Internet Explorer Mobile Brow...

Page 31: ... device Getting Started Display help on how to use some functions GPSXtra Allow you to download GPS data to enhance GPS performance Internet Sharing Connect a notebook computer to the Internet using the FR68 Series data connection Messenger Use this mobile version of Windows Live Messenger Notes Create handwritten or typed notes drawings and voice recordings Pictures Videos View and manage picture...

Page 32: ...tions for each of the input methods Lock Set a password for the FR68 Series Menus Set what programs appear in the Start menu Owner Information Enter personal information on the FR68 Series Phone Make and receive calls switch between calls and set up Conference Call Sounds Notifications Enable sounds for events notifications and more and set the type of notification for different events Today Custo...

Page 33: ...n Encryption Allow files on a storage card to be encrypted Encrypted files are readable only on your device Enroller Allow you to get a Certificate from Certificate servers Error Reporting Enable or disable the device s error reporting function When this function is enabled and a program error occurs technical data about the state of the program and your computer is logged in a text file and deliv...

Page 34: ...ws Mobile on your device with the latest security patches or fixes Do not use Obtain updates from Motorola Connection Tab Beam Set the FR68 Series to receive incoming IrDA beams and bluetooth beam Bluetooth Search for other Bluetooth devices Connections Set up one or more types of modem connections for your device such as phone dial up GPRS Bluetooth and more so that your device can connect to the...

Page 35: ... the volume on or off You can also adjust the system volume using the Sounds Notifications window or use the Up Down button on the side of the FR68 Series Battery Status Indications Battery icons appear on the navigation bar indicating the battery power level When the main battery or backup battery power falls below a predetermined level the icon indicates the status and a battery dialog box appea...

Page 36: ...sed Figure 2 4 Battery Icon on the Title Bar Also view the battery status using the Power window Power Setting 1 Tap Start Settings System Power icon A power remaining capacity bar appears Figure 2 5 Main Tab 2 Select the Advanced tab 3 Select the following options to save the power and tap ok Figure 2 6 AdvancedTab 4 Select the USB Charging tab 5 Select Slow Charge or Fast Charge radio buttons an...

Page 37: ...ns The temperature notification system displays warnings as the following figures when the temperature within the battery exceeds specific temperature thresholds Figure 2 8 Main Battery Temperature Notification NOTE The Temperature Warning dialog box remains visible until you tap Hide ...

Page 38: ...ed to a power source Charger cradle is not powered Slow blinking amber FR68 Series is charging Solid green Charging complete Note When the battery is initially inserted in the FR68 Series the amber LED flashes once if the battery power is low or the battery is not fully inserted Fast blinking amber Battery over temperature condition Fast blinking red Charging error e g Temperature is too low or to...

Page 39: ...change update Table 2 7 Wake up Default Settings Condition for Wake up Power Button Automatic Time out AC power is applied No Yes Mobile computeris insertedinto a cradle No Yes Mobile computeris removedfrom a cradle No Yes Mobile computeris connectedto a USB device No Yes Mobile computeris disconnectedfrom a USB device No Yes The scan triggeredis pressed No Yes The screen is touched No No Audio Ja...

Page 40: ... of keypad configuration alpha numeric Alpha numeric Keypad Configurations The alpha numeric keypads produce the 26 character alphabet A Z both lowercase and uppercase numbers 0 9 and assorted characters The keypad is color coded to indicate which modifier key to press to produce a particular character or action The keypad default is alphabetic producing lowercase letters See Table 2 8 for key and...

Page 41: ...secondarylayer of charactersand actions shown on the keypadin orange z Press the Orange key once to activate this mode temporarily followed by another key This displays the following icon at the bottomof the screen until a secondkey is pressed z Press the Orange key twice to lock this mode This displays the followingicon at the bottom of the screen z Press the Orangekey a third time to unlock z Pr...

Page 42: ... the following icon at the bottom of the screen until a second key is pressed z Press and hold the Shift key while selecting a sequence of keys to activate this mode temporarily This displays the following icon at the bottom of the screen as long as the key is pressed z Press the Shift key twice to lock this mode This displays the following icon at the bottom of the screen z Press the Shift key a ...

Page 43: ...odes Key Normal Shift Key Orange Key Q q Q W w W 1 E e E 2 R r R 3 T t T Y y Y _ U u U I i I O o O P p P A a A S s S 4 D d D 5 F f F 6 G g G H h H J j J K k K L l L Backspace Backspace Shift Shift Z Z Z 7 X x X 8 C c C 9 V v V B b B N n N M m M ENTER Enter ...

Page 44: ...m certain functions Figure 2 13 Function Buttons 1 Scan button 2 Up button 3 Down button 4 Power button z Power Press the red Power button to turn the FR68 Series screen on and off The FR68 Series is in suspend mode when the screen is off For more information see Powering on the FR68 Series on Page 20 Press the reset button to reboot the device by performing a cold boot See Resetting the FR68 Seri...

Page 45: ...e Drag in a list to select multiple items CAUTION To prevent damage to the screen do not use any device other than the Motorola provided stylus Entering Data When entering data on the keypad use either the single hand method or the two hand method as shown in Figure 2 14 Single hand Method Two hand Method Figure 2 14 Entering Data on the Keypad Data Capture The FR68 Series offers one type of data ...

Page 46: ...e scanner closer and further away to find the right working range for the bar codes being scanned z Angle Scanning angle is important for promoting quick decodes When laser beams reflect directly back into the scanner from the bar code this special reflection can blind the scanner To avoid this scan the bar code so that the beam does not bounce directly back But don t scan at too sharp an angle th...

Page 47: ... the red scan beam covers the entire bar code The Scan Decode LED lights red to indicate that scanning is in process then lights green and a beep sounds by default to indicate the bar code was decoded successfully Figure 2 16 Linear Scanner Aiming Pattern ...

Page 48: ... enabled Indicates the current resolution setting Indicates the brightness setting Indicates the contrast setting Indicates the zoom level setting Press the up and down volume buttons on the side of the FR68 to change the zoom level Photos do not have zoom feature Indicates the timer setting Photos only Indicates that video recording is in process Opens the settings control panel Opens the Picture...

Page 49: ...con Video Sets the resolution for photos and video For Photos VGA 640 x 480 1M 1 megapixel 1280 x 960 2M 2 megapixel 1600 x 1200 3M 3 megapixel 2048 x 1536 For Video QVGA 320 x 240 Sets the brightness settings 1 0 1 2 3 Sets the contast settings 2 1 0 1 2 Sets the image effects Color Black and White Antique Negative Sets a self timer Not applicable for video 0 seconds 3 seconds 5 seconds 10 second...

Page 50: ...e card NOTE You cannot use the camera if the battery power is less than 30 1 Press the Camera button on the side of the FR68 or launch the Camera application by tapping Start Programs Pictures Videos icon 2 Tap the Setting icon on the Status bar to change the settings as required 3 Press the Camera button to capture a picture The captured picture appears on the display 4 Three icons appear in the ...

Page 51: ...time limit for recording videos is 30 seconds When the 30 seconds limitation is reached a message appears on the display and the recording is ended NOTE Press the volume up and down buttons on the side of the FR68 to zoom in and out 5 Press the Camera button again to stop recording and save the video Viewing Photos and Videos NOTE For detailed information on the Photos and Videos refer to the Micr...

Page 52: ... can also beam files not folders from the File Explorer window Tap and hold the item you want to send then tap Beam File from the pop up menu First activate the beam function before exchanging files with another IrDA device To activate the Beam function 1 Tap Start Settings Connections tab Beam icon 2 Tap Receive all incoming beams check box Figure 2 19 Beam Window 3 Tap ok ...

Page 53: ...to send and locate the item in the list NOTE Do not cover or block the IrDA window 2 Align the IrDA port of the FR68 Series with that of the IrDA device so that they are unobstructed and within a close range Figure 2 20 Align FR68 Series with IrDA Device 3 Tap and hold the item then tap Beam type of item on the pop up menu 4 Tap the device that you want to send the file to Figure 2 21 Beam Contact...

Page 54: ... tap Yes Figure 2 22 Receive File Using WLAN With WLAN you can access the internet 1 Tap Start Settings Connection tab Wireless Manager icon Menu Or tap the operator name on the Today screen Figure 2 23 Wireless Manager menu 2 Tap WLAN settings to enter the configuration screen Figure 2 24 Wireless networks configuration ...

Page 55: ...2 25 Networks to access 4 Tap the Network Adapters tab in the Figure 2 25 Figure 2 26 Network Adapter 5 In the Figure 2 26 tap Edit or tap the network card connections to or tap an adapter to modify the settings Figure 2 27 Network Adapter settings modification 6 Tap Use specific IP address in the Figure 2 27 ...

Page 56: ...Usingthe FR68 Series 54 Figure 2 28 IP address setting 7 Tap the Name Servers tab in the Figure 2 28 Figure 2 29 Name Servers setting Adding New Network Figure 2 30 Wireless networks configuration ...

Page 57: ...ew wireless networks configuration Note Only one of the two check box works 2 Enter the name in the Figure 2 31 Figure 2 32 New wireless networks configuration 3 Tap Next in the in the Figure 2 32 Figure 2 33 Config ure Network Authentication 4 Tap Next in the Figure 2 33 ...

Page 58: ...uthentication 5 Tap Next in the Figure 2 34 Figure 2 35 Configure Network Authentication 6 In the Figure 2 35 tick the Use IEEE 802 1x network access control check box then tap Finish to finish the network adding Figure 2 36 Configure Network Authentication ...

Page 59: ...es and not become distracted by the device to the exclusion of safe driving practices It is unsafe to operate the controls of the device while driving Software Installation Third party GPS navigation software is required Evaluation software is available from various suppliers If interested in purchasing GPS navigation software check with the GPS software vendor before purchasing downloading or ins...

Page 60: ...nals may be limited or unavailable NOTE When using a GPS navigation application ensure that the FR68 Series does not go into suspend mode If the FR68 Series suspends then the power to the GPS radio is removed Upon resume the GPS receiver must reacquire a valid GPS signal resulting in a delay of positional information GPS Maps on microSD Cards GPS navigation software vendors may sell maps on microS...

Page 61: ...trength place the FR68 Series where there is a clear view of the sky A direct line of sight is required between the FR68 Series and the GPS satellites to access information from the satellites The Global Positioning System GPS is a system that allows the user to track their position anywhere on the earth Assisted GPS GPS can be used in stand alone or Assisted GPS A GPS modes A Stand alone GPS rece...

Page 62: ...Using 60 ...

Page 63: ... AFH to work There is no AFH when connecting and discovering devices Avoid making Bluetooth connections and discoveries during critical 802 11b communications AFH for Bluetooth consists of four main sections Channel Classification A method of detecting an interference on a channel by channel basis or pre defined channel mask Link Management Coordinates and distributes the AFH information to the re...

Page 64: ... it is up to user to respond to the key request event Authentication of Bluetooth devices is based upon a challenge response transaction Bluetooth allows for a PIN number or passkey that is used to create other 128 bit keys used for security and encryption The encryption key is derived from the link key used to authenticate the pairing devices Also worthy of note is the limited range and fast freq...

Page 65: ...enabled Figure 4 2 Enable Bluetooth Bond New Device s The FR68 Series can exchange information with bonded devices To find Bluetooth devices in the area 1 Ensure that Bluetooth is enabled on both devices 2 Ensure that the Bluetooth device to discover is in discoverable and connectable modes 3 Ensure that the two devices are within 30 feet 10 meters of one another 4 Tap the Bluetooth icon to enter ...

Page 66: ... new device to search for Bluetooth devices Figure 4 4 Add new device Window 6 After the device appears you have to select it and then tap Next 7 Enter a passcode to establish a secure connection with other devices Meanwhile enter the passcode on the target device Figure4 5 Discover Devices Dialog Box ...

Page 67: ...ow tap Menu Beam picture Menu Figure 4 6 Select file 2 Then choose the destination device and wait till Done is showed Figure 4 7 Transfer file Window Bluetooth Settings Use the Bluetooth Settings window to configure the operation of the application Tap Menu Settings The Bluetooth Settings window appears Device Info Tab Use the Device Info tab to add and bond new devices Please refer to Bond new d...

Page 68: ...urn on Bluetooth 2 If you want other devices to find your FR68 Series select Make this device visible to other devices check box COM Ports Tab Use the COM Ports tab set specific outgoing ports for bonded devices 1 Tap New Outgoing Port Figure 4 9 Add COM Ports 2 Select the device you want to add Then tap Next ...

Page 69: ...Using Bluetooth 67 Figure 4 10 Select device 3 Select a port from drop down list Then tap Finish Figure 4 11 Select a Port for Device ...

Page 70: ...68 ...

Page 71: ...e files to the correct format z Backs up the data stored on the mobile computer Synchronization is a one step procedure that ensures the data is always safe and up to date z Copies rather than synchronizes files between the mobile computer and host computer z Controls when synchronization occurs by selecting a synchronization mode e g set to synchronize continually while the mobile computer is con...

Page 72: ...op down list 4 Tap OK to exit the Connections window and tap OK to exit the ActiveSync window 5 Proceed with installing ActiveSync on the host computer and setting up a partnership Setting Up an ActiveSync Connection on the Host Computer To start ActiveSync 1 Select Start Programs Microsoft ActiveSync on the host computer The ActiveSync Window displays NOTE Microsoft recommends installing ActiveSy...

Page 73: ... Synchronization with a Windows Mobile 6 Device NOTE When a mobile computer with Windows Mobile 6 is connected to a host computer and an ActiveSync connection is made the WLAN radio if applicable is disabled This is a Microsoft security feature to prevent connection to two networks at the same time To synchronize with a Windows Mobile 6 device 1 If the Get Connected window does not appear on the h...

Page 74: ...2 Click Next Figure 5 5 Synchronization Directly With a Server Window 3 Select the check box to synchronize with a server running Microsoft Exchange if applicable 4 Click Next Figure 5 6 Synchronization Option Window ...

Page 75: ...py is complete and all data is synchronized the mobile computer can be disconnect from the host computer For more information about using ActiveSync start ActiveSync on the host computer then see ActiveSync Help NOTE The first ActiveSync operation must be performed with a local direct connection Windows Mobile retains partnerships information after a cold boot For more information about using Acti...

Page 76: ...74 ...

Page 77: ...d read e mail Connect to the Internet or work network over High Speed Downlink Packet Access HSDPA FR6876 using Cellular Line or using the modem specified by the mobile operator Accessing the Phone Keypad Access the keypad regardless of the program in use Applications on the FR68 Series can be in use during a call Antenna Signal Figure 6 1 P hone Keypads To access the phone keypad tap Start Phone ...

Page 78: ...s for use during phone calls z Handset Mode Switches audio to the speaker at the top front of the FR68 Series so you can use the FR68 Series as a handset This is the default mode z Speaker Mode Use the FR68 Series as if on speaker phone Tap the Speaker On button to activate this mode Tap the Speaker Off button to switch back to handset mode z Headset Mode Connect a wired or Bluetooth headset to au...

Page 79: ...adset Using a Bluetooth Headset You can use a Bluetooth headset for audio communication when using an audio enabled application See Chapter4 Using Bluetooth for information on connecting a Bluetooth headset to the FR68 Series Set the FR68 Series volume appropriately before putting the headset on When a Bluetooth headset is connected the speakerphone is muted It is recommended for phone conversatio...

Page 80: ...ider To adjust the volume tap the Speaker icon in the Title bar Move the slider up or down to adjust the volume NOTE Adjust the conversation phone volume during a call Adjusting the volume while not in a call affects the ring and notification sound levels Making a Call NOTE You can make emergency calls even when the FR68 Series is locked or when a SIM card is not installed See Making an Emergency ...

Page 81: ...n and end red calls If you tap a wrong number tap Delete key to erase each subsequent digit of a number To erase the entire number tap and hold the Delete key Using Contacts Use Contacts to make a call without looking up or entering the phone number To make a call from Contacts 1 Tap Start Contacts 2 From the contact list tap and hold the contact name Figure 6 7 Contacts Menu 3 Tap Call Work Call ...

Page 82: ...y on the FR68 Series keypad 2 From the Phone keypad tap and hold the speed dial location number assigned to a contact To dial a one digit speed dial location number tap and hold the speed dial number To dial a two digit speed dial location number tap the first digit and then tap and hold the second digit or from the Phone keypad tap Speed Dial and tap the speed dial location number of the desired ...

Page 83: ... Call To ignore the incoming call tap Ignore This may send the caller to voice mail depending on the service provider Otherwise this presents busy signal to the calling party To end the call tap End or press the red phone key on the FR68 Series keypad Incoming Call Features z If you receive a call while in a call tap Wait to place the call in call waiting z You can use other programs on the FR68 S...

Page 84: ...r starting from the first character of a contact name as well as from the character that appears after a space dash or underscore in a contact name For example if you tap number 2 which is associated with a b c on the Phone keypad contact names such as the following will be considered matches Smith Bernard Adams John Carlson Eileen Dillon Albert Childs Larry Cooper Robert and Parks Celine z If the...

Page 85: ...all 3 Tap Mute on the display to mute the audio The Mute icon appears Figure 6 12 Mute Button and Icon Taking Notes To create a note during a call tap Note on the display then enter the note For more information about creating notes see the Windows On Device Help To access a note created during a call 1 Tap Start Phone or press the green phone key on the FR68 Series keypad 2 From the Phone keypad ...

Page 86: ...numbers with a single tap Before creating a speed dial entry ensure the phone number exists in Contacts Adding a Speed Dial Entry To add a speed dial entry from the phone keypad 1 Ensure the contact and phone number are in the Contacts list 2 Tap Start Phone or press the green phone key on the FR68 Series keypad 3 Tap Menu Speed Dial Menu New Figure 6 15 Contacts 4 Tap the desired contact name and...

Page 87: ...to assign as the new speed dial entry The first speed dial location is reserved for voice mail 6 Tap ok to add the contact to the speed dial list Figure 6 17 Speed Dial Contact List 7 Tap ok to exit the Speed Dial Contact List To add a speed dial entry from the Contacts window 1 Tap Start Contacts Figure 6 18 Contacts 2 Tap a contact name ...

Page 88: ... is reserved for voice mail 5 Tap ok Editing a Speed Dial Entry 1 Tap Start Phone or press the green phone key on the FR68 Series keypad 2 Tap Menu Speed Dial Figure 6 20 Speed Dial Contact List 3 Tap and hold the contact name 4 Tap Edit 5 Change the name phone number or location information 6 Tap ok NOTE Editing names and phone numbers in Speed Dialdoes not alter contact information in Contacts S...

Page 89: ...he time and duration of all incoming outgoing and missed calls It also provides a summary of total calls and easy access to notes taken during a call Table 6 1 lists the call history icons that appear in the Call History window Table 6 1 Call History Icons Ico n Description This icon appears next to the contact information for all outgoing calls This icon appears next to the contact information fo...

Page 90: ...to display only missed calls outgoing calls incoming calls or calls listed alphabetically by caller name 5 Tap ok to exit the Call History window Resetting the Recent Calls Counter 1 Tap Start Phone or press the green phone key on the FR68 Series keypad to display the Phone keypad 2 From the Phone keypad tap Call History 3 Tap Menu Figure 6 23 Call History Tools Menu 4 Select Call Timers ...

Page 91: ...ay the Phone keypad 2 From the Phone keypad tap Call History 3 Tap Menu Call Timers Figure 6 25 Call History Call Timers 4 In the Delete call history items older than drop down list select a time period on which to base deletion of stored items 5 Tap ok to exit the Call Timers window Deleting All Call History Items 1 Tap Start Phone or press the green phone key on the FR68 Series keypad to display...

Page 92: ...ndow Viewing Call Status 1 Tap Start Phone or press the green phone key on the FR68 Series keypad to display the Phone keypad 2 From the Phone keypad tap Call History 3 Tap an entry The Call Status window appears Figure 6 28 Call History Detail NOTE When more than one call is on the phone line only the duration of the first call is recorded 4 Tap ok and then ok to exit ...

Page 93: ...old an item in the list Figure 6 29 Call History Menu 4 Select an applicable item from the menu as needed 5 Depending on the item selected the appropriate window displays For example select Send SMS to display the Inbox window 6 Tap ok to exit the Call History window Swapping Calls To move between two or more phone calls 1 Tap Start Phone or press the green phone key on the FR68 Series keypad to d...

Page 94: ...be available on all services Please check with your service provider for Conference Calling availability To create a conference phone session with multiple people 1 Tap Start Phone or press the green phone key on the FR68 Series keypad to display the Phone keypad 2 Enter the first phone number and press Talk When the call connects Hold appears on the keypad Figure 6 34 Conference Call Hold 3 Tap H...

Page 95: ...y with one party during a conference call tap Menu Private To include all parties again tap Menu Conference Figure 6 36 Creating a Private Call Text Messaging Use the Text Messages window to send and receive text messages to and from mobile phones The text can contain words numbers or an alphanumeric combination no longer than 160 characters Short text messages delivered over mobile networks trans...

Page 96: ...38 New Text Message Notification The Caller Identification feature matches incoming text message numbers with those stored in Contacts so you know who is sending you a message Furthermore the New Text Message dialog box gives you the option to call the sender or save dismiss or delete the message Figure 6 39 New Text Message Options When the phone function is off you can still view received text m...

Page 97: ...indow appears Figure 6 41 Messaging Window 2 In the message list tap a Text Messages Figure 6 42 Text Messages List 3 Tap Reply to reply the message NOTE If the phone is turned off and you tried to call the sender send a reply or forward the message you are prompted to turn the phone function on ...

Page 98: ...ur message Address Area Message Area Figure 6 44 Create Text Message z The auto correct feature automatically fixes common spelling errors as you type so your messages are more accurate z The character counter lets you see and control the size of the message as you compose z If you want to know if your text message was received tap Menu Message Options then select the Request SMS text message deli...

Page 99: ...he phone If you do so the message is sent otherwise when you tap ok the message is saved in the Drafts folder and sent when the phone is turned on If you are out of coverage area the message is saved in the Drafts folder and sent when you return to a coverage area NOTE On FR68 devices the message remains in the Drafts folder and has to be manually re sent when you return to a coverage area ...

Page 100: ...98 ...

Page 101: ...nect to the Internet or work network using Cellular Line or using the modem specified by the mobile phone service provider NOTE Before using an FR6874 FR6876 on a wireless network first select a provider establish a voice and data enabled service plan and configure the FR6874 FR6876 where applicable See Chapter 6 Using the Phone for information on how to use the phone and services FR6874 FR6876 Se...

Page 102: ...the service provider s network appears in the Current network field c If the network does not appear tap Find Network If the network still does not appear verify that the SIM card was installed correctly If it was and no network appears contact the service provider Configuring a Data Connection A data connection allows Internet access across a wireless network To set up a new data connection 1 Acq...

Page 103: ...tions Window Make New Connection 4 Enter a connection name in the Enter a name for the connection text box 5 Select Cellular Line GPRS from the Select a modem drop down list 6 Tap Next Figure 7 5 Connections Window Access Point Name 7 Enter the APN from the service provider in the Access point name text box 8 Tap Next ...

Page 104: ...t box if required by the service provider 12 Tap Finish 13 Tap ok to exit Connections Establishing a Data Connection 1 Ensure a SIM card is installed in the FR6874 FR6876 2 Configure a GPRS data connection See Configuring a Data Connection on Page 100 3 Tap the connectivity icon or at the top of the screen Figure 7 7 Connectivity Dialog Box 4 Tap Settings 5 Tap Connections icon 6 Tap Managing exis...

Page 105: ...e SIM card In this case enter the PIN and tap ok NOTE Place emergency calls at any time without entering a PIN or a SIM card 10 When a connection is established launch Internet Explorer to browse the Internet or launch an applicable application Ending a Data Connection To cancel a data connection in progress tap Cancel in the Connecting dialog window To end an established data connection 1 Tap or ...

Page 106: ...ptions depending on the type of service Phone Use the Phone tab to customize ring type ring tone keypad tone and security options Tap Start Settings Personal tab Phone icon Phone tab or Start Phone Menu Options Phone tab Figure 7 11 FR6874 FR6876 Phone Window Phone Tab Sounds 1 Phone Number automatically displays on the Phone tab when a live SIM card is installed 2 Select a ring type from the Ring...

Page 107: ...nes NOTE Turning off sounds saves power and prolongs battery life Security Enabling a PIN NOTE Place emergency calls at any time without requiring a PIN or a SIM card To require a PIN when using the phone 1 From the Phone tab Figure 7 11 select the Require PIN when phone is used check box under Security Figure 7 12 Enter PIN 2 Use the touch keypad to enter a four to eight digit PIN 3 Tap Enter to ...

Page 108: ...phone services For example block certain types of incoming and or outgoing calls disclose the caller s identity when making outgoing calls forward incoming calls to a different phone number receive notification of incoming calls when a phone session is in use and set up voice mail and short message service 1 Tap Start Settings Personal tab Phone icon Services tab Figure 7 13 FR6874 FR6876 Phone Wi...

Page 109: ...to forward incoming calls to a different phone number z To forward all calls to a different phone number select the Forward all incoming phone calls check box enter the phone number to receive forwarded calls in the To text box z To forward incoming calls to a different phone number based on a specific situation select one or more of the check boxes under Forward phone calls only if No answer ente...

Page 110: ...rks Check with your service provider for availability Call waiting notifies you of an incoming call when the phone is in a phone session Select the Notify me radio button to enable call waiting Select the Do not notify me radio button to disable call waiting Figure 7 17 Call Waiting Voice Mail and Text Messages To use voice mail and send short messages enter the voice mail and or text message phon...

Page 111: ...ne number or area code to restrict and tap Done 5 Repeat steps 3 and 4 to add more numbers and tap Done twice when complete 6 Enter PIN2 and tap Done Network Use the Network tab to view available networks determine the order in which the phone accesses another network if the current network is unavailable and specify whether to change networks manually or automatically The current network remains ...

Page 112: ...indow Network Tab 2 From the Network selection drop down list select Manual Figure 7 21 Choose Network 3 From the Choose Network window select the network to use 4 Tap OK Viewing Available Networks To view all wireless networks available 1 Tap Start Settings Personal tab Phone icon Network tab or Start Phone Options Network tab Figure 7 22 FR6874 FR6876 Phone Window Network Tab ...

Page 113: ...tting preferred networks allows the FR6874 FR6876 to access a second preferred network if the first is unavailable 1 Tap Start Settings Personal tab Phone icon Network tab or Start Phone Menu Options Network tab Figure 7 24 FR6874 FR6876 Phone Window Network Tab 2 Tap Set Networks to view all available networks Figure 7 25 Preferred Networks 3 Select the preferred networks by tapping one or more c...

Page 114: ... 7 Tap ok to exit settings Phone Info Use the Phone Info tab to view hardware and software information about the phone 1 Tap Start Settings Personal tab Phone icon Phone Info tab or Start Phone Menu Options Phone Info tab Figure 7 26 FR6874 FR6876 Phone Window Phone Info Tab 2 Tap ok to exit settings Network Time Synchronization The FR6874 FR6876 can support NITZ Network Identity and Time Zone fea...

Page 115: ...gs into a vehicle cigarette lighter to charge the FR68 Series while on the road z Charge Only Cable Provides power to the FR68 Series z USB Charging Cable Provides power to the FR68 Series and USB communication with a host computer z Headset Used in noisy environments Single Slot USB Serial Cradle This section describes how to use a Single Slot USB Serial cradle with the FR68 Series The Single Slo...

Page 116: ...gure 8 1 FR68 Series Battery Charging Charging the Spare Battery Spare Battery Figure 8 2 Spare Battery Charging Battery Charging Indicators The Single Slot USB Serial Cradle charges the FR68 Series main battery and a spare battery simultaneously The FR68 Series charge LED indicates the status of the battery charging in the FR68 Series See Table1 2onPage20 for charging status indications The spare...

Page 117: ...ing is disabled due to abnormal temperatures via its LED See Table1 2onPage20and Table 6 1 on Page 115 Table 6 1 Spare Battery LED Charging Indicators Spare Battery LED on cradle Indication Off Battery is not charging battery is not inserted correctly in the cradle cradle is not powered Slow Blinking Amber Spare battery is charging Solid Amber Charging complete Four Slot Battery Charger This secti...

Page 118: ...for charging status indications The 1950 mAh battery is fully charged in less than four hours and the 3600 mAh battery in approximately six hours Charging Temperature Charge batteries in temperatures from 0 C to 45 C 32 F to 113 F Charging is intelligently controlled by the FR68 Series To accomplish this for small periods of time the charger alternately enables and disables battery charging to kee...

Page 119: ...atible headsets For best performance Motorola recommends a 2 5mm jack headset p n 90 17C28 001R Figure 8 5 Headset Connection Cables This section describes how to set up and use the cables The cables are available with a variety of connection capabilities The following communication charge cables are available z USB Client Charge cable standard A connector and a barrel receptacle for power z Auto ...

Page 120: ...e 3600 mAh standard battery in approximately six hours See Table1 2onPage20 for charging status indications 3 When charging is complete remove the cable by gently pulling the FR68 Series and the cable apart LED Charge Indications The amber Charge LED on the FR68 Series indicates battery charging status See Table1 2on Page20 for charging status indications Charging Temperature Charge batteries in t...

Page 121: ...it to strong impact z Protect the FR68 Series from temperature extremes Do not leave it on the dashboard of a car on a hot day and keep it away from heat sources z Do not store or use the FR68 Series in any location that is dusty damp or wet z Use a soft lens cloth to clean the FR68 Series If the surface of the FR68 Series screen becomes soiled clean it with a soft cloth moistened with a diluted w...

Page 122: ...Do not disassemble or open crush bend or deform puncture or shred z Severe impact from dropping any battery operated device on a hard surface could cause the battery to overheat z Do not short circuit a battery or allow metallic or conductive objects to contact the battery terminals z Do not modify or remanufacture attempt to insert foreign objects into the battery immerse or expose to water or ot...

Page 123: ...ndow Wipe the scanner exit window periodically with a lens tissue or other material suitable for cleaning optical material such as eyeglasses Connector 1 Remove the main battery from mobile computer See Replacing the Main Battery on Page 22 2 Close battery door 3 Dip the cotton portion of the cotton tipped applicator in isopropyl alcohol 4 Rub the cotton portion of the cotton tipped applicator bac...

Page 124: ...found on other areas of the cradle use lint free cloth and alcohol to remove 8 Allow at least 10 to 30 minutes depending on ambient temperature and humidity for the alcohol to air dry before applying power to cradle If the temperature is low and humidity is high longer drying time is required Warm temperature and dry humidity requires less drying time Cleaning Frequency The cleaning frequency is u...

Page 125: ...munication cable and re transmit Incorrectcable configuration See the systemadministrator During data communication no data transmitted or transmitteddata was incomplete Communication softwarewas incorrectlyinstalled or configured Performsetup No sound Volumesetting is low or turned off Adjust the volume See Adjusting Volume on Page 33 FR68 Series is inactive The FR68 Series turns off after a peri...

Page 126: ... Rechargethe battery FR68 Series keepspowering down to protect memorycontents The internal Bluetooth radio is poweredon for a long time Becausethis mode requiresbatterypower power it off when not needed Scanning application is not loaded Load a scanningapplicationon the FR68 Series See the system administrator Unreadablebar code Ensurethe symbolis not defaced Distancebetween exit windowand bar cod...

Page 127: ...cannotfindany Bluetoothdevices nearby The Bluetooth device s are not in discoverablemode Set the Bluetoothdevice s to discoverable mode If needed referto the device suser documentationfor help When trying to connecta Bluetooth phone and FR68 Series the phone thinks a previouslypaired FR68 Series is used The phone remembers the name and address of the FR68 Series it last paired with via the Bluetoo...

Page 128: ...ted FR68 Seriesis removed from cradle or cradle is unpluggedfrom AC power too soon Ensure cradle is receiving power Ensure FR68 Series is seated correctly Confirm main battery is charging under Start Settings System Power The 3600 mAh battery isfully charged in approximately six hours Batteryis faulty Verify that other batterieschargeproperly If so replacethe faulty battery The FR68 Series is not ...

Page 129: ...retransmit Incorrectcable configuration See the systemadministrator During data communication no data transmits or transmitteddata was incomplete Communication softwareis not installedor configuredproperly Performsetup Four Slot Battery Charger r Table 9 4 Troubleshooting The Four Slot Battery Charger Symptom Possible Cause Action Batterywas removedfrom the chargeror charger wasunplugged from AC p...

Page 130: ...y that other batterieschargeproperly If so replace the faulty battery FR68 Series batteryis not charging The FR68 Series is not fully attachedto power Detachand re attachthe power cable to the FR68 Series ensuringit is firmly connected Cable was disconnectedfrom FR68 Series during communications Re attachthe cable and retransmit Incorrectcable configuration See the systemadministrator During data ...

Page 131: ... QVGA with backlight TFT LCD 240x320 QVGA Touch Panel Glass analog resistivetouch Backlight LED backlight Main Battery Rechargeable Lithium Ion 3 7V 1950 mAh battery or optional 3 7V 3600 mAh battery BackupBattery Lithium battery rechargeable 25mAh 3V not user accessible ExpansionSlot microSD slot SDHC compliant NetworkConnections High speed client USB Notification Vibrator and LED KeypadOptions 5...

Page 132: ...LAN radio Dual modeIEEE 802 11b g Data Rates Supported 1 2 5 5 6 9 11 12 24 36 48 and 54 Mbps OperatingChannels Chan 1 13 2412 2472MHz Chan 14 2484 MHz Japan only Actual operatingfrequenciesdependon regulatoryrules and certification agency Security Open Shared Key WPA WPA2 WEP TKIP AES EAP EAP MD5 CHAP EAP TLS PEAP EAP SIM SpreadingTechnique Direct SequenceSpreadSpectrum DSSS and OrthogonalFrequen...

Page 133: ...2 F to 122 F StorageTemperature 40 C to 70 C 40 F to 158 F Charging Temperature 0 C to 40 C 32 F to 104 F Humidity 5 to 95 non condensing Drop 76 2 cm 30 0 in drops to vinyl tiled concreteat room temperature Electrostatic Discharge ESD 15 kV air 8 kV contact Four Slot Battery Charger Table A 4 Four Slot Battery Charger Technical Specifications Item Description Dimensions Length 210 mm 8 27 in Widt...

Page 134: ...132 ...

Page 135: ...y digit One bit is the basic unit of binary information Generally eight consecutive bits compose one byte of data The pattern of 0 and 1 values within the byte determines its meaning boot or boot up The process a computer goes through when it starts During boot up the computer can run self diagnostic tests and configure hardware and software C Cold Boot A cold boot restarts the mobile computer and...

Page 136: ...egulates laser safety by specifying various laser operation classes based on power output during operation IP Internet Protocol The IP part of the TCP IP communications protocol IP implements the network layer layer 3 of the protocol which contains a network address and is used to route a message to a different network or subnetwork IP accepts packets from the layer 4 transport protocol TCP or UDP...

Page 137: ...g wireless radio technology Q QWERTY A standard keyboard commonly used on North American and some European PC keyboards QWERTY refers to the arrangement of keys on the left side of the third row of keys R RF Radio Frequency ROM Read Only Memory Data stored in ROM cannot be changed or removed S Scanner An electronic device used to scan bar code symbols and produce a digitized pattern that correspon...

Page 138: ...136 ...

Page 139: ... Connection 125 Bond 63 boot 37 Brightness 47 Buttons 42 Cables 117 Calendar 28 Calibrating the Screen 20 Call History 87 Changing the Backlight Settings 23 Changing the Power Settings 23 Chapter Descriptions 12 Charging Temperature 20 115 116 Cleaning 120 Clock Alarms 31 cold boot 37 communication charge cables 117 Communication charge cables 117 Conference Call 92 Configurations 11 38 Connectivi...

Page 140: ...3 Notational Conventions 13 Notes 29 Notification 26 notification icons 26 Office Mobile 28 operating system 12 Phone 28 Phone Software 12 Pictures Videos 29 Powering On the FR68 Series 20 Radio Status 36 Replacing the Main Battery 22 Scanner Exit Window 121 Scanning Considerations 44 screen protector 119 Screen Protector 22 Search 29 Secure User Plane Location 59 Security 62 Sending a Text Messag...

Page 141: ......

Page 142: ...26 http www motorola com MOTOROLA and the Stylized MLogo and Symbol and the Symbol logo are registeredin the U S Patent and Trademark Office All other product or service names are the property of their registered owners Motorola Inc 2009 72E 119055 01 Revision B August 2009 ...

Reviews: