


E - 6
CA50/UCA Client & Server Developer & User Guide
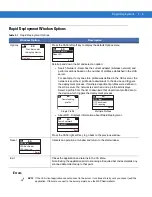
For step-by-step instructions on how to configure the WS2000 and its AP follow the steps below.
1.
Connect the CAT 5 cable from the network port in the laptop to the WS2000 port 5 or 6, and provide power
to the WS2000.
2.
Connect the AP with a Cat 5 cable into WS2000 port 1.
3.
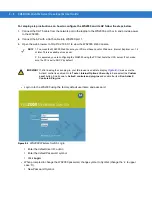
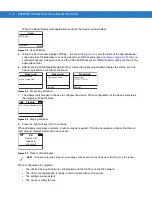
Open the web browser to http://192.168.0.1 to view the WS2000 Web Console.
•
Login in to the WS2000 using the factory default username and password:
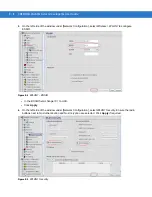
Figure E-2
WS2000 Wireless Switch Login
•
Enter the default User ID: admin
•
Enter the default Password: symbol
•
Click Login.
•
When prompted to change the WS2000 password, change symbol to Symbol (change the ‘s’ to upper
case ‘S’).
•
New Password: Symbol.
NOTE
1. To access the WS2000 Web Console, your PC must have Java for Windows - Internet Explorer ver. 1.4
or later. This is available at Java.com.
2. It is assumed you are configuring the WS2000 using the PC that hosts the UCA server. If not, make
sure the PC is set to DHCP by default.
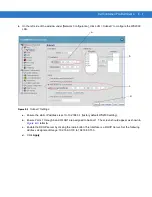
IMPORTANT
If, after loading the Java plug-in, your IE browser is unable to display
, make sure the
ActiveX control is enabled. Go to Tools > Internet Options > Security tab and select the Custom
Level button. Scroll down to ActiveX controls and plug-ins and enable the item Run ActiveX
Controls & Plug-ins.
Summary of Contents for CA50
Page 1: ...CA50 UCA Client Server Developer User Guide ...
Page 2: ......
Page 3: ...CA50 UCA Client Server Developer User Guide 72E 93914 02 Revision A November 2009 ...
Page 18: ...xvi CA50 UCA Client Server Developer User Guide ...
Page 24: ...xxii CA50 UCA Client Server Developer User Guide Page intentionally blank ...
Page 30: ...1 6 CA50 UCA Client Server Developer User Guide Page intentionally blank ...
Page 34: ...2 4 CA50 UCA Client Server Developer User Guide Page intentionally blank ...
Page 48: ...3 14 CA50 UCA Client Server Developer User Guide Page intentionally blank ...
Page 106: ...4 58 CA50 UCA Client Server Developer User Guide Page intentionally blank ...
Page 109: ...UCA Client Application on the CA50 5 3 Page intentionally blank ...
Page 110: ...5 4 CA50 UCA Client Server Developer User Guide ...
Page 135: ...UCA Server 6 25 Figure 6 30 Installing Prerequisites Figure 6 31 SQL Server Setup ...
Page 200: ...7 32 CA50 UCA Client Server Developer User Guide Page intentionally blank ...
Page 284: ...9 56 CA50 UCA Client Server Developer User Guide Page intentionally blank ...
Page 302: ...10 18 CA50 UCA Client Server Developer User Guide Page intentionally blank ...
Page 350: ...11 48 CA50 UCA Client Server Developer User Guide Page intentionally blank ...
Page 358: ...12 8 CA50 UCA Client Server Developer User Guide Page intentionally blank ...
Page 418: ...A 6 CA50 UCA Client Server Developer User Guide Page intentionally blank ...
Page 436: ...B 18 CA50 UCA Client Server Developer User Guide Page intentionally blank ...
Page 478: ...E 12 CA50 UCA Client Server Developer User Guide 6 7 8 9 10 11 ...
Page 488: ...F 4 CA50 UCA Client Server Developer User Guide Page intentionally blank ...
Page 492: ...G 4 CA50 UCA Client Server Developer User Guide Page intentionally blank ...
Page 510: ...I 14 CA50 UCA Client Server Developer User Guide Page intentionally blank ...
Page 538: ...Index 12 CA50 UCA Client Server Developer User Guide ...
Page 540: ......
Page 541: ......


