background image

9.0  Lumbar Support (Optional)

9.1  Lumbar Support Adjustment

:

1.

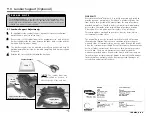
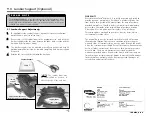
To install/adjust the Lumbar Support, open outer cover at the bottom
rear of the back pan (via velcro strip).

The 

Lumbar Support

is a pre-fabricated foam insert that provides lower

back support for additional comfort. The position of the lumbar insert can
be adjusted inside the Matrx Mini cover 

(see instructions below)

, or it may be

removed if no lumbar support is desired. 

P L E A S E   N O T E

!

FRONT

2.  If necessary, cut the lumbar foam to the appropriate size* and insert the

lumbar support inside the cover between the foam back cushion and the
back pan (refer to images below)

3.

The lumbar support can be adjusted manually to any desired height/
position/orientation, or it can be removed completely if no lumbar support
is required.

adjust lumbar position as

needed or remove completely

lumbar
support

4.  Refasten the cover (velcro strip) onto the back pan.

foam cushion

lumbar foam

Lumbar Support

*NOTE: 

The lumbar foam may

be cut/modified as needed, to
meet the needs of the end user.

15

WARRANTY

Every Invacare Matrx

®

Mini back is carefully inspected and tested to 

provide optimum performance. Each back is guaranteed to be free 
from defects for a period of 24 months from the date of purchase, 
provided normal use. Should a defect in materials or workmanship 
occur within 24 months of the original date of purchase, Motion 
Concepts will, at its option, repair or replace it free of charge. 
This warranty does not apply to punctures, tears or burns, nor to 
the removable cushion cover.

The original back must be returned to the dealer and will become 
the property of Motion Concepts as a condition of processing the 
warranty claim. All warranty claims must be made through the dealer
where the cushion was purchased. Except for express warranties made
herein, all other warranties of fitness or use for a particular purpose 
are excluded. There are no warranties that extend beyond the 
warranties provided above. Remedies for breach of this warranty are
limited to repair or replacement of goods. In no event shall damages 
for breach of any warranty include any consequential damages or 
exceed the original cost of the back.

TRD0354, Rev A

Summary of Contents for Invacare Matrx Mini back

Page 1: ...wn good judgement and common sense as well as that of your provider caregiver and or health professional The following symbols are used throughout this manual to identify warnings cautions and importa...

Page 2: ...wn good judgement and common sense as well as that of your provider caregiver and or health professional The following symbols are used throughout this manual to identify warnings cautions and importa...

Page 3: ...ILT IN SPACE RECLINE POSITION and or SEAT DEPTH before use Use extreme caution when using a new seating position When a Matrx Mini is added to a TILT and or RECLINING chair a RIGIDIZER BAR or CROSSBAR...

Page 4: ...ILT IN SPACE RECLINE POSITION and or SEAT DEPTH before use Use extreme caution when using a new seating position When a Matrx Mini is added to a TILT and or RECLINING chair a RIGIDIZER BAR or CROSSBAR...

Page 5: ...igned to provide 1 5 38mm of fore and aft adjustment relative to the cane clamp To reconfigure a mounting plate cane clamp to the forwardmost orientation detach the Mounting Plate from the Cane Clamp...

Page 6: ...igned to provide 1 5 38mm of fore and aft adjustment relative to the cane clamp To reconfigure a mounting plate cane clamp to the forwardmost orientation detach the Mounting Plate from the Cane Clamp...

Page 7: ...e mounting plates see Figure 6 Slide the lower mounting pins into the hooked slots at the bottom of each mounting plate 1 With the lower pins in place lock snap the upper mounting pins into the latch...

Page 8: ...e mounting plates see Figure 6 Slide the lower mounting pins into the hooked slots at the bottom of each mounting plate 1 With the lower pins in place lock snap the upper mounting pins into the latch...

Page 9: ...move the backrest from the wheelchair and use the wrench provided to loosen each flange nut If necessary replace the standard mounting pins with long mounting pins iii Adjust the mounting pin depth cl...

Page 10: ...move the backrest from the wheelchair and use the wrench provided to loosen each flange nut If necessary replace the standard mounting pins with long mounting pins iii Adjust the mounting pin depth cl...

Page 11: ...cally on the left right mounting plates The vertical lines on the mounting plates are designed as a point of reference to assist with symmetrical mounting see image below The back position can be angl...

Page 12: ...cally on the left right mounting plates The vertical lines on the mounting plates are designed as a point of reference to assist with symmetrical mounting see image below The back position can be angl...

Page 13: ...f problems are discovered Corrective measures can be perfomred at or arranged through your equipment supplier 14 8 0 One Hand Cord Release Optional 8 1 Installation Instructions 1 Thread the Nylon Cor...

Page 14: ...f problems are discovered Corrective measures can be perfomred at or arranged through your equipment supplier 14 8 0 One Hand Cord Release Optional 8 1 Installation Instructions 1 Thread the Nylon Cor...

Page 15: ...d as needed to meet the needs of the end user 15 WARRANTY Every Invacare Matrx Mini back is carefully inspected and tested to provide optimum performance Each back is guaranteed to be free from defect...

Page 16: ...d as needed to meet the needs of the end user 15 WARRANTY Every Invacare Matrx Mini back is carefully inspected and tested to provide optimum performance Each back is guaranteed to be free from defect...

Reviews: