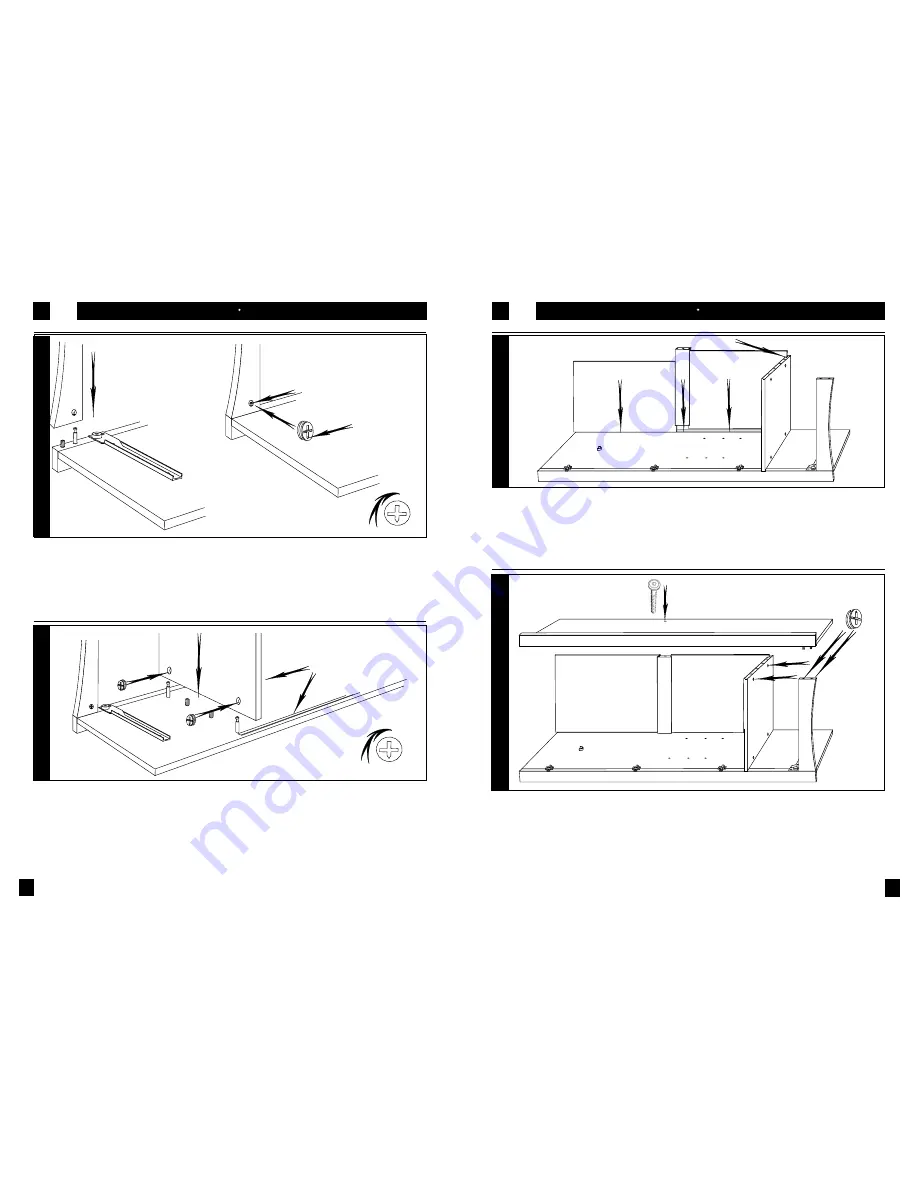
2
attach the plinth
monte el plinto
insert the back
introduzca el fondo
4
assembly montaje
3
assembly montaje
3
4
5
3
fit the lower shelf
monte el estante inferior
5
fix the opposite side
monte el otro lado
Arrow
Flecha
Push the end of the plinth down over the cam pin
and dowel at the bottom and front of one of the
prepared sides. There are holes in one face
which must be at the back. Insert a large cam
into the hole with the cam pin now visible inside
(the arrow must point towards the side panel) and
tighten with a screwdriver.
Baje el borde del plinto sobre la chaveta y la
clavija al borde inferior y al borde delantero de
uno de los lados preparados. Hay agujeros en
una superficie que deben mirar hacia atrás.
Introduzca una leva grande en el agujero con la
chaveta visible adentro. (La flecha debe apuntar
al lado). Apriete con un destornillador.
Cam pin
Chaveta
Groove
Ranura
With the groove to the back and facing upwards,
lower the edge of the lower shelf onto the cam
pins and dowels above the drawer runner. Insert
2 cams and tighten with a screwdriver.
La ranura hacia el fondo y arriba, baje el borde del
estante inferior sobre la clavijas y las chavetas por
encima de la corredera. Introduzca 2 levas y
apriete con un destornillador.
Insert the 2 back panels as shown, longest edge
into the side’s groove and white face towards the
front of the wardrobe. The lower panel must enter
the groove in the lower shelf. The back brace
slides in between the two panels. (Do not attempt
to screw this to the side at this stage)
Introduzca los dos tableros para el fondo, tal
como se indica, el borde más largo entra en la
ranura del lado y la superficie blanca hacia la
parte delantera del ropero. El tablero inferior entra
en la ranura del estante inferior. La abrazadera
deslice entre los dos tableros. (No se ensaye de
apretarla al lado ahora.
Gently lower the other side onto the
assembly, taking care that all the dowels and
cam pins enter their correct holes, and that
the back boards enter the rear groove
completely. Insert cams into the holes on the
underside of the lower shelf and into the back
of the plinth and tighten with a screwdriver.
Insert a flat headed screw bolt into the hole at
the back edge of the side and tighten into the
back brace with the Allen key.
Baje el otro lado cuidadosamente en la ensambladura,
teniendo cuidado de que todas las clavijas y las
chavetas entrén en los agujeros apropiados, y que los
tableros para el fondo entrén completamente en la
ranura al fondo. Introduzca levas en los agujeros en la
superficie inferior del estante inferior, y en la superficie
trasera del plinto y apriete con un destornillador.
Introduzca un perno como tornillo (cabeza plana) en el
agujero al borde trasero del lado y apriete hasta la
abrazadera con la llave Allen.


