Motak MCO1-N Installation & Operation Manual Download Page 5

Installation/Owner’s Manual 20201109 

For Warranty Service Call  833-474-0367 

Air supply and ventilation: 

The area in front and around the appliance must be kept clear to avoid

any obstruction of the flow of combustion and ventilation air. Adequate clearance must be
maintained at all times in front and at the sides of the appliance for servicing and proper ventilation.

Pressure Regulator: 

All commercial cooking equipment must have a pressure regulator on the

incoming service line for safe and efficient operation. The internal regulator provided for this
appliance is adaptable for both Natural Gas and Liquefied Propane (LP) Gas. A conversion kit with
separate instructions is included explaining this procedure in detail.

Regulator information: 

Internal p

ressure regulator is factory adjusted for four (4”) inch Water

Column (WC) Natural Gas standard and may be converted by qualified personnel to be used for
Propane at ten (10”) Water Column pressure.
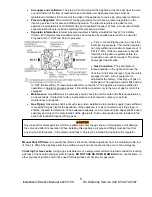
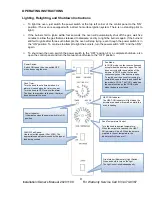
Prior to connecting the gas line, check the

incoming line pressure. The internal regulator
can only withstand a maximum pressure of ½
PSI (14” WC). If the line pressure is beyond
this limit, a step down regulator before the
convection oven will be required. The arrow
shows gas flow direction.

Gas Connection: 

The serial plate is

located outside on the right panel near the
front top. It indicates the type of gas the unit is
equipped to burn. All our equipment is
adjusted at the factory. Check type of gas on
serial plate. The appliance comes fitted with a

¾” NPT (National Pipe Thread) male adapter for connection. The appliance is design-certified for 
operation on natural or propane gases, it should be connected only to the type of gas for which it is 
equipped. 

Maintenance

: A qualified service company should check the unit for safe and efficient operation on

an annual basis. Contact the factory representative or local service company to perform
maintenance and repairs.

Gas Piping: 

Gas piping shall be of such size and so installed as to provide a supply of gas sufficient

to meet the full gas input of the appliance. If the appliance is to be connected to existing piping, it
shall be checked to determine if it has adequate capacity. Joint compound (pipe dope) shall be used
sparingly and only on the male threads of the pipe joints. Such compounds must be resistant to the
action of Liquefied Propane (LPG) gases.

Manual Shut Off Valve: 

A manual shut off valve should be installed upstream from the manifold, within four 

(4) feet, (1.2M) of the appliance and in a position where it can be reached in the event of an emergency.

Checking For Gas Leaks: 

Using a gas leak detector or a soapy water solution is recommended for locating 

gas leaks. Check entire piping system for leaks. 

DO NOT USE AN OPEN FLAME 

Matches, candle flame, or 

other sources of ignition shall not be used for this purpose of checking for gas leaks 

Any loose dirt or metal particles, which are allowed to enter the gas lines on this appliance, will damage 
the valve and affect its operation. When installing this appliance, all pipe and fittings must be free from 
any internal contaminates. It is recommended that a “drip leg” be installed in-line before the regulator. 

Summary of Contents for MCO1-N

Page 1: ...This manual contains important information regarding your MOTAK unit Please read the manual thoroughly prior to equipment set up operation and maintenance Failure to comply with regular maintenance guidelines outlined in the manual may void the warranty Improper installation adjustment alteration service or maintenance can cause property damage injury or death Read this manual thoroughly before in...

Page 2: ...Keep appliance area free and clear of combustibles Retain this manual for future reference FIRE HAZARD FOR YOUR SAFETY Do not store or use gasoline or other flammable vapors and liquids in the vicinity of this or any other appliance Keep area around appliances free and clear of combustibles Purchaser of equipment must post in a prominent location detailed instructions to be followed in the event t...

Page 3: ...d to L P gas by a licensed and certified gas technician Documentation will be necessary for warranty issues Failure to comply with this instruction will void warranty See the included L P G conversion kit for gas conversion parts and instructions in separate publication Unit installation must conform to the National Fuel Gas Code ANSI Z223 1 NFPA 54 the National Gas Installation Code CSA B149 1 or...

Page 4: ... when it comes to requirements for installation of equipment Therefore installation should comply with all local codes 4 Install casters to legs as shown into permanently fastened adapter on the leg Attached each leg to each corner of the oven and securely tighten Legs must be installed to adequately provide proper ventilation to the unit 5 The supplied gas pressure regulator is built in the combi...

Page 5: ...mes fitted with a NPT National Pipe Thread male adapter for connection The appliance is design certified for operation on natural or propane gases it should be connected only to the type of gas for which it is equipped Maintenance A qualified service company should check the unit for safe and efficient operation on an annual basis Contact the factory representative or local service company to perf...

Page 6: ...or death Read the installation operating and maintenance instruction thoroughly before installing or servicing this equipment FIRE and INJURY or DEATH HAZARD Injuries or death can occur if this equipment is not used properly To reduce risk of injury or death Keep the appliance area free and clear from combustibles Do not obstruct the flow of combustion and ventilation air Do not spray controls or ...

Page 7: ...any unauthorized parts to this equipment Doing so may create a hazard and will void the warranty We take every care to ensure that all products are safe Steel cutting procedures used to manufacture these items result in sharp edges These sharp edges are removed to the best of our ability however we insist the operator take care when in contact with this piece of equipment Always keep hands hair an...

Page 8: ...which of the ovens will be on the bottom Attached either the legs or casters that are in the Stacking Kit to the bottom oven as shown on the right Remove flue assembly from both top and bottom oven Carefully lift top oven onto the bottom aligning the top and bottom locator holes Install stacking bracket as shown This will prevent the top oven from moving on the bottom oven Install the stacked flue...

Page 9: ... oven Cook Timer Turn the knob to set a time duration An alarm will sound when the timer runs out Turn the knob to OFF to cancel the alarm The timer is a reminder to the user the timer does not control the oven Fan Mode In COOK mode the fan runs continuously except when the doors are open The fan does not cycle with the operation of the burners In COOL mode the fan runs continuously even if the do...

Page 10: ...oven doors load the product into the oven and close the doors 7 You can use the Cook Timer as a reminder of when to remove the load from the oven If so desired turn the Cook Timer knob until the indicator mark points to the desired cooking time up to 55 minutes The timer knob will rotate counterclockwise as the timer runs down indicating how much time remains You can turn the knob while cooking to...

Page 11: ...nterior surfaces with mild detergent and warm water Rinse thoroughly with clean water For stubborn baked on debris a commercial oven cleaner may be used Do not use steel wool in the interior of the oven particles of the steel wool could be left behind and may contaminate food product Scotch Brite pads or alike that are non metallic may be used MONTHLY CLEANING Clean around the rear of the oven esp...

Page 12: ...Installation Owner s Manual Ref IR20200116 For Warranty Service Call 866 359 7378 Electrical Wire Diagram 12 ...

Page 13: ...13 Installation Owner s Manual Ref 20201109 For Warranty Service Call 833 474 0367 Page left blank intentionally ...

Page 14: ...14 Installation Owner s Manual Ref 20201109 For Warranty Service Call 833 474 0367 Page left blank intentionally ...

Page 15: ...15 Installation Owner s Manual Ref 20201109 For Warranty Service Call 833 474 0367 Page left blank intentionally ...

Page 16: ...474 0367 A product with the MOTAK name incorporates the best in durability and low maintenance We all recognize however that replacement parts and occasional professional service may be necessary to extend the useful life of this unit When service is needed contact an MOTAK Authorized Service Agency or your dealer To avoid confusion always refer to the Model Number Serial Number and the Gas Type o...

Reviews: