background image

12

Flight

Precautions

Flight

(Mode 2)

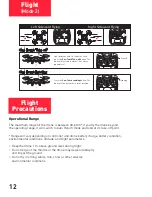
Take-off 

Landing

Left Sideward Flying

Right Sideward Flying

Link the drone with its controller, then 
press the 

One-Touch Take-off

 button. The 

drone will ascend to about 1.5 m. above 
ground level.

Press the 

One-Touch Landing

 button. The 

drone will land from its current position.

Operational Range

The maximum range for the drone is between 30-60 m.* If you fly the drone beyond 

the operating range, it will switch to Auto Return mode and land at its take-off point. 

* Range will vary depending on controller and drone battery charge, battery condition, 

environmental conditions, altitude, and flight parameters.

•  Keep the drone 1 m. above ground level during flight.

•  Do not let go of the throttle or the drone may descend abruptly 

    and impact the ground.

•  Do not fly in strong winds, rain, snow or other adverse 

    environmental conditions.

Summary of Contents for Pro live-4000

Page 1: ...this manual carefully before flying It has information you need to know for safe and efficient flight Please keep this manual in a safe place For Owner s Manual updates warranty information and suppo...

Page 2: ...fly Near or around obstacles such as birds or pets aircraft helicopters other drones antennas or overhead lines or airborne toys like kites In or near airports or restricted areas In adverse condition...

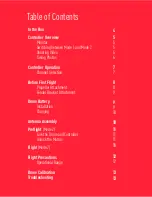
Page 3: ...Channel Selection Before First Flight Propeller Attachment Fender Bracket Attachment Drone Battery Installation Charging Antenna Assembly Preflight Mode 2 Link the Drone and Controller Unlock the Moto...

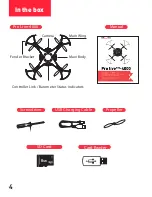
Page 4: ...4 In the box Propeller Main Body Main Wing Fender Bracket Controller Link Barometer Status Indicators Camera Pro Live 4000 USB Charging Cable Manual Screwdriver SD Card Card Reader...

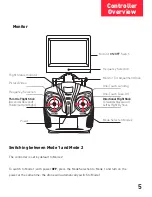
Page 5: ...er at the same time the drone will automatically switch to Mode 1 Flight Status Indicator Monitor ON OFF Switch Frequency Selection Monitor Tilt Adjustment Knob One Touch Landing One Touch Take Off Mo...

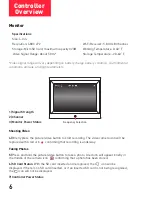
Page 6: ...Temperature 0 40 F Storage Temperature 20 60 F Video signal range will vary depending on battery charge battery condition environmental conditions altitude and flight parameters Frequency Selection 5...

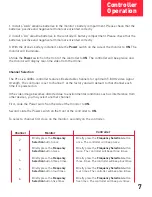
Page 7: ...environmental conditions such as interference from other devices you may select another channel First slide the Power switch on the side of the monitor to ON Second slide the Power switch on the front...

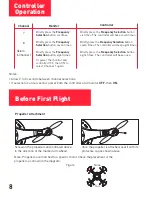
Page 8: ...times Briefly press the Frequency Selection button eight times Or power the monitor and controller OFF then ON to select Channel 1 again Notes Allow 2 to 3 seconds between channel selections If select...

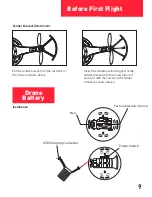
Page 9: ...irst Flight Fender Bracket Attachment Installation Put the fender bracket into the card slot of the drone as shown above Insert the middle positioning post of the fender bracket with the screw bits an...

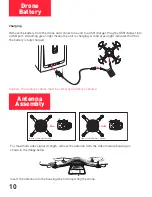
Page 10: ...w Insert the antenna into the housing when transporting the drone Charging Remove the battery from the drone and connect one end to a USB charger Plug the USB charger into a USB port A flashing green...

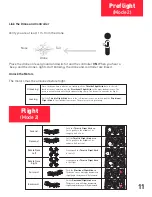
Page 11: ...ocked once they began rotating slowly The drone is now ready for flight Push the Throttle Flight Stick up Pull it gently to the middle of its range to halt ascent Pull the Throttle Flight Stick down P...

Page 12: ...ge The maximum range for the drone is between 30 60 m If you fly the drone beyond the operating range it will switch to Auto Return mode and land at its take off point Range will vary depending on con...

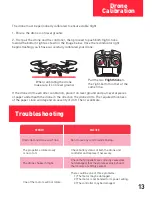
Page 13: ...aper stack will depend on severity of drift Then recalibrate When calibrating the drone make sure it s on level ground Pull the two Flight Sticks to the right bottom corner at the same time Troublesho...

Page 14: ...14 Copyright 2016 Mota Group Inc...

Reviews: