


(a) Remove switch housing by
unscrewing and removing three
screws as shown here. Set the
screws aside for reinstallation
at step (c).
(b) Depending on when your fan
was produced, a 2-pin connector
may already be present. If so, skip
to step (c). If your fan has separate
wire connectors, join the bridge
connector ends with light kit lead
wires from fan.
5
WARNING
See Page 2
POWER OFF
Circuit Breaker
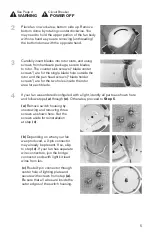
Carefully insert blades into rotor slots, and using
screws from hardware package, secure blades
to rotor. The counter sink screws (“blade center
screws”) are for the single blade hole outside the
rotor and the pan head screws (“blade holder
screws”) are for the two holes inside the rotor
area for each blade.
3
If your fan was ordered/configured with a light, identify all parts as shown here
and follow steps (a) through (e). Otherwise, proceed to Step 5.
4
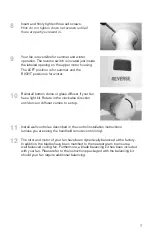
Place fan on work area, bottom side up. Remove
bottom dome by rotating counterclockwise. You
may need to hold the upper portion of the fan body
with one hand as you are removing (unthreading)
the bottom dome with the opposite hand.
2
5
(c) Route 2-pin connector through
center hole of lighting plate and
secure with screws from step (a).
Be sure that all wires are inside the
outer edges of the switch housing.


