morse 26 Operator'S Manual Download Page 4

The Specialist In Drum Handling Equipment

Drum Pumps

morsedrum.com

Copyright 2019  -  Morse Mfg. Co., Inc. 


Form PL26 


(Updated 11 Jun, 2019)


4

Pump operating Instructions

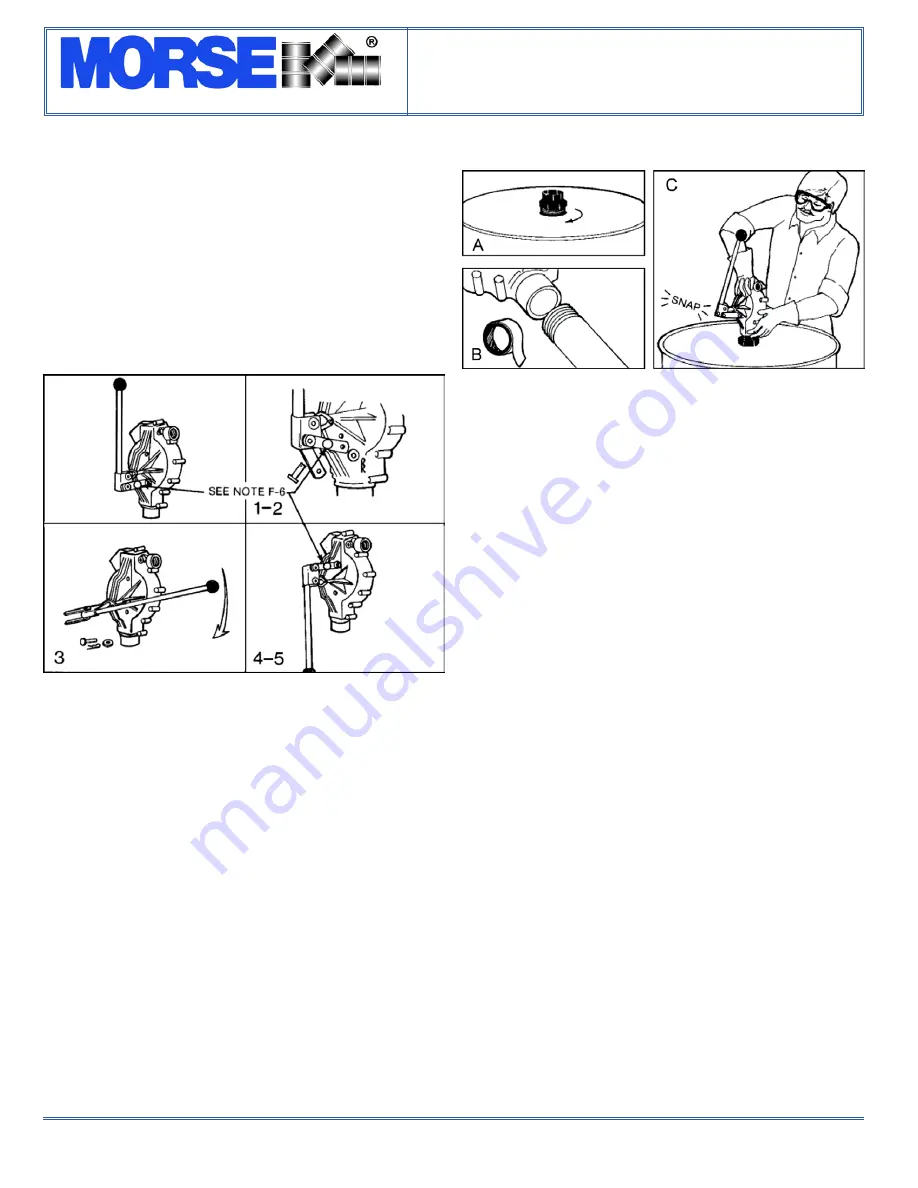
FoR eAsY InstALLAtIon FoLLoW tHese stePs In tHe 

oRDeR sHoWn.

Screw the bung adaptor into the drum or barrel. Be sure not to 

A. 

overtighten (Refer to Safety Precautions step H on page 3).

Install supplied clamp loosely around bung adaptor.

B. 

Thread appropriate length of suction tube and extension 

C. 

tube(s) into pump section. Use teflon tape provided (Refer to 

Safety Precautions step H on page 3).

Install pump and tubing into bung adaptor by pushing straight 

D. 

down firmly. Housing will snap in place. Tighten the clamp 

(item 31). Screw hose and adaptor or discharge spout into 

pump body.

Caution: When pumping from a lined drum, order part item  

E. 

58-0069. This is a flexible suction tube to prevent damage to 

the liner.

The handle position can be changed with the following steps.

F. 

Remove hairpin clip (item 6) from clevis pin (item 7).

1. 

Remove clevis pin from housing to free links (item 8).

2. 

With links clear of housing, rotate handle 1/2 turn to new 

3. 

position.

Install clevis pin through the links and the opposite hole in 

4. 

housing.

Install hairpin clip through the hole in the clevis pin. 

5. 

Ensure the flat washer (item 4) is installed between the 

hairpin clip and the link.

CAUTION: This hole is used for security lock only. 


6. 

Remove hose from hanger and place nozzle in container. 

G. 

Operate handle to prime the pump. 3-6 strokes are required under 

most conditions. After the pump is primed it will deliver about one 

gallon for every four full strokes (backward and forward).

Two Position Pump Handle

trouble shooting Guide

A. pump will not prime

Clogged suction. Check that the suction tubes are clear and 

1. 

that the screen filter is not dirty or clogged. Use a pair of 

needle nose pliers or a stiff piece of wire to pull the suction 

screen from housing. Clean it, if necessary, and push it gently 

back into the housing or with a fi nger or blunt rod.

Air leakage. Check that the connection to housing, extension 

2. 

tube and suction tube are threaded tightly and sealed with 

teflon tape (Refer to Safety Precautions step H on page 3).

Piston leakage. Verify that the teflon ring fits snugly in bore 

3. 

and is not cut or excessively worn.

Valve leakage. Inspect poppet valves for weak springs 

4. 

or clogging. If pump was recently disassembled VERIFY 

PROPER POSITION OF VALVE SEATS (Refer to 

Maintenance step B.1. on page 5).

Gasket leaks. Inspect for torn gasket (item 18), poor fit or 

5. 

loose coverplate bolts (item 20). 

B. not enough Flow

Check items A. 1-5. 

1. 

Check discharge hose for clogging or pinching. Verify that the 

2. 

nozzle is not clogged.

Check that piston is travelling its full stroke and the linkage 

3. 

has not bound or jammed.

Summary of Contents for 26

Page 1: ...tem 21 1 nozzle item15 2 hose clamps item16 4 1 suction tube item 36 5 1 extension tube item 34 6 1 coupling item 35 7 1 discharge spout 8 Limited 1 Year Warranty Morse drum handling equipment is guaranteed against defects in workmanship or materials for one year when used properly within its rated capacity Warranty does not cover wear from normal use or damage from accident or abuse Motors and ot...

Page 2: ...UTION DO NOT allow drum to impact on floor ground or dumping station etc WARNING Verify the chemical compatibility of the materials of your pump with the liquid you want to pump If you are uncertain regarding chemical compatibility contact your dealer for applications assistance and request a copy of our Corrosion Resistance Charts Do not use a pump that is not chemically compatible with the liqui...

Page 3: ...E ONLY ORIGINAL FACTORY REPLACEMENT PARTS B When pumping flammable liquids ensure adequate ventilation C to prevent explosive build up of fumes Pumping should always be done in a NO SMOKING area Approved fire extinguishers in good condition should be available for fire suppression Containers holding flammable liquids should be grounded and D portable containers bonded to prevent explosion hazards from...

Page 4: ...alled between the hairpin clip and the link CAUTION This hole is used for security lock only 6 Remove hose from hanger and place nozzle in container G Operate handle to prime the pump 3 6 strokes are required under most conditions After the pump is primed it will deliver about one gallon for every four full strokes backward and forward Two Position Pump Handle Trouble Shooting Guide A pump will no...

Page 5: ...acing each other when installed The discharge valve seats upper two should have b springs facing away from each other Install piston rod O ring item 11 Install retainer plate item 2 10 with the groove facing AWAY from the pump housing Ensure piston item 28 has O ring item 29 and teflon ring item 30 installed Teflon ring will stretch enough to install by hand tools may damage the piston Slide piston ...

Page 6: ...ectrical interconnection between containers such as a drum and a receiving can Bonding must be completed BEFORE pumping begins See diagrams below GROUNDING is the electrical connection between a container and a constant ground A constant ground would be a metal pipe or rod in contact with the earth An underground tank and piping connected to it would be inherently grounded by nature of the install...

Page 7: ...ir Kit Description 26 5867 P Cork Nitrile Gasket Viton O Rings Polyester Valves Teflon Piston Ring 27 1AE 5869 P EPDM Gasket and O Rings Polyester Valves Teflon Piston Ring 27 4AV 5866 P Viton Gasket and O Rings Polyester Valves Teflon Piston Ring 28 5BV 5865 P Viton Gasket and O Rings Halar Valves Teflon Piston Ring 28 6BE 5868 P EPDM Gasket and O Rings Halar Valves Teflon Piston Ring ...

Page 8: ... SCREW 1 4 20 X 2 SS PAC 21 1 26 27 1AE 27 4AV 1214 30 ADAPTER HOSE PE 60DEG PAC 21 1 28 5BV 28 6BE 1214 90 ADAPTER HOSE HALAR 60DEG PAC 22 11 26 27 1AE 27 4AV 0721 00 NUT 1 4 20 HEX PLATED PAC ITEM QTY MODEL PART DESCRIPTION 22 11 28 5BV 28 6BE 0721 10 NUT 1 4 20 HEX SS PAC 23 2 27 1AE 1340 02 VALVE ASM SMALL PE EPDM PAC 23 2 26 27 4AV 28 5BV 1340 03 VALVE ASM SMALL PE VITON PAC 23 2 28 6BE 1340 ...

Reviews: