background image

6

Assembly

CAUTION:

Always be sure that the machine is switched off and
unplugged before carrying out any work on the tool.

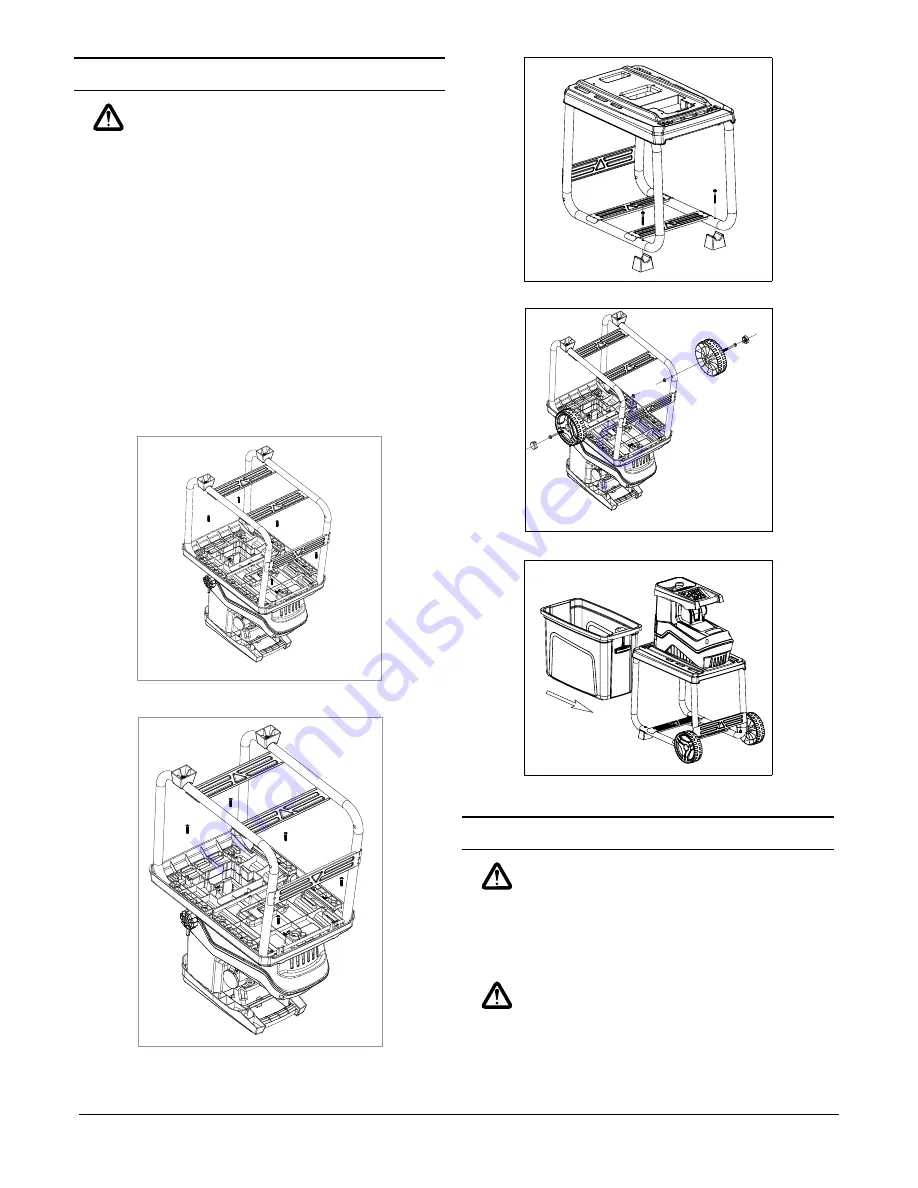
1.  Place the upper enclosure upside down on the flat floor and 

then put the base frame on it. Be careful about the direction of 
the part. (Fig. 2)

2.  Fasten each part by tightening screws. Make sure they become 

perfectly stable. (Fig. 3)

3.  Attach the stoppers by screw. Make sure they are fastened 

tightly. (Fig. 4)

4.  Attach wheels as follows: (Fig. 5) 


-

Attach the axis on one of the wheel. Pass the axis 
through the holes on the leg.


-

Attach the other wheel to the axis by passing the pin 
through the hole on the axis. Fasten the wheel by 
bending the pin.


-

Attach the covers on the wheels.

5.  Attach the retaining basket. And then raise the locklever.  

(Fig. 6)

2

4

6

Functional Description

WARNING

Before plugging in the machine, always make sure that 
the machine is switched off. Plugging in the machine with  
the switch on may cause an unexpected start resulting in 
serious personal injury.

Power Switch (Fig. 7)

CAUTION:

Do not use the machine if the switch does not turn it on
and off. Have defective switches replaced by authorized 
service centre.
To turn on the machine, push the green button.
To turn off the machine, push the red button.

3

5

Summary of Contents for YT5461-01

Page 1: ...8 E 0 Revised July 2016 Important Please read this Owner s Manual and the Express Warranty before using this product The Warranty does not cover damage due to misuse or failure to follow the operating...

Page 2: ...2...

Page 3: ...ation on proper handling Not observing this instruction can lead to faults in the machine User information This information helps you to use all the functions correctly Proper Use For safety reasons t...

Page 4: ...ore Leaving the machine unattended Before clearing a blockage or any fault Before checking cleaning or working on the machine Before making any adjustments changing accessories or storing Whenever the...

Page 5: ...nance or repair work other than that described in this instruction manual Any other work must be carried out by authorized service centre Only use original replacement parts and accessories intended f...

Page 6: ...the holes on the leg Attach the other wheel to the axis by passing the pin through the hole on the axis Fasten the wheel by bending the pin Attach the covers on the wheels 5 Attach the retaining baske...

Page 7: ...itched off and unplugged before opening the blade cover Wear protective gloves before opening the blade cover The cutter does not stop immediately after switch off Wait until all the parts stop In cas...

Page 8: ...in reverse mode as this could cause injury to the operator or damage to the machine Maintenance CAUTION Always be sure that the machine is switched off and unplugged before performing inspection or m...

Page 9: ...is not drawn into the shredder Reverse rotation Switch off device and switch over direction of rotation selector switch Shredding material caught in filling hopper Switch off device Switch the forwar...

Page 10: ...10...

Page 11: ...11...

Page 12: ...Head Office New Zealand 1 37 Mt Wellington Highway Panmure Auckland 1060 P O Box 14 349 Panmure Auckland 1741...

Reviews: