background image

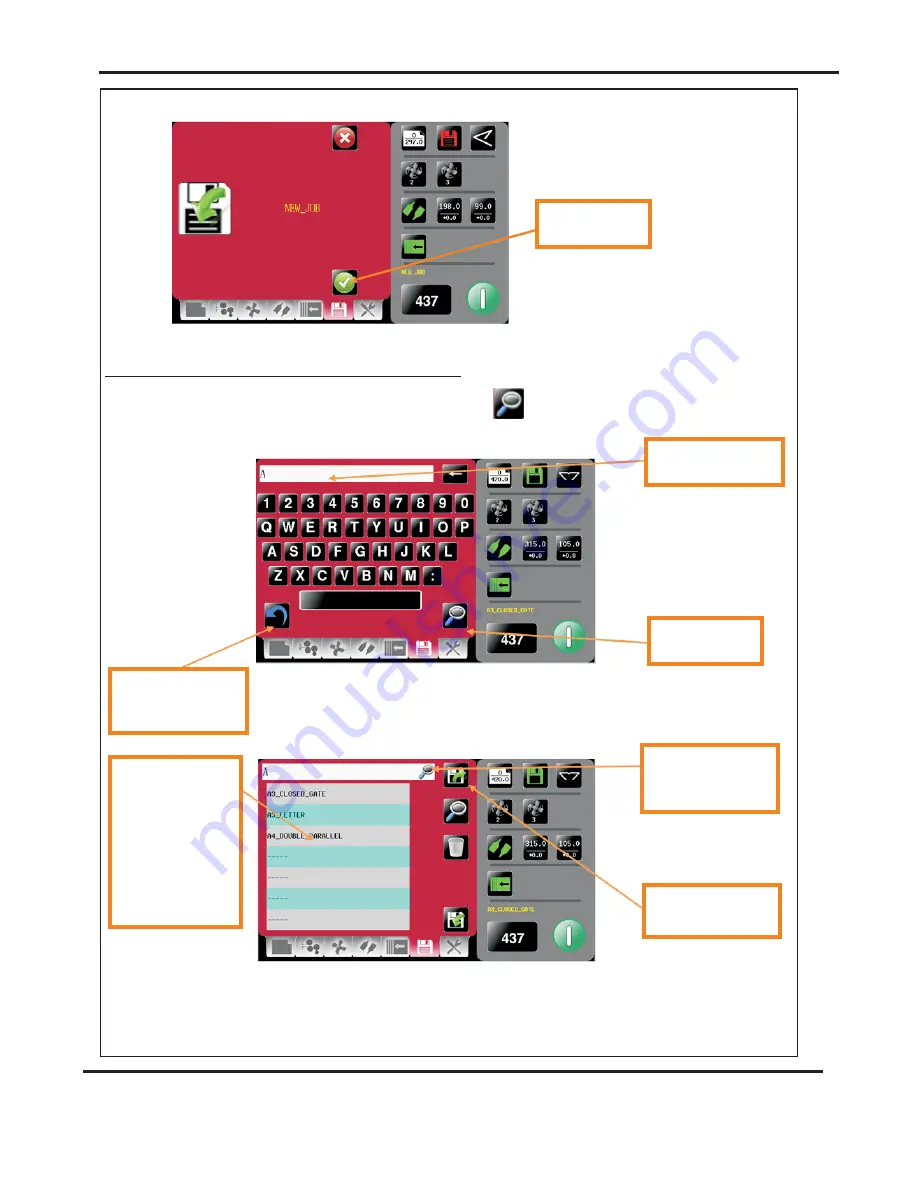
To change your mind &

return to the previous

screen click here.

To confirm saving

of job click here.

Type in job description

or first few characters

Press search icon

to start search

Jobs matching

characters in text box

will be shown in this

area - selecting job

from this area will

show job settings in

the right hand status

area. Job selected will

be shown in text box.

Press to load job

shown in text box.

Toggle between search

results & full list of

jobs

Page 27

SYSTEM

Save confirmation screen.

You can search for jobs by clicking the search icon

, this will bring up the

search keyboard for text input.

Search for current jobs to load or modify.

DigiFold Pro

Operating the AutoFold Pro

Summary of Contents for AutoFold Pro

Page 1: ...ISSUE 7 MAY 2011 DOCUMENT FOLDING MACHINE OPERATORS MANUAL 184 011 AutoFold Pro Website www morgana co uk Facsimile 01908 692399 Telephone United Kingdom Morgana Systems Limited 01908 608888 ...

Page 2: ...to the Autocreaser and Aligning the Machines Touchscreen Layout Paper Settings Page Roller Gap Set Page Feed Bed Fans Settings Page Folds in Set By Fold mode Folds in Set By Position mode Example of Set By Position mode Delivery Settings Page Status Screen Running the Job Setting the machine to operate in manual sheet feed mode Store Pages Tools Menu Paper crease out of square Paper fold out of sq...

Page 3: ... 36 ACCESSORIES AND OPTIONS 37 RECOMMENDED SPARES 38 39 01 32 MACHINE CALIBRATION HISTORY SHEET 40 FUSE POSITIONS RATINGS 41 PRODUCT RECYCLING AND DISPOSAL 42 FUSE POSITIONS AND RATINGS 43 Paper Crunch Clip 1 NOT Clear Clip 1 NOT Blocked Clip 2 NOT Clear Clip 2 NOT Blocked Overlap Sheets Too Close AutoFold Pro ...

Page 4: ...d unprinted stock E OE AutoFold Pro It is to note that to prevent cracking when using dry ink or toner based print engines the material be fully acclimatised for at least 48 hours before putting an image onto the paper Feeding System Conveyor Vacuum Sheet Alignment Input Bed Height Adjustable from 850mm to 1000mm Max Sheet Size 600mm x 385mm 24 x 15 Min Sheet Size 210mm x 140mm 8 3 x 5 5 dependant...

Page 5: ...under any circumstances adjust the paper gate when the machine is switched on REGLES DE SECURITE A FAIRE ET A NE PAS FAIRE Lire ce mode d emploi avant d utiliser la machine Respecter l alimentation électrique indiquée Brancher sur une prise séparée car une surcharge peut entraîner un incendie ou un choc électrique Installer le cordon d alimentation de manière à ne pas pouvoir trébucher par dessus ...

Page 6: ...otating rollers Do be aware of low current anti static shock Attention au risque de se coincer les doigts et aux pièces en mouvement lors du fonctionnement de la machine Ne pas porter de vêtements flottants lors de l utilisation de la machine Rassembler les cheveux longs lors de l utilisation de la machine Attention au risque de se coincer les doigts et aux pièces en mouvement lors du fonctionneme...

Page 7: ...UMENT FOLDING MACHINE Key to photograph below 1 Delivery assembly 2 Top Cover 3 Touchscreen 4 Gap Set Knobs 5 System Switch 6 Fuses 7 Mains Input Socket 8 Emergency Stop Switch 1 5 7 2 3 6 4 AutoFold Pro AutoFold Pro 8 ...

Page 8: ...ghten both of the knurled locking collars 1 The AutoFold is supplied as standard with a Transfer Bed Assembly that fits onto the AutoCreaser 33 and AutoCreaser Pro 33 machines A Transfer Bed Assembly that will fit the wider AutoCreaser 50 and AutoCreaser Pro 50 machines can be purchased as an optional extra see accessories and options on page 37 i Remove the stacker unit from the AutoCreaser and f...

Page 9: ...toFold the AutoCreaser will stop feeding When using the AutoFold with an AutoCreaser Pro 33 or an AutoCreaser Pro 50 it is recommended that the AutoCreaser is set to Pulse Feed and the speed is set to number 2 Depending on the type of crease and length of the paper the speed setting may need to be changed to speed number 1 or number 3 NOTE TOP VIEW FIG 9 AutoCreaser Transfer Bed Assembly Morgana A...

Page 10: ...ick links to setting pages Tabs to enable switching between setting pages choose either Paper Settings Gap settings Feed Fan Setting Fold settings Delivery settings Store and Tools Operating the AutoFold Pro IMPORTANT If you have not been trained to operate this machine we strongly advise that you select the red cross icon We recommend that you either seek training or ask a trained operator to run...

Page 11: ... a guide choose as follows 0 approx 0 1 thk 3 approx 0 3 thk 1 approx 0 2 thk 2 approx 0 3 thk Paper Length On selection the status area is replaced with a calculator for inputting new values Length range 190mm 900mm Arrows may be selected to increase or decrease the page size in 0 1mm increments Fold Selection For quick setting of fold positions on standard size sheets Highlighted fold is type cu...

Page 12: ...Page 12 FOLDING Paper Thickness Selection Operating the AutoFold Pro Paper Thickness input Pre set Paper Thickness sizes for quick insertion ...

Page 13: ...ed and the type of fold being produced The roller gaps may also require adjustment if cracking of the print is noticeable see Fig 13 1 below Setting the Roller Gaps Gap 1 Gap 2 Gap 3 AutoFold Pro Operating the AutoFold Pro Roller Gap 3 Roller Gap 1 INFEED FIG 13 1 Roller Gap 2 K1 K2 Current gap setting for 2nd Fold Roller Current gap setting for 1st Fold Roller Recommended gap values based on pape...

Page 14: ...alue to the required setting Do not set the gap from a value lower than that required i Measure the thickness of the sheet using a Digital Vernier Calliper ii Set roller GAP 1 to the vernier reading iii Set roller GAP 2 and roller GAP 3 for the type of fold being produced using the GAP SET GUIDE table shown on next page IMPORTANT must PROCEDURE Roller Gap 1 Knob Roller Gap 2 Knob Roller Gap 3 Knob...

Page 15: ...X X X X X X X 2X 2X 3X 3X 3X 3X 3X Double X 2X 4X HALF LETTER DOUBLE CLOSED GATE ENGINEERING GATE CONCERTINA FOLD TYPES Example 1 When producing a fold if GAP 1 is 0 2 X then set GAP 2 to 0 4 2 x X and set GAP 3 to 0 4 2 x X Example 2 When producing a fold if GAP 1 is 0 3 X then set GAP 2 to 0 3 X and set GAP 3 to 0 9 3 x X Half K1 Gate AutoFold Pro Operating the AutoFold Pro ...

Page 16: ...the stock down onto the drive belts The drive belts then pull the stock against the rear side lay so that the stock enters the folding mechanism squarely When feeding light stocks if the stock buckles reduce the speed of the front fan Fan 1 0 slowest speed 3 fastest speed When feeding heavy stocks if the stock skews and is not pulled against the rear side lay increase the speed of the front fan Fa...

Page 17: ...g the AutoFold Pro Folding on off selector green is on red is off This is also indicated in the status area With Folding turned off the deflect positioned can be micro adjusted Micro adjust range is 5 0 to 5 0 with increments of 0 1mm Folding can be Micro adjusted for fine Micro adjust range is 5 0 to 5 0 with increments of 0 1mm adjustment K1 Fold micro adjust On selection the status area is repl...

Page 18: ...m Clicking this icon switches deflect off K1 returns to its original position K1 deflect button K1 micro adjust selected K1 in deflect position This can be micro adjusted Micro adjust range is 5 0 to 5 0 with increments of 0 1mm K1 K2 in deflect position This can be micro adjusted Micro adjust range is 5 0 to 5 0 with increments of 0 1mm ...

Page 19: ...ations in paper thickness hardness and substrate see page 11 SET BY FOLD l l Paper type 0 Paper type 1 2 3 The crease and fold are set at exactly the same position This may be used but beware some thin stocks will allow the fold to wander from one side of the crease to the other and will move the fold relative to the crease and should be tried out with the stock in use Generally a higher number wi...

Page 20: ...79 0mm 7 Crease 3 260 0mm 10 2 Fold 1 179 0mm 7 Fold 2 260mm 10 2 All dimensions are from the leading edge of the paper Example of Set by Position Crease 2 Fold 1 0 35 First Fold Second Fold Leading Edge Crease 3 Fold 2 179 0 260 0 Finished Document 9mm 0 35 Leading Edge 9mm 0 35 Leading Edge SETTINGS 9mm 7 10 2 Operating the AutoFold Pro ...

Page 21: ...on may be micro adjusted by clicking here Shingle may be micro adjusted by clicking here Roller adjustment calculator Shingle adjustment calculator The Delivery can be toggled On or Off by clicking here Delivery on off status red is off green is on Batch on off Button Set to ON green for Batch feeding See Page 22 Set to OFF red for Normal feeding ...

Page 22: ...ion and shingle length are achieved they can be stored with the job If paper is being fed in Batch mode the Batch On Off Button should be set to green The delivery roller will run continuously and the batches on the delivery conveyor will be separated If paper is being fed normally i e not batched the Batch On Off Button should be set to red The delivery roller will then stop rotating if the paper...

Page 23: ... input from the paper setting screen Fan speed 0 1 2 or 3 Front Rear Long bed option also has centre fan Indicator for status of knives K1 K2 On K1 Off K2 On K1 On K2 Off K1 K2 Off Clicking in this area will take you to the delivery setting page Clicking in this area will take you to the Fold setting page Fold Positions Micro adjust settings Current job count click to zero A screen will appear to ...

Page 24: ...ick to confirm System switch is on then click run button again Click to run machine Run count Job Count Click to stop machine Operating the AutoFold Pro Run Job System Switch Not On The machine running screen will appear ...

Page 25: ... up in exactly the same way as explained when operating the machine automatically The machine can now be started by activating the System switch to on Select the icon on the touch screen and begin to feed the sheets individually onto the feed bed To stop feeding the sheets select the icon on the touch screen and switch the System Switch off NOTE If the delay between feeding sheets is excessive the...

Page 26: ...e job shown Return to Store Menu click save icon to save job to store Page 26 FOLDING Store Pages New Jobs To get to the Store setting page click the lower tab or from the status area Having set up your job you can give the job a name and save it to a store You can also retrieve previously saved jobs modify them or delete jobs you no longer require Keyboard for entering job name Operating the Auto...

Page 27: ... area selecting job from this area will show job settings in the right hand status area Job selected will be shown in text box Press to load job shown in text box Toggle between search results full list of jobs Page 27 SYSTEM Save confirmation screen You can search for jobs by clicking the search icon this will bring up the search keyboard for text input Search for current jobs to load or modify D...

Page 28: ...confirm overwrite of Job press here To confirm deletion of Job press here To cancel deletion of Job press here Page 28 FOLDING Loading job confirmation screen Loaded job may be modified and then re saved as the same job name Overwrite job confirmation screen Delete job confirmation screen Operating the AutoFold Pro ...

Page 29: ... Pro Operating the AutoFold Pro Inch paper in direction of arrow to clear jams Clicking this icon will show Machine programme revision Touch Screen software revision Machine main board software revision Touch screen software revision Inch paper in direction of arrow to clear jams ...

Page 30: ...ilst running the machine follow the steps described below to allow access to remove the jammed paper 1 Unlock and lower the delivery unit open the top cover see FIG 29 1 below 2 If the paper is jammed in the fold rollers try to rotate the top fold roller using both hands Position the thumbs under the tie bar and spread the fingers out above the tie bar ...

Page 31: ...been released Check that the top cover is down Check that the delivery unit is in the up position and located correctly the machine will not start if the delivery unit is not in its up position For heavy stocks very small or very large sheets embossed or even irregular stock it may be necessary to feed the sheets manually see page 25 Cracking of the material along the crease may be caused by the f...

Page 32: ...r jam has been detected Press the system switch down and then select the right or left arrows to inch the paper forwards or backwards See page 30 that describes how to remove paper jams Press the green tick button and then press the start button If the machine stops and error message 09 is displayed on the touch screen this indicates that the sensor is or was blocked when it should have been clear...

Page 33: ...ror message 11 is displayed on the touch screen this indicates that the sensor is or was blocked when it should have been clear i e A jam in the paper path or the wrong length of paper has passed through the sensor To correct check if paper is present and check that the paper path is clear before restarting See page 30 that describes how to remove paper jams If the machine stops and error message ...

Page 34: ...Page 34 Trouble Shooting FOLDING Clip 2 Clip 1 Top Sensor Back Sensor SENSOR POSITIONS ...

Page 35: ...compressed air Clip 1 sensor is situated on the lower guides beneath the delivery conveyor and can be cleaned when required using a slim brush Clip 2 sensor is situated on the upper guides inside the top cover and can be cleaned when required using a slim brush Page 35 SYSTEM Trouble Shooting Error Screens Continued Sheets too close Overlap If the machine stops and error message 13 is displayed on...

Page 36: ... 9 10 11 12 624 018 DISPATCH BOX 4 1 1 6 1 13 14 Page 36 8 FOLDING 601 167 1 DIGITAL THICKNESS GAUGE 65 104 1 SPECIFICATION LABEL MSL CE 5 613 229 1 WRITE ON SERIAL NO LABEL 650 040 1 POWER CORD C19 UK 16A 2 5m 620 027 BONDUS WRENCH 5mm L AutoFold Pro 184 011 180 95 01 620 032 SPANNER 13MM COMBINATION ...

Page 37: ... 01 02 FEED BED FRAME SHORT ACCESSORIES OPTIONS May be obtained from May also be obtained and your dealer and fitted to your fitted by your dealer You should machine using the instructions not attempt to fit options as supplied or by reading your specialist tools and knowledge are operators manual required AutoFold Pro ...

Page 38: ... Bar Assembly 175 11 05 Sensor Bar Assembly Page 38 125 25 01 Small Stepper Driver High Power 174 06 01 Small Stepper Driver Low Power 174 19 01 RS232 Adaptor PCB Assy 75 500 04 Mini ITX Motherboard Autofold Pro 76 310 PSU Assembly ATX12V 300W FOLDING 184 04 01 Fan Control PCB Assembly 76 281 Lead Fan Assy 76 283 Lead Fan Assy 76 277 Lead Sensor 76 300 Lead Drive Motor 76 301 Lead Fold Knives Moto...

Page 39: ... Motor Roller Drive 75 512 Anti Static Transformer UL 76 258 Stepper Motor Belt Drive 76 259 Stepper Motor Roller Position 124 01 27 Lead Delivery Roller Pot 626 009 Anti Static Bar Female 184 03 02 Jam Detector Receiver 184 03 01 Jam Detector Emitter 186 02 01 Clip Sensor Assy Lower 604 108 Gas Spring 182 014 03 Belt Paper Transport Short 182 014 02 Belt Paper Transport Medium 607 182 Timing Belt...

Page 40: ...K1 Deflect Trim Stretch Lead Edge Trim Del Roller Trim Knife 1 Trim Date Total Count K2 Deflect Trim Knife 2 Trim K1 Deflect Trim Stretch Lead Edge Trim Del Roller Trim Knife 1 Trim Date Total Count K2 Deflect Trim Knife 2 Trim K1 Deflect Trim Stretch Lead Edge Trim Del Roller Trim Knife 1 Trim Date Total Count K2 Deflect Trim Knife 2 Trim K1 Deflect Trim ...

Page 41: ...ITIONS RATINGS PSU 12V F3 15AH 250 613 023 PSUs 24V 48V T6 3AH 250 681 019 T315mAH 250 681 011 ANTI STATIC UNIT FUSIBLE PSU 12V FUSIBLE PSUs 24 V 48 V FUSIBLE ANTI STATIQUE POSITION ET CLASSIFICATION DES FUSIBLES AutoFold Pro ...

Page 42: ...ion Application of this symbol on your equipment is confirmation that you should not dispose of the equipment in the normal household waste stream In accordance with European legislation end of life electrical and electronic equipment subject to disposal must be segregated from household waste Private households within EU Member States may return used electrical and electronic equipment to designa...

Page 43: ...d Pro FUSE POSITIONS RATINGS PSU 5V 12V F3 15AH 250 613 023 PSUs 24V T6 3AH 250 681 019 T315mAH 250 681 011 ANTI STATIC UNIT FUSIBLE PSU 5V 12 V FUSIBLE PSUs 24 V FUSIBLE ANTI STATIQUE POSITION ET CLASSIFICATION DES FUSIBLES ...

Reviews: