


12
ENGLISH
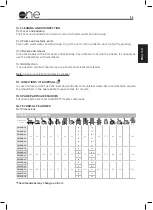
DIMENSIONS AND WEIGHT
Measures
in cm
Kg
Portata
MAX
CP500B-40
103
75
43
91
73
50
20
40
43
58
26
16,5
30
20
-
120
CP500B-43
43
60,5
CP500B-45
45
63
CP500B-46
46
63,5
CP500B-48
48
65
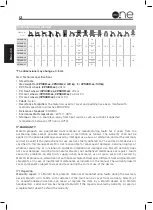
CP500R-40
103
75
43
91
73
50
20
40
43
58
26,5
16,5
30
20
-
120
CP500R-43
43
60,5
CP500R-45
45
63
*The dimensions may change ± 0,5 cm
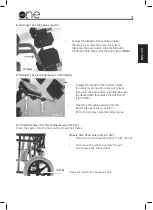
16.2 Technical specifications
• Steel frame
• Max weight for
CP100R-xx, CP103R-xx: 120 kg
- for
CP500R-xx: 130 kg
• PVC front wheels
(CP100R-xx)
: 20cm
• PU front wheels
(CP103R-xx, CP500R-xx)
: 20cm
• PU rear wheels (
CP100R-xx, CP500R-xx)
: 60cm PU
• PU rear wheels
(CP500R-xx)
: 30cm PU
• Fabric: Nylon
• Resistance to ignition: the materials used for cover and padding have been treated with
methods specified in Directive EN1021-1/2
• Reference standards: EN12183
• Environmental temperature: -20°C/+ 40°C
• Storage: store in a cool place, away from heat sources, such as sunlight (suggested
temperature b10°C and +40°C)
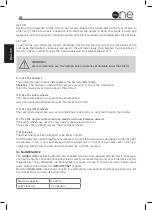
17. WARRANTY
Moretti products are guaranteed from material or manufacturing faults for 2 years from the
purchasing date, except possible exclusion or restriction as follows. The warranty shall not be
applied in the possible damages caused by improper use, abuse or alteration, and for the warranty
will not be valid if the instructions for use are not strictly adhered to. The correct intended use is
specified in this manual. Moretti is not responsible for consequent damages, personal injuries or
whatever caused by or in relation to mistaken installation or improper use. Moretti warranty does
not cover damages resulting from: natural disaster, not authorized maintenance or repairs , faults
caused by problems on electricity supply (when necessary), use of spare parts not covered by
Moretti, improper use, alteration not authorized, shipment damages (different from original Moretti
shipment), or in case of insufficient maintenance as indicated in the manual. The warranty doesn’t
cover components subject to wear and tear during the correct use of the device.
17.1 Repairing
Warranty repair: If a Moretti item presents material or manufacturing faults during the warranty
period, Moretti will confirm with customer if the fault can be cover from warranty. Moretti, at
its unquestionable discretion, can repair or replace the item, by a Moretti dealer or to Moretti
headquarters. Labor cost can be charged to Moretti if the repair is covered by warranty. A repair or
a replacement doesn’t extend the warranty.
Summary of Contents for ARDEA ONE CP100 Series
Page 14: ...14 ITALIANO NOTE...
Page 16: ......
Page 30: ...14 ESPA OL NOTA...
Page 32: ......
Page 46: ...14 ENGLISH NOTES...


