4. Cabling
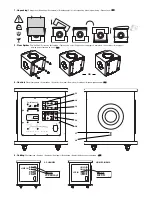
If you are using a 2-channel system, connect the pre-amp outputs on your amplifier to the Line In sockets on your Performance 9
subwoofer using a high quality stereo phono cable. When this input is used the frequency and slope controls for the subwoofer pre-
amp are activated.
If you are using a home cinema receiver, connect the "LFE" or "Sub" output on the receiver to the LFE In socket on your Performance
9 subwoofer using a high quality mono phono cable. When this input is used the frequency and slope controls in the Line In pre-
amp are deactivated. In this instance, the parameters are controlled by the receiver.
Use the Input switch to choose between the two pre-amp options. If you simultaneously use 2-channel hi-fi and home cinema, both
cables can be left connected. If you are using two or more subwoofers connect the second subwoofer to the corresponding Line
Out or LFE Out.
5. Positioning
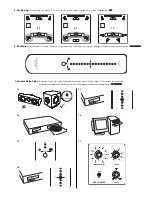
See diagrams for some typical set-ups. Your subwoofer can be placed almost anywhere in the room as bass is not directional.
However, due to the acoustic effects of the room, experimentation is recommended. Before setting the Notch Filter, try to achieve
the best performance by changing the position of the subwoofer. Remember to adjust only a little at a time and to make only one
change between listening tests.
Note: If applicable, ensure the correct distances/time delays are entered in the "Loudspeaker Set-Up" page of your home cinema
receiver (refer to your home cinema receiver manual for more information).
6. SPL (Sound Pressure Level) Meter
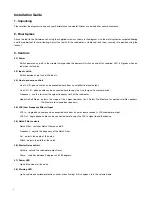
The SPL Meter supplied with the Performance 9 is included to aid the set-up of the Notch Filter. It may also be used to correctly
set-up satellite speaker levels when used in conjunction with an AV receiver. Press the button to turn on and off or hold the button
down to select range.
7. Variable Notch Filter
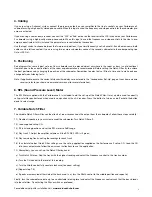
The Variable Notch Filter will lessen the effects of room resonance on the output from the subwoofer. Follow these steps carefully:
7.1) Disable all speakers in your system except the subwoofer. Turn Notch Filter off.
7.2) Load supplied set-up CD.
7.3) Sit in listening position and set the SPL meter to 2dB range.
7.4) Play track 1. Adjust the amplifier volume until the SPL REF LED is lit green.
7.5) Play remaining tracks, noting the readings for each track.
7.6) To calculate the best Notch Filter settings, use the set-up application supplied on the Performance 9 set-up CD. Load the CD
into your computer and follow the on-screen instructions to use the application.
7.7) Alternatively, you can set-up the Notch Filter by hand:
a) Turn Notch Filter on. Find the track with the highest reading and adjust the Frequency control to this track number.
b) Turn the Cut control to the level of this reading.
c) Turn the Width control fully counter clockwise (to narrow setting).
d) Repeat step 7.5).
e) If peaks are measured either side of the track used in a), turn the Width control to the middle position and repeat d).
Finally, turn the subwoofer volume up to a comfortable listening level and adjust the Frequency control such that the bass blends
into the satellites. Try adjusting the Phase switch as preferred.
For additional help with installation visit
www.mordaunt-short.com
3


