mopio Sterling Standing Desk Assembly Instructions Manual Download Page 10

Operation
Instructions

1.  Product Outline

2.  Product Specification

Bottom introduction: 

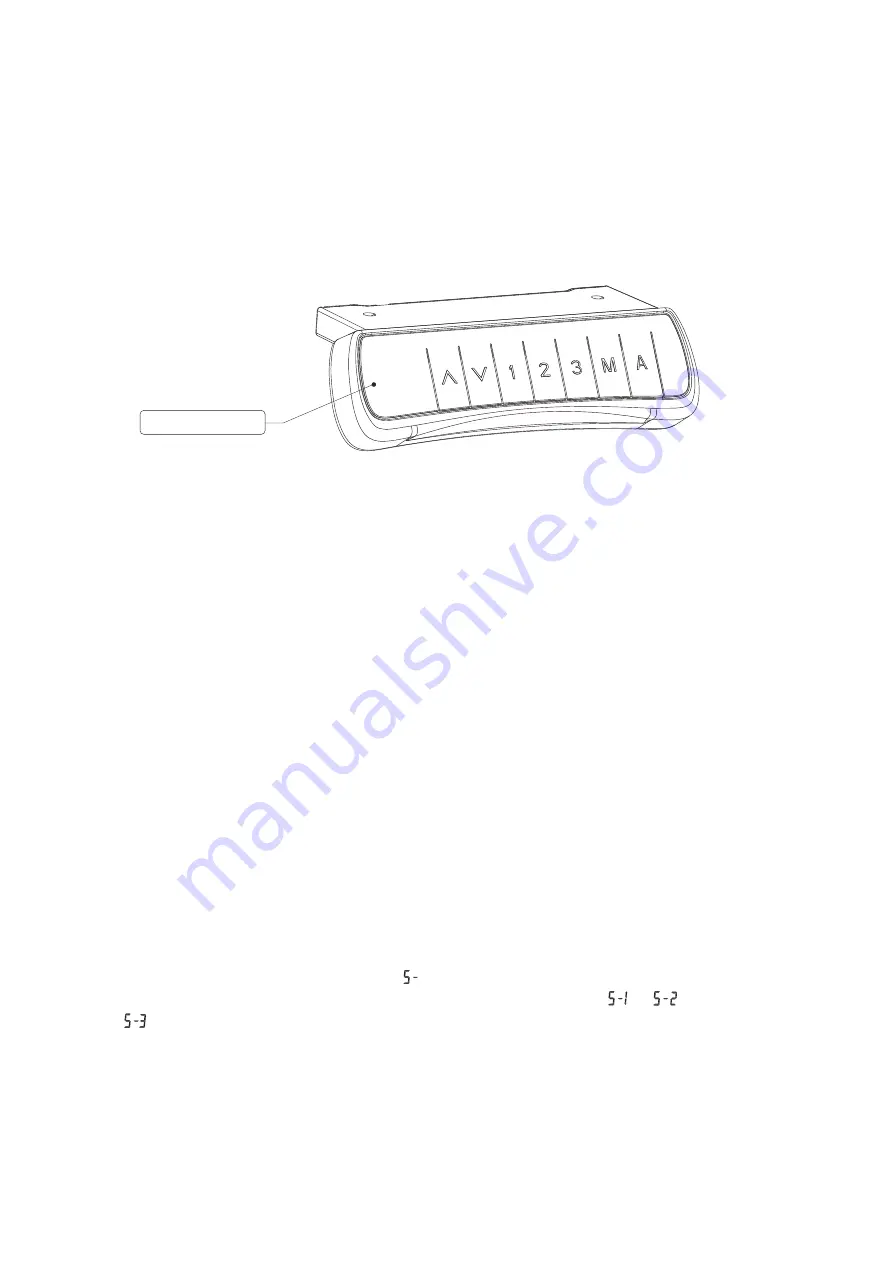
There are 7 buttons "▲" , "▼" , "1" , "2" , "3" , "M" , "A"

(1) "▲" : Adjust the desk upwards
(2) "▼" : Adjust the desk downwards
(3) "1" : Position 1, recall the 1st saved height position
(4) "2" : Position 2, recall the 2nd saved height position
(5) "3" : Position 3, recall the 3rd saved height position
(6) "M" : Height memory function
(7) "A” : Alert button to remind users changing posture

3.  Operating Instructions

 Height Adjustable Function:

Press the"▲" or "▼" button to adjust the height. The LED display shows the current height.

 Height Memory Function:

(a) Press UP or DOWN button and adjust the height to the desired height. Press "M" to save  
the height, and the screen will display "      "; Press "1" , "2" ,or "3" to save the height to 
corresponding memory position. The LED display screen will show "      " ,"       ", or
"      " accordingly.

(b) Press "1", "2" or "3" button directly to automatically adjust to the height you saved.

LED Display

STERLING STANDING DESK  |  10

Summary of Contents for Sterling Standing Desk

Page 1: ...DESK Column Number Maximum Load Speed Input Voltage 2 154lbs 1 0 inch s 100 240V 28 7 48 3 47 x27 5 55 x27 5 Motor maximum operation duration 2 mins Pause for at least 18 mins 32 104 F Lowest Position...

Page 2: ...n our website at www mopio com warranty register or scan the QR code REGISTERED CUSTOMERS ALSO RECEIVE Exclusive offers and free gifts Early access to new product releases Interior design and styling...

Page 3: ...d familiarize yourself with the workload Make sure there are enough helping hands to assist you and that you have allocated the time required to assemble your new product Make sure you have cleared en...

Page 4: ...SK 04 x1 Control Box 7 x1 Power Cable 10 x2 Baffle 8 x1 Hand Switch 9 1 2 3 9 4 5 8 7 6 11 10 11 x1 Transmission Rod 5 x2 Supporting Plate 6 x1 Supporting Beam 4 x2 Pedestal 1 x1 Column 3 x1 Column 2...

Page 5: ...the actual object please in kind prevail Before discarding the packaging please use the checklist to ensure that you have all the parts required to assemble your product Please kindly note you will ne...

Page 6: ...porting beam 4 Install 1 2 3 together use 5x5 Allen key C to tighten the screws A C 5x5 A x8 Loose screws on 4 with Allen key 4x4 C then stretch supporting beam Install supporting beam on the column 2...

Page 7: ...D G Install Transmission rod 5 Loose Insert Tighten Insert Tighten Install 5 2 3 following picture1 shows first then picture 2 use 2 5x2 5 Allen key D to tighten Do not rotate the drive rod more than...

Page 8: ...DESK 08 Step 5 Step 6 7 9 1 2 Install Control box 7 and Hand Switch 9 Install Baffle 8 Install desktop with screw F use pistol drill to tighten Install 8 use 2 5x2 5 Allen key D to tighten the screws...

Page 9: ...m following checks to ensure assembly is properly done Have you tightened all the screws Check if the legs and tabletop are stable enough Are the legs balanced Unbalanced legs could be caused by uneve...

Page 10: ...rt button to remind users changing posture 3 Operating Instructions Height Adjustable Function Press the or button to adjust the height The LED display shows the current height Height Memory Function...

Page 11: ...the time setup otherwise system will save the time setup automatically after 5 seconds During the countdown any controller operation will interrupt and reset the countdown When the countdown finishes...

Page 12: ...uring stationary mode Check if desk is overloaded Max bearing load is 154 lbs This indicates controller enters an error state and requires program reset Firstly check if desk is overloaded Max bearing...

Page 13: ...o be re configured If you are facing any difficulties doing the troubleshooting please contact your supplier or dealer for detailed resolutions With power remain connected pause any motor usage i e le...

Page 14: ...em is completely normal and this doesn t affect the regular usage Under circumstance of damaged supply cord contact the manufacturer service agent or professional electrician for replacement to avoid...

Page 15: ...ed Yes Simply write to our customer service team at help mopio com let us know your order ID and we will be happy to assist further 4 Who do I contact for repair queries You may write to us at help mo...

Page 16: ...ing this product immediately and contact customer service 4 This warranty applies only when the product has been properly used by consumers who purchased the product from authorized channels as a new...

Page 17: ...further assistance with your Mopio products The Refund We will assist you to complete the return process We will perform standard inspection upon your return is received and will send you a message to...

Reviews: