background image

SDY

The Interface Solution Experts   11

PC-Programmable Signal 

Isolator/Converter with Display

Setting the Display


The SDY has numerous settings for its display, all 

of which are controlled using the “Input Range and 

Setup Options” box.  You can set the customizable 

display to display the input, output, or toggle 

between the two every two seconds.  The display 

will even scale to display any type of engineering 

units you desire.


Input, Output, and Toggle


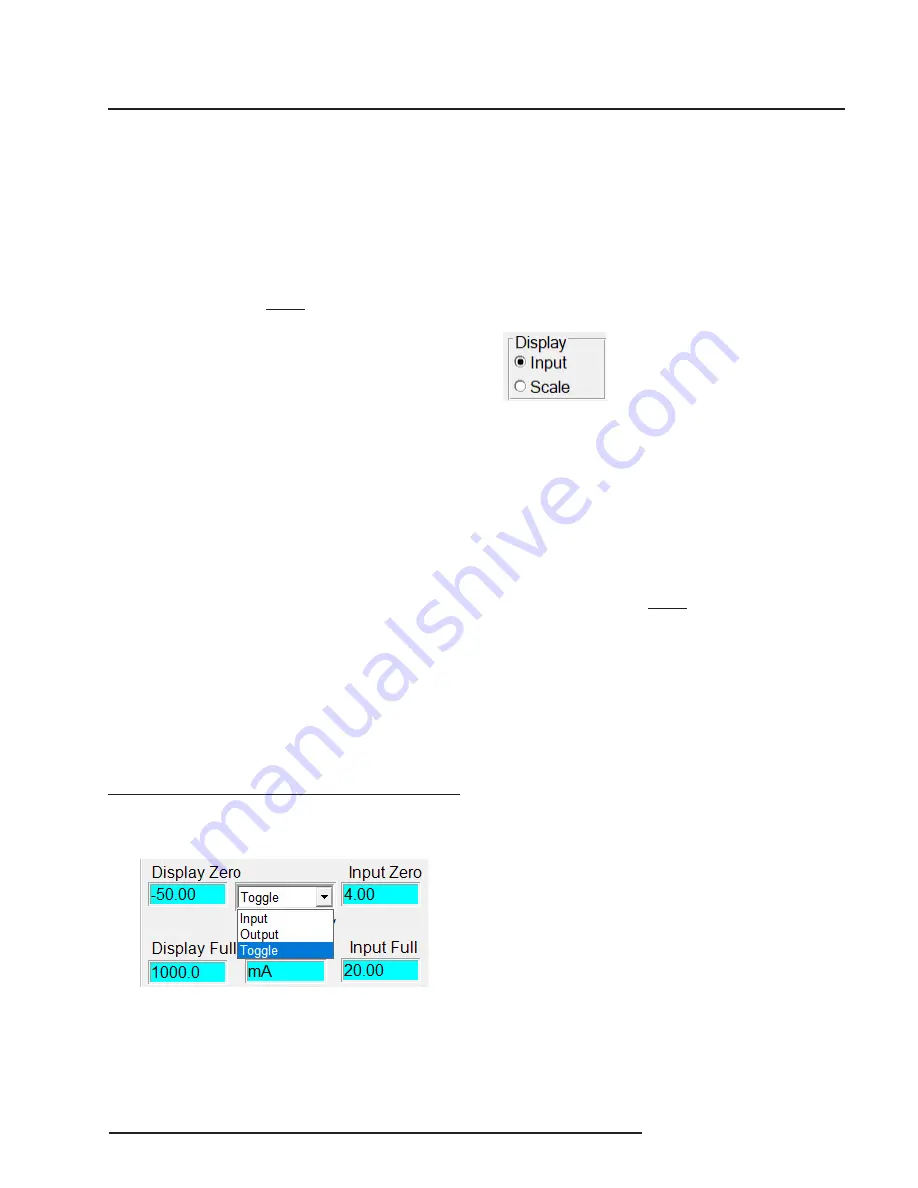
The pull-down menu shown below is used to adjust 

what the SDY displays.  There are three settings: 

“Input”, which causes the SDY to display the input 

it is receiving, “Output”, which causes the SDY 

to display the 4-20mA output it is emitting, and 

“Toggle”, which causes the SDY to switch between 

displaying Input to Output every two seconds.  To 

switch between these, simply click on the pull-down 

menu, select the appropriate function, and program 

the transmitter by clicking the “Prog” button.

Figure 4.

  The pull-down menu lets you select what the SDY 

displays.

Display Zero & Display Full


The display zero and display full show what values 

will actually be displayed.  If the pull-down menu in 

Figure 4 and the radio button on Figure 5 both have 

“Input” selected, then Display Zero will match Input 

Zero and Display Full will match Input Full.  

Figure 5.

  Use the Display radio button to switch from standard 

input display to a scaleable display of any engineering unit type.


Scaling the SDY Output

To scale the transmitter’s output, use the mouse to 

move the slider bars in the “Output” section of the 

Main Configuration screen.  “Zero Scale Output” 

effects the zero output, and “Full Scale Output” 

effects full scale output.

Note:


The SDY Output Scaling function will not operate 

unless a SDY is connected in the calibration setup 

shown in Figure 2.

Scaling the Display


The SDY can scale its display.  This feature is use

-

ful when you need to limit, expand, or manipulate 

the numbers the SDY displays.  Doing this also 

gives you the option of changing the engineering 

units being displayed to any engineering unit type.  


Scaling the input display is a simple procedure.  

First, click “Scale” on the radio button in Figure 5.  

Note:


If you have the pull-down menu in Figure 4 set 

to “Output”, the Display radio button will not be 

available.


You can then enter values into the “Display Zero”, 

“Display Full”, and “Display EGU” boxes.  When 

you have entered the appropriate values, program 

the SDY with the new information by clicking the 

“Prog” button.

Summary of Contents for SDY

Page 1: ...a n d M o o r e R e l i a b i l i t y All product names are registered trademarks of their respective companies User s Manual SDY PC Programmable Signal Isolator Converter with Display No 235 770 00G...

Page 2: ...tion File from an SDY 10 Setting Output Damping 10 Trimming SDY Output 10 Scaling the SDY Output 11 Setting the Display 11 Trimming the Input 12 Creating a Custom Linearization Table 12 Installation 1...

Page 3: ...ile 2 wire loop powered PC Programmable Signal Isolator Converter that accepts current or voltage input and provides an isolated proportional 4 20mA output See Figure 1 for a list of accommodated inpu...

Page 4: ...asured across 250 resistor Power Supply Effect 0 002 of span per 1V change Over Voltage Performance Continued Protection 48V maximum on output 48V reverse polarity protection on output Maximum Input O...

Page 5: ...DN mounting will fit the TS 32 DIN rail and the TS 35 DIN rail FL Mounting flanges on HP suitable for relay track or screw mounting FLD Mounting flanges on HP suitable for 3 relay track mounting A suf...

Page 6: ...nit tagging input type and range settings and output zero span trim Prior to shipment our team of skilled technicians subjects every SDY to rigorous testing Every product Moore Industries manufactures...

Page 7: ...26 CAUTION MOORE INDUSTRIES ISOLATING CABLE PROVIDES A GALVANIC BARRIER BETWEEN THE TRANSMITTER AND THE PC CONFIGURING IT IT IS NOT NECESSARY TO USE AN ISOLATING CABLE BUT FAILURE TO DO SO MAY RESULT...

Page 8: ...tion of the screen will be blank and the Communication indicator will show steady ON as opposed to blinking During setup the SDY tests the availability of COM Ports 1 through 4 in your system The firs...

Page 9: ...DY Saving the SDY Configuration File to Disk This is an optional procedure You do not have to save the file to disk in order to download the file into SDY memory Use this procedure to save information...

Page 10: ...e box to the right of the Damping sec area and type in a number between 0 and 20 032 This number is the number of seconds that the sensor s value will be averaged over Trimming SDY Output The SDY has...

Page 11: ...u in Figure 4 and the radio button on Figure 5 both have Input selected then Display Zero will match Input Zero and Display Full will match Input Full Figure 5 Use the Display radio button to switch f...

Page 12: ...the table fields to set values for input and output from the transmitter s intended application Use the Up Down Left and Right arrow keys on the PC keyboard to move the cursor among the cells in the t...

Page 13: ...points but the first and last points in the curve always default to the 0 and 100 input scale input range If you decide not to use all 85 points you must change the number of points in the Points fie...

Page 14: ...Ground Wiring Practices Moore Industries recommends the following ground wiring practices Any Moore Industries product in a metal case or housing should be grounded The protective earth conductor must...

Page 15: ...Display Figure 12 Connecting the HP Housed SDY PS PS 1 2 3 4 SDY 10 278 MA 10 42Vdc POWER SOURCE CURRENT METER CALIBRATED 0 50mA CURRENT SOURCE I I CALIBRATED 0 10V VOLTAGE SOURCE V V PS PS 1 2 3 4 SD...

Page 16: ...ions of the explosion proof BH housing for the SDY unit 84mm 3 30 in 118mm 4 65 in 130 mm 5 12 in 112mm 4 40 in 82 6 mm 3 25 in 64mm 2 50 in INSTRUMENT TAG 116 mm 4 56 in 27mm 1 05 in CONDUIT FITTING...

Page 17: ...le Signal Isolator Converter with Display FRONT VIEW SIDE VIEW 61mm 2 4 in 83mm 3 25 in 62mm 2 45 in 64mm 2 50 in 66mm 2 58 in 76mm 3 00 in 43mm 1 70 in 18mm 70 in PS PS 1 2 3 4 SDY 16 203 MA Figure 1...

Page 18: ...Ex nA IIC Ex nA IIC When installed as Division 2 equipment the SDY shall be mounted within a tool secured enclosure which meets the requirements of ANSI ISA 61010 1or C22 2 No 1010 1 and be capable of...

Page 19: ...ons Zone 0 Ex ia IIC The SDY shall be installed in an enclosure which maintains an ingress protection rating of at least IP20 The communications port shall be programmed through Moore Industries Cable...

Page 20: ...led and supplied with the correct power SDY transmitters begin to operate Depending upon environmental conditions they can be expected to continue to operate unattended for extended periods of time Ma...

Page 21: ...he installation diagram for the SDY carrying the intrinsically safe option It also includes guidelines for setting up zener barriers necessary in these types of applications These diagrams must be use...

Page 22: ...SDY 22 The Interface Solution Experts PC Programmable Signal Isolator Converter with Display...

Page 23: ...SDY The Interface Solution Experts 23 PC Programmable Signal Isolator Converter with Display...

Page 24: ...SDY 24 The Interface Solution Experts PC Programmable Signal Isolator Converter with Display...

Page 25: ...ginal Buyer only and not to Buyer s customers or the users of Buyer s products unless Buyer is an engineering contractor in which case the policy shall extend to Buyer s immediate customer only This p...

Reviews: