background image


Page 7 

For HELP, call 727.573.9611


S i t e   S e l e c t i o n   a n d   I n s t a l l a t i o n  

Proper planning is an important consideration when installing your new 

hot tub

Site selection is a critical step and requires serious thought. Planning ahead 
makes the installation process easier. The following information is provided to 
assist you in site preparations. 

1)  Always comply with local building codes and obtain any necessary permits. 

You may also need to consult with an engineer to address your specific 
design needs. 

2)  Contact an electrician to assess your electrical needs, install wiring, and 

assure a safe operation. 

3) Position 

your 

hot tub

 with proper access to water, drainage, and electricity. 

4) Place 

your 

hot tub

 on a uniform solid, flat surface designed to properly 

support its weight. For external installations, a 4-inch (10 cm) thick cement 
pad suffices. See page 8 for conduit entry locations for your model 

hot tub

5)  For internal installations, check the load carrying capabilities of the floor on 

which the 

hot tub

 will reside. Most homes meet the requirement of 80 

pounds per square foot. 

6) Assure 

that 

your 

hot tub

 will fit into the space you have chosen and the 

delivery route will accommodate its large size. 

7)  Provide adequate ventilation for the humidity created by your hot tub. In 

most cases, a Hot Tub Hard Cover is sufficient. 

8)  Protect the pump and all equipment from the weather by ensuring the 

cabinet panels are secure at all times. 

9)  Allow 36 inches (1 meter) of unobstructed access to all sides of your 

hot tub


for normal servicing. Your 

hot tub

 is not designed to be recessed in the 

ground or in a deck. 


Figure 1 – Clearances and Support 


Summary of Contents for ML 736

Page 1: ...HOT TUB OWNER S MANUAL MODELS ML 736 1301ML ML 844 1302ML Premium Leisure LLC 6101 45th St N St Petersburg FL 33714 727 573 9611 Part Number 7302 Revised 09 2013...

Page 2: ..._______ Address __________________________ Telephone __________________________ Hot Tub Date Delivered __________________________ Model __________________________ Color __________________________ Seri...

Page 3: ...nty card within 30 days of purchase to ensure you understand what you are entitled to in terms of service If you have any questions you can call our customer care center at 727 573 9611 Printed in the...

Page 4: ...l provides feel free to visit our Web sites at www Moonlightspas com or call our customer care center at 727 573 9611 WARNING This manual was written to ensure the proper use and installation of your...

Page 5: ...l The GFCI must be tested before each spa use Dangers RISK OF ACCIDENTAL DROWNING Extreme caution must be exercised to prevent unauthorized access by children To avoid accidents ensure that children c...

Page 6: ...dication should consult a physician before using a spa hot tub since some medication may include drowsiness while other medication may affect heart rate blood pressure and circulation Do not connect a...

Page 7: ...ersons with sensitivities and when hot tub use exceeds 10 minutes WATER TEMPERATURE IN EXCESS OF 100 F 38 C MAY BE INJURIOUS TO YOUR HEALTH Hyperthermia occurs when the internal temperature of the bod...

Page 8: ...Basic Water Quality Guidelines During the initial filling of the spa add a sequestering agent to combat suspended minerals in the water Allow water to circulate and filter for at least 12 hours befor...

Page 9: ...iform solid flat surface designed to properly support its weight For external installations a 4 inch 10 cm thick cement pad suffices See page 8 for conduit entry locations for your model hot tub 5 For...

Page 10: ...ram for reference Figure 2 Conduit Entry Location Reference Points Model Dimension A Dimension B 1301 26 12 1302 20 12 Table 1 Conduit Entry Location Dimensions 10 Consider positioning your hot tub ou...

Page 11: ...will not be covered under your warranty All hot tubs must be over current protected with a built in GFCI or RCD for export models in the service panel Model Volts V Freq Hz Rating A GFCI A Wire size...

Page 12: ...l devices must be located or fixed so that they cannot fall into the hot tub Means for disconnection must be used in fixed wiring in accordance with wiring rules Important To allow the 240V GFCI to fu...

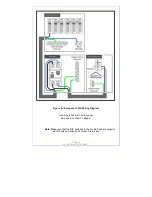
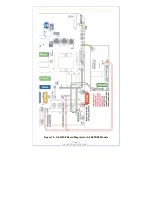
Page 13: ...Page 11 For HELP call 727 573 9611 Figure 5 U S and Canada Wiring Diagram See wire size chart on page 9...

Page 14: ...3 9611 Figure 6 European 1x32A Wiring Diagram All wiring is 3x4 mm2 solid copper See wire size chart on page 9 Note Make sure that the DIP switches in the hot tub Pack are properly set for 50Hz operat...

Page 15: ...9611 Figure 7 European 2x16A Wiring Diagram All wiring is 5x 1 5 mm2 solid copper See wire size chart on page 9 Note Make sure that the DIP switches in the hot tub Pack are properly set for 50Hz oper...

Page 16: ...Page 14 For HELP call 727 573 9611 Figure Wiring Diagram for All Domestic Models See wire size chart on page 9...

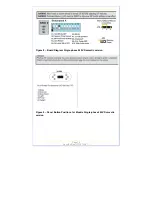
Page 17: ...Page 15 For HELP call 727 573 9611 Figure 8 Board Diagram Single phase 240V Domestic version Figure 9 Panel Button Positions for Models Single phase 240V Domestic version...

Page 18: ...Page 16 For HELP call 727 573 9611...

Page 19: ...Page 17 For HELP call 727 573 9611 Figure 12 GS510SZ Board Diagram for All EXPORT Models...

Page 20: ...Page 18 For HELP call 727 573 9611 Figure 13 Board Diagram and Panel Positions for all EXPORT Models Figure 14 Panel Button Positions for export models...

Page 21: ...customer care center at 727 573 9611 For best results read each step in its entirety before proceeding Caution Running the hot tub pump dry without water running through it can cause IMMEDIATE damage...

Page 22: ...ge to unions and gaskets which will not be covered under warranty Figure 17 Unions Tight 6 Check that the unions on all pumps are tight 7 Clean out any foreign debris from within the service access ar...

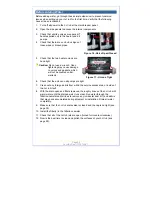
Page 23: ...ly If too much water pressure is used foaming water can force air into the pipes and cause startup problems Important To assure that the pump is properly primed fill the hot tub through the filter are...

Page 24: ...power on again Sometimes momentarily turning the pump off on will help to prime Only do this four times 5 If the water is running smoothly through the lines open the air control valve to the jets and...

Page 25: ...total alkalinity has too much buffering capacity making the pH difficult to change 2 pH 7 2 7 8 Use Spa Up to raise the pH level and Spa Down to lower it Caution A pH lower than 7 2 can harm the meta...

Page 26: ...ast measured temperature is constantly displayed on the LCD and is current only when the pump has been running for at least two minutes To display the set temperature press the WARM or COOL button onc...

Page 27: ...pressing the WARM or COLD button then pressing the MODE button Standard Mode is programmed to constantly maintain the desired temperature Std will be displayed momentarily when you switch into standar...

Page 28: ...cated inside heater detects ambient conditions below 44 F 6 7 C it automatically enters the Smart Winter Mode for period of four minutes after it detects the hot tub temperature has risen to 45 F 7 2...

Page 29: ...Double stitched seams 3 Marine grade cover material 4 Edge overlap material 5 Grip handle 6 Aluminum channel 7 Heat sealed insulation 8 Chemical resistant vapor barrier 9 Polystyrene seam stoppers 10...

Page 30: ...ur home The service technician may assess reasonable travel charges during on site repairs Call our customer care center at 727 573 9611 How do I bleed air from my system When draining and refilling y...

Page 31: ...order these easy to use cleaning products How often should I drain my hot tub You should drain and refill your hot tub every 1 3 months depending on usage Every other time you drain and refill you sh...

Page 32: ...Microban antimicrobial product protection is built in to Lucite acrylic during the manufacturing process to help prevent the growth of stain causing bacteria on the surface of the hot tub Microban pr...

Page 33: ...ak Loose connection Check and hand tighten unions at heater pumps or clamps on jets Drain open Close drain valve or replace cap Light doesn t LED burnt out Replace bulb work Loose wire Check wiring ha...

Page 34: ...pages 25 26 Error Codes MESSAGE MEANING ACTION REQUIRED none No message on display Power has been cut off to hot tub The control panel is disabled until power returns Hot tub settings are preserved OH...

Page 35: ...as power If the problem persists contact service LF Low Flow persistent problem Displays after the fifth occurrence of the HL message within 24 hours Heater shuts down but other hot tub functions run...

Page 36: ...red cover on your hot tub is made from a weatherproof marine grade vinyl Your cover will last much longer if you heed the following suggestions 1 Don t drag the cover on the ground wearing of the viny...

Page 37: ...n prior to refilling hot tub 8 Attach the garden hose to a thoroughly flushed pre filter not included rinsed of all residual sediment and refill your hot tub through the filtration canister 9 After re...

Page 38: ...ll proper and your sanitation level is still too low high you can adjust the sanitation intensity up down by adding more less sanitizer a little at a time and testing the water again after two days Sh...

Page 39: ...from soap residue on your skin and hair or laundry detergent residue on clothing Take a soapless shower and rinse all clothing in warm water prior to bathing CLEAR green or brown water Your source wat...

Page 40: ...Dimensions 83 5 L x 83 5 W x 35 D 212cm x 212cm x 89cm Seats 6 Water Jets 36 Air Jets 0 Water Capacity 310 USG 1 173 L Dry Weight 640 Lbs 380 Kg Filled Weight 3 427 Lbs 1 554 Kg Electrical 230VAC 48A...

Page 41: ...Page 39 For HELP call 727 573 9611 ML 736 Callouts...

Page 42: ...nsions 90 5 L x 90 5 W x 35 D 230cm x 230cm x 89cm Seats 6 1 Lounger Water Jets 44 Air Jets 0 Water Capacity 375 USG 1 420 L Dry Weight 900 Lbs 408 Kg Filled Weight 4 030 Lbs 1 828 Kg Electrical 230VA...

Page 43: ...Page 41 For HELP call 727 573 9611 ML 844 Callouts...

Page 44: ...Page 42 For HELP call 727 573 9611 N o t e s...

Page 45: ...be credited with item cost upon the manufacturer accepting the Warranty claim and providing Premium Leisure with a replacement item Warranty Performance In the event of a suspected defect covered by...

Page 46: ...6101 45th St N St Petersburg FL 33714 727 573 9611...

Reviews: