Mooney Flowgrid Installation, Operation & Maintenance Manual Download Page 3


Front View

Back View

Top View

Flowgrid Regulator |  3
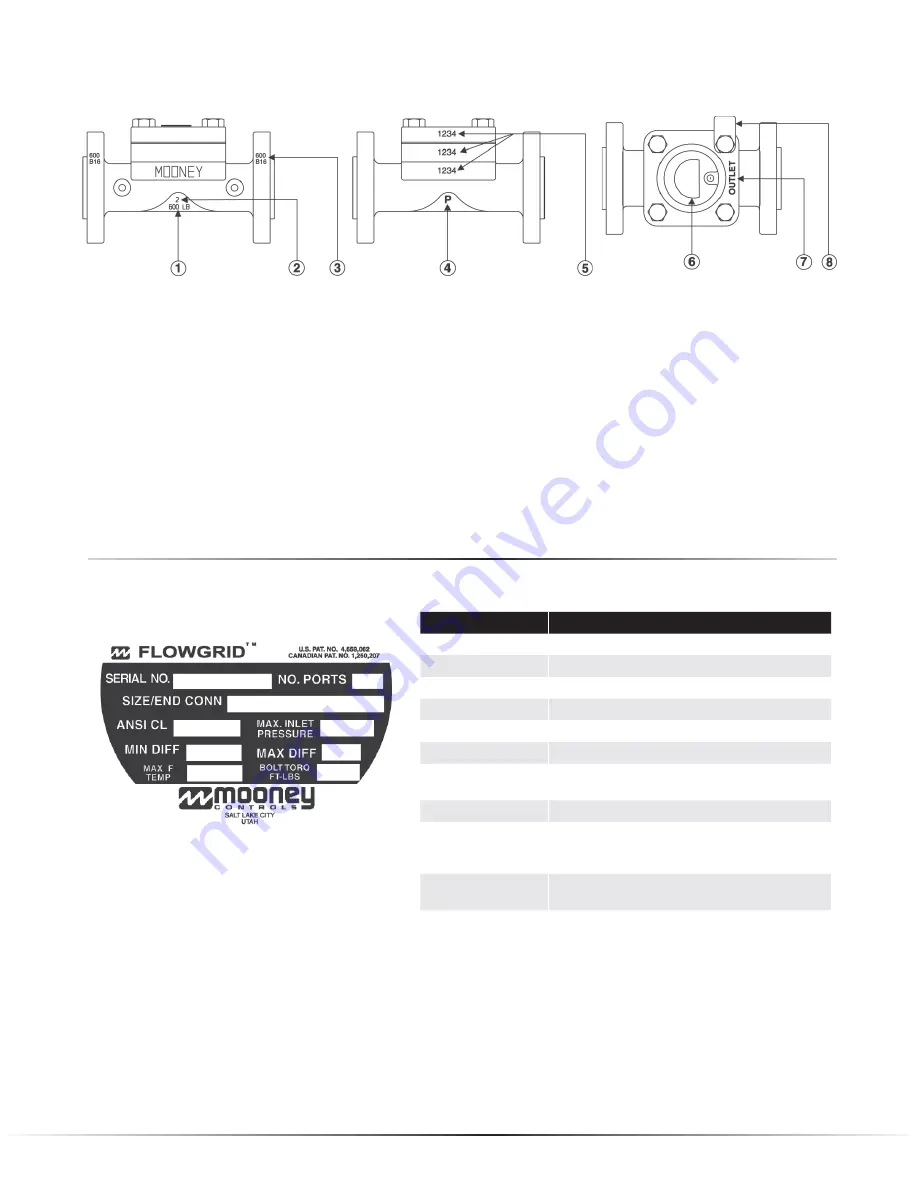
 Valve Markings

Nameplate Information

 1.   American National Standards Institute (ANSI) pressure class rating of the valve.

2.   Line size of body.

3.   ANSI pressure class rating of the flange.

4.   Indication that the valve has been hydrostatically tested according to code requirements.

5.   The serial number is stamped on the spring case, spacer*, and Body.

6.   The Nameplate location.

7.   The  flow direction is marked on the spring case (“INLET” or “OUTLET”). Proper alignment assures that the diaphragm 

guide on the Spring Case is aligned toward outlet side of the valve.

8.   The % Capacity tag indicates the capacity of the throttle plate (100%, 75%, 50%, & 35%) in the valve. 

NOTE: On all 1” valves and 2” standard valves the throttle plate itself is stamped.

Item

Definition

Flowgrid

®

Registered name of valve

BLANK

CE Marking

SN

Serial number assigned to valve

FG

Flowgrid

®

 Model description

SIZE/END CONN

Line size of bogy an type of end connection

ANSI CL

American National Standards Institute pressure class

MAX INLET 
PRESSURE

Maximum inlet pressure (psig)

YR

Year manufactured

DIFF/MIN/MAX

Minimum differential required to fully open valve
Maximum allowable operating pressure differential 
(psig)

MAX F 
TEMPERATURE

Maximum Operating Temperature in degrees 
Fahrenheit

BOLT TORQ FT-LBS

Recommended bolt torque for spring case in foot 
pounds

Summary of Contents for Flowgrid

Page 1: ...y or redundancy Non stretching fabric reinforced diaphragm for stability and fast response at all temperatures Positive spring shutoff Two stage pressure drop to minimize noise and provide cavitation...

Page 2: ...ng spring case Table 1 Table 2 Figure 1 The throttle plate 2 supports the diaphragm and provides a machined surface that the diaphragm seals against for bubble tight shutoff Restricted capacity plates...

Page 3: ...et side of the valve 8 The Capacity tag indicates the capacity of the throttle plate 100 75 50 35 in the valve NOTE On all 1 valves and 2 standard valves the throttle plate itself is stamped Item Defi...

Page 4: ...ng the pressure above the diaphragm allows the inlet pressure to progressively lift the diaphragm off the throttle plate opening the valve and satisfying the demand for flow in the downstream system R...

Page 5: ...MSS SP 61 standards If it is necessary to retest the valve follow one of the procedures listed below to prevent damage to the diaphragm OPTION 1 1 Disconnect and remove all control line s and the pil...

Page 6: ...alled in confined or enclosed spaces should be provided with adequate ventilation to prevent the possibility of gas buildup or accumulation from leaks and venting Leaks or vented gas may accumulate ca...

Page 7: ...ent valves and gauge connections are recommended in the inlet and outlet piping to the Flowgrid valve A gauge connection may be installed on the loading pressure connection to the Spring Case of the F...

Page 8: ...outlet connection on Type 30 Filter to Type 24 Restrictor inlet 3 Type 24 Restrictor mounted to Tee connection 3A Type 24 Restrictor mounted to Inlet port of Series 20 Pilot 4 Tee mounted to Inlet Por...

Page 9: ...alve 5 Sense line connecting Sense port on Series 20 Pilot to downstream piping 6 Outlet port of Series 20 Pilot connected to Outlet connection of Flowgrid valve 6A Outlet port of Series 20 Pilot conn...

Page 10: ...2 is plugged 10 Pilot cartridges in PRV mode 2nd Stage Regulator 11 Filter supply connected from inlet connection on valve body to Type 30 Filter inlet 12 Pilot supply from outlet connection on Type 3...

Page 11: ...d 9 Slowly close the downstream block valve or vent to check the Flowgrid valve for lockup shut off 10 Slowly open the downstream block valve Back Pressure Regulator or Relief Valve 1 Adjust the pilot...

Page 12: ...n the set point of the Operating Regulator becomes less than the set point of the Monitor regula tor the interstage pressure will drop from approximately full inlet pressure to 5 10 PSI above the outl...

Page 13: ...t this time 10 Raise the setpoint of Pilot 3 to verify the setpoint of the Monitor Pilot 2 Adjust if necessary Check for system stability and adjust the restrictor on Pilot 1 if required 11 Return set...

Page 14: ...sharp metal tools The bottom of the groove must have a smooth finish to prevent leakage The mating surface of adjacent parts must also be smooth to prevent leakage Assembly NOTE Do not lubricate diap...

Page 15: ...e sense line to a new location often solves control problems 4 Check to make sure needle valves are not used on any pilot system connections Full opening type valves are recommended 5 Check for pilot...

Page 16: ...O REPRE SENTATION OR WARRANTY OF ANY KIND EXPRESS OR IMPLIED AS TO MERCHANTABILITY FITNESS FOR PARTICULAR PURPOSE OR ANY OTHER MATTER WITH RESPECT TO ANY OF THE PRODUCTS While the information in this...

Reviews: