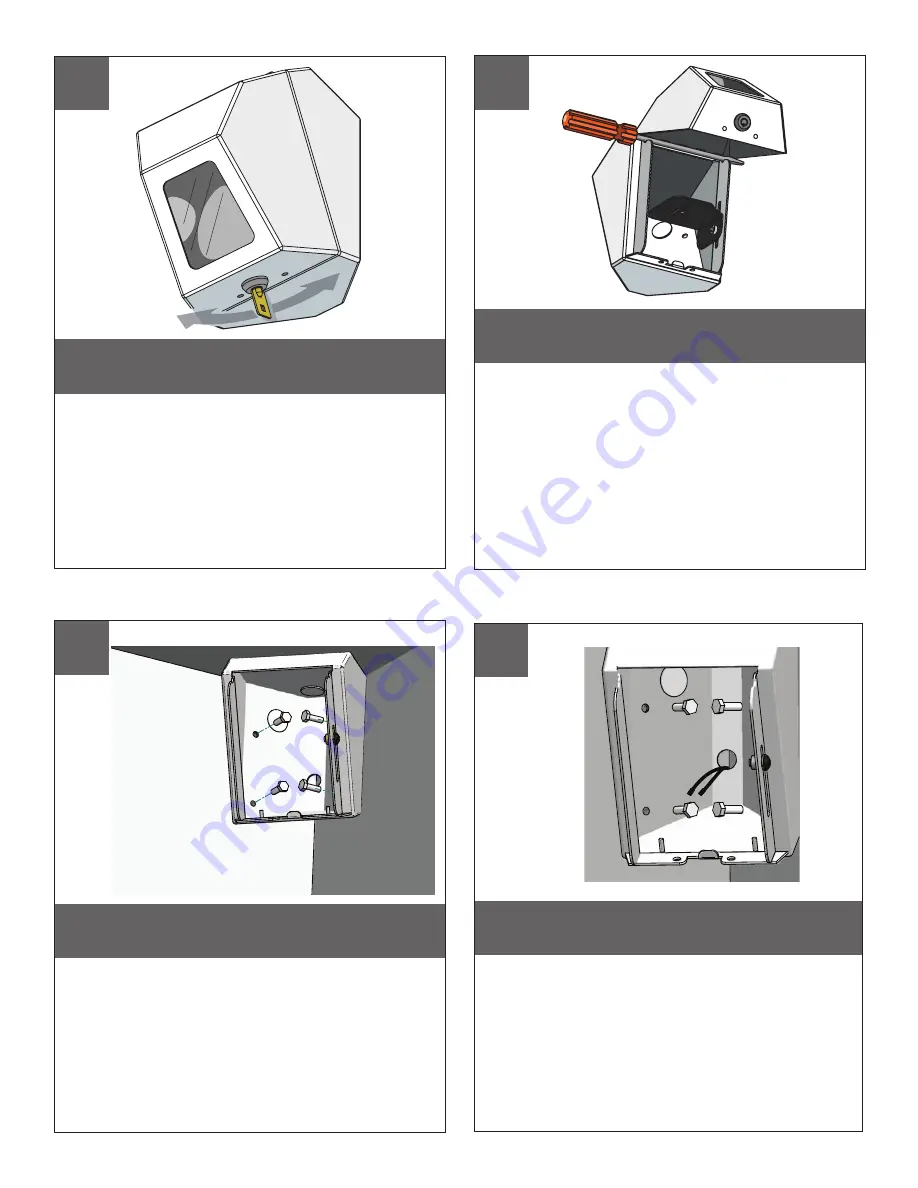
Open the lid of the unit with the barrel lock key.
NOTE: Key is removable only when the lid is locked.
• Abra la tapa de la unidad con la llave de cerradura del barril. NOTA:
La llave es desprendible solamente cuando la tapa es bloqueada.
• Ouvrez le couvercle de l'unité avec la clé de verrouillage de baril.
NOTE : La clef est démontable seulement quand le couvercle est
verrouillé.
• Öffnen Sie die Kappe der Maßeinheit mit der Faßsperrtaste.
ANMERKUNG: Schlüssel ist entfernbar, nur wenn die Kappe verschlos-
sen ist.
• Abra a tampa da unidade com a chave de fechamento do tambor.
NOTA: A chave é removível somente quando a tampa é locked.
• Apra il coperchio dell'unità con la chiave di catenaccio del barilotto.
NOTA: La chiave è smontabile soltanto quando il coperchio è locked.
To access the inside of the unit during mounting and
adjusting, the lid can be temporarily propped open
by using a screw driver or similar object.
• Tener acceso al interior de la unidad durante el montaje y el ajuste,
la tapa puede estar abierta temporalmente apoyado usando un
destornillador o un objeto similar.
• Pour accéder à l'intérieur de l'unité pendant le support et
l'ajustement, le couvercle peut être ouvert temporairement étayé en
employant un tournevis ou un objet semblable.
• Um das Innere der Maßeinheit während der Montage und der
Justage zugänglich zu machen, kann die Kappe propped geöffnetes
sein vorübergehend indem sie einen Schraubenzieher oder einen
ähnlichen Gegenstand verwendet.
• Para alcançar o interior da unidade durante a montagem e o ajuste,
a tampa pode estar aberta temporariamente sustentado usando
uma chave de fenda ou um objeto similar.
• Accedere alla parte interna dell'unità durante il montaggio e la
registrazione, il coperchio può essere aperto temporaneamente
propped usando un cacciavite o un oggetto simile.
Position the unit in the desired location and
mark the spots for the four mounting holes.
• Coloque la unidad en la localización deseada y marque
los puntos para los cuatro agujeros de montaje.
• Placez l'unité dans l'endroit désiré et marquez les taches
pour les quatre trous de support.
• Bringen Sie die Maßeinheit in der gewünschten Position in
Position und kennzeichnen Sie die Punkte für die vier
Entlüftungslöcher.
• Posicione a unidade na posição desejada e marque os
pontos para os quatro furos de montagem.
• Posizioni l'unità nella posizione voluta e contrassegni i punti
per i quattro fori di montaggio.
Pass electrical and video cables through the
access hole on the back of the unit, then secure
the unit in place with appropriate hardware.
• Pase eléctrico y los cables video a través del agujero de acceso en
la parte posteriora de la unidad, entonces aseguran la unidad en
lugar con hardware apropiado.
• Passez élém. élect. et les câbles visuels par l'ouverture d'accès sur le
dos de l'unité, fixent alors l'unité en place avec le matériel approprié.
• Führen Sie elektrisches und videokabel durch das Zugangsloch auf
der Rückseite der Maßeinheit, sichern dann die Maßeinheit im Platz
mit passenden Kleinteilen.
• Passe elétrico e os cabos video através do furo de acesso na parte
traseira da unidade, fixam então a unidade no lugar com ferragem
apropriada.
• Passi elettrico ed i video cavi attraverso il foro di accesso sulla parte
posteriore dell'unità, allora assicurano l'unità sul posto con fissaggi
adatti.
3
4
1
2


