Montgomery Ward FC950B Instruction Manual Download Page 9

Cleaning and Care

Troubleshooting

16

17

1

888

557

3848

Wards.com      

  1.  Turn off the microwave and unplug the power cord from the wall before  

cleaning.

  2.  Keep the inside of the microwave clean. When food splatters or spilled liquids 

adhere to the microwave walls, wipe with a damp cloth. Mild detergents may 
be used if the microwave gets very dirty. Avoid using spray or other harsh 
cleaners. They may stain, streak or dull the door surface.

  3.  The outside of the microwave should be cleaned with a damp cloth. To prevent 

damage to the operating parts inside the microwave, water should not be  
allowed to seep into the ventilation openings.

  4.  Wipe the window on both sides with a damp cloth to remove any spills or 

splatters.

  5.  Do NOT allow the control panel to become wet. Clean with a soft, damp cloth. 

When cleaning the panel, leave the microwave door open to prevent it from  
accidentally turning on.

  6.  If steam accumulates inside or around the outside of the door, wipe with a soft 

cloth. This may occur when the microwave is operated under high humidity. 
This is normal.

  7.  It may be necessary to remove the glass tray for cleaning. Wash the tray in 

warm, soapy water or in a dishwasher. The roller ring and microwave floor 
should be cleaned regularly to avoid excessive noise. Wipe the bottom surface 
of the microwave with a mild detergent.

  8.  The roller ring may be washed in mild, soapy water or in a dishwasher. When 

removing the roller ring, be sure to replace it in the proper position.

  9.  Remove odors from your microwave by combining a cup of water with the 

juice and skin of one lemon in a microwaveable bowl. Microwave for 5 minutes. 
Wipe thoroughly and dry with a soft cloth.

10.  The microwave should be cleaned regularly and any food deposits should be 

removed. Failure to maintain the microwave in a clean condition could lead 
to deterioration of surfaces that could adversely affect the life of the unit and 
could possibly result in a hazardous situation.

11.  Please do not dispose of this appliance in a regular garbage receptacle. 

Please check to see where you can dispose of such appliances.

12.  When it becomes necessary to change the oven light, consult a technician to 

have it replaced.

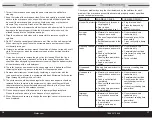
Check your problem by using the chart below and try the solutions for each  
problem. If the microwave oven still does not work properly, contact a qualified 
service technician for service.

TROUBLE

POSSIBLE CAUSE

POSSIBLE REMEDY

Oven will not start a.  Electrical cord for oven is 

not plugged in

b.  Door is open
c.  Wrong operation is set

a.  Plug into the outlet
b.  Close the door and try 

again

c.  Check instructions

Arcing or  

sparking

a.  Materials to be avoided in 

the oven were used

b.  The oven is operated while 

empty

c.  Spilled food remains in the 

cavity

a.  Use microwave-safe  

cookware only

b.  Do not operate with the 

oven empty

c.  Clean cavity with a damp 

towel

Unevenly cooked 

foods

a.  Materials to be avoided in 

the microwave oven were 

used

b.  Food is not defrosted 

completely

c.  Cooking time, power level 

is not suitable

d.  Food is not turned or 

stirred

a.  Use microwave-safe  

cookware only

b.  Completely defrost food
c.  Use correct cooking time, 

power level

d.  Turn or stir food

Overcooked 

foods

Cooking time, power level is 

not suitable

Use correct cooking time, 

power level

Undercooked 

foods

a.  Materials to be avoided in 

the microwave oven were 

used

b.  Food is not defrosted 

completely

c.  Oven ventilation ports are 

restricted

d.  Cooking time, power level 

is not suitable

a.  Use microwave-safe  

cookware only

b.  Completely defrost food
c.  Check to see that oven 

ventilation ports are not 

restricted

d.  Use correct cooking time, 

power level

Improper  

defrosting

a.  Materials to be avoided 

in microwave oven were 

used

b.  Cooking time, power level 

is not suitable

c.  Food is not turned or 

stirred

a.  Use microwave-safe  

cookware only

b.  Use correct cooking time, 

power level

c.  Turn or stir food

Summary of Contents for FC950B

Page 1: ...Hz 900W Wards com 1 888 557 3848 Montgomery Ward Customer Service 3650 Milwaukee Street Madison WI 53714 8 00 am to Midnight Monday through Friday Wards com 1 888 557 3848 0 9 Cu Ft Microwave Oven Easy to use with substantial size and power ...

Page 2: ...eated in this oven 5 This microwave is intended for use only as described in this manual Do NOT use corrosive chemicals or vapors in this microwave This microwave is specifi cally designed to heat cook or dry foods It is not designed for laboratory use 6 As with any appliance close supervision is necessary when used by children 7 To reduce the risk of fire in the oven cavity a Do NOT overcook food...

Page 3: ...gy 1 Do NOT attempt to operate this microwave with the door open Door open operation can result in harmful exposure to microwave energy It is important not to defeat or tamper with safety interlocks 2 Do NOT place any objects between the microwave front face and the door or al low soil or cleaner residue to accumulate on sealing surfaces 3 Do NOT operate the microwave if damaged It is particularly...

Page 4: ... the extension cord should be the same type 3 wire The longer cord should be arranged so that it will not drape over the counter top or tabletop where it can be pulled on by children or tripped over Electrical Requirements The electrical requirements for this microwave are 120 volt 60 Hz AC only 20 amp It is recommended that a separate circuit serving only the microwave be provided The microwave i...

Page 5: ...R to enter into the standby mode Setting the clock To enter the digital clock time press the TIMER CLOCK button once and then use the NUMBER PADS to set the time of day Example to set the clock to read 6 35 1 Press TIMER CLOCK once 2 Enter the clock time with the NUMBER PADS press 6 3 5 3 Press TIMER CLOCK again to confirm NOTE This is a 12 hour clock You can see the time during cooking by pressin...

Page 6: ...cooking time at 2 minutes 3 Press POWER LEVEL to set 50 cooking power 4 Use the NUMBER PADS to set cooking time at 1 minute 30 seconds 5 Press START MINUTE PLUS to begin Child Lock Use to prevent unsupervised operation of the oven by small children The CHILD LOCK indicator will show on the display screen and the oven cannot be operated while the CHILD LOCK is set To set the CHILD LOCK Press and ho...

Page 7: ...ts to reheat 4 Press START to start cooking Food Code Press NUMBER PAD of Units Casserole 1 1 2 1 2 cup Soup 2 1 2 1 2 cup Pizza 3 1 2 1 2 slices Beverage 4 1 2 1 2 1 cup Dinner Plate 5 1 3 1 3 Dinner Roll Muffin 6 1 2 1 2 Menu Cook For food or the following cooking mode it is NOT necessary to program the time and the cooking power It is sufficient to indicate the type of food that you want to coo...

Page 8: ... of small items such as steaks chops or pancakes Follow the directions provided with your browning dish Microwaveable Plastic Wrap Use to retain steam Leave a small opening for some steam to escape and avoid placing it directly on the food Paper Towels and Napkins Use for short term heating and covering these absorb excess moisture and prevent splattering Do NOT use recycled paper towel may contai...

Page 9: ...eterioration of surfaces that could adversely affect the life of the unit and could possibly result in a hazardous situation 11 Please do not dispose of this appliance in a regular garbage receptacle Please check to see where you can dispose of such appliances 12 When it becomes necessary to change the oven light consult a technician to have it replaced Check your problem by using the chart below ...

Page 10: ... AND CONDITIONS EXPRESS OR IMPLIED INCLUDING BUT NOT LIMITED TO THOSE OF MERCHANTIBILITY OR FITNESS FOR A PARTICULAR PURPOSE 1 Year Limited Warranty Montgomery Ward Customer Service 8 00 am to Midnight CST Monday through Friday 19 18 Returns If any item for any reason does not meet your expectations just return it to us We ll gladly either Refund your merchandise amount Credit your account Send a ...

Reviews: