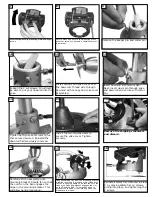


Insert downrod into motor yoke.
Next, insert clevis pin through yoke
and downrod and secure with cotter
pin.
Carefully lift fan assembly onto
mounting bracket. Rotate fan so that
the notch on the ball engages the
ridge in the mounting bracket. This
will allow hands-free wiring.
16
12
Install canopy and yoke cover over
the downrod. Thread wire through
downrod with canopy and yoke cover
assembled.
11
13
Tighten both yoke set screws to fur-
ther secure downrod. Reinstall the
downrod ball previously removed.
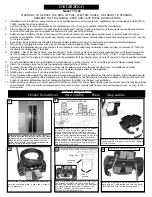
Loosen the 2 set screws. You should
be able to put your downrod into the
yoke.
10
Remove the keeper pin and cotter pin.
9
Remove the shipping stabilizers
and discard.
15
Lift mounting neck to mounting Plate and align
screws.
7
Secure mounting neck to the mounting plate
with four screws to become a complete mount-
ing bracket.
8
17
Hang assembled fan from the mounting bracket
installed to ceiling in previous step. Make sure
the fan is hanging straight. Rotate fan until the
tab on the Mounting bracket engages the slot
on the Downrod Ball. This must be done to
prevent the fan body from rotating when the
blades are in motion.
Re-install safety bar removed in step.
3 by placing safety bar on screws,
sliding into place, and tightening the
2 screws.
18
Install the two thumbscrews to
secure the yoke cover. Tighten
securely.
14


