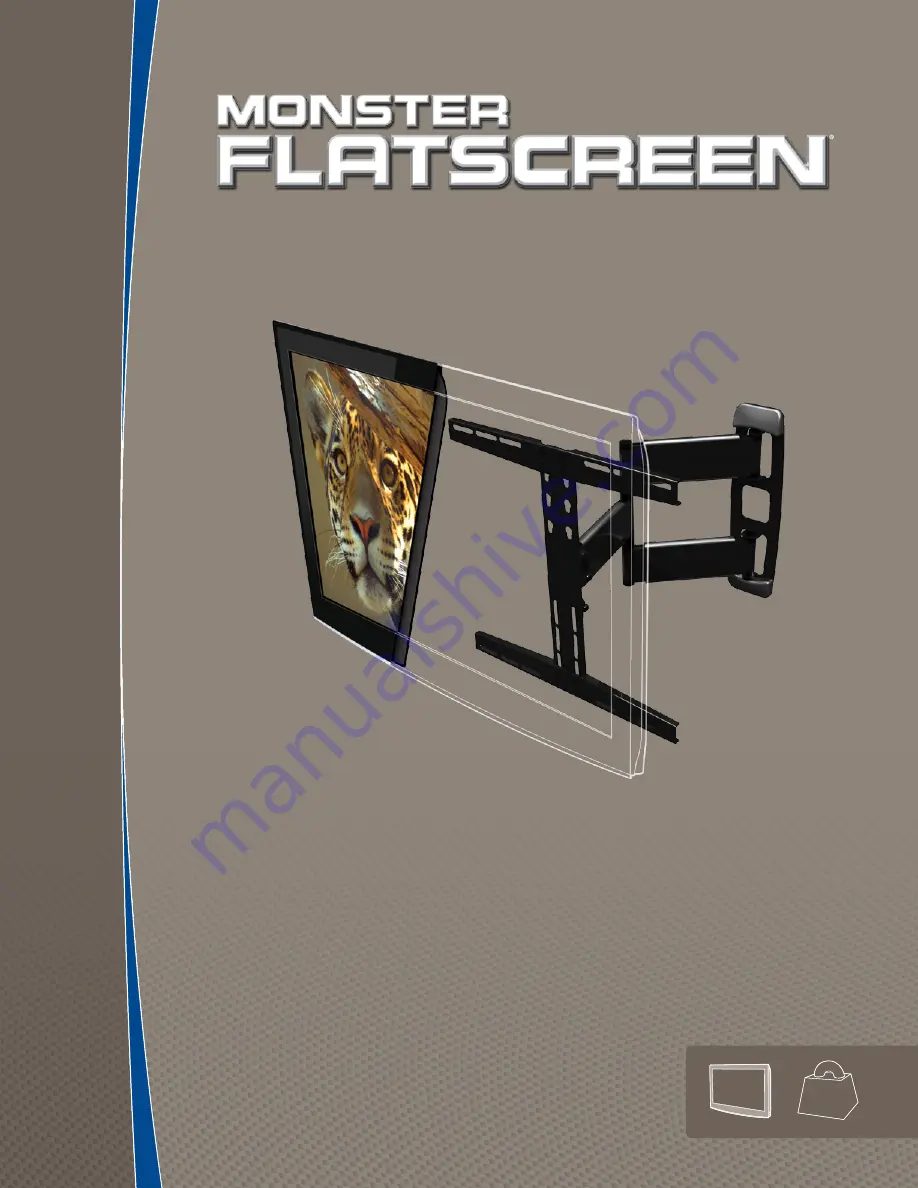
SUPERTHIN
™
MEdIUM ARTIcUlATINg MOUNT
SECURE, EASY TO INSTALL, LOW-PROFILE MOUNT WITH EXTENDING SWING ARMS
INSTAllATION MANUAl
ANd wARRANTy
80
lbs.
(36.28kg)
27
"
-46
(68-116cm)
Page 1: ...SUPERTHIN Medium Articulating MOUNT SECURE EASYTO INSTALL LOW PROFILE MOUNTWITH EXTENDING SWING ARMS Installation manual and warranty 80lbs 36 28kg 27 46 68 116cm...
Page 2: ...Asia Pacific China 400 820 8973 contact Monster LLC 455 Valley Drive Brisbane CA 94005 at 1 877 800 8989 If you bought the Product anywhere else contact Monster Technology International Ltd Ballymaley...
Page 3: ...7 4 44 2cm 4 92 to 15 75 12 5cm to 40cm 16 73 42 5cm 18 78 47 4cm 8 58 214cm 16 54 42cm Specifications and Notes VESA 200 200 300 300 400 200 400 400 Compliant Monster is constantly striving to improv...
Page 4: ...Washers 1 Upper TV Mounting Bracket 1 Hex Wrench Screws 4 each M4 10 M4 15 M4 25 4 each M5 10 M5 15 M5 25 4 each M6 10 M6 15 M6 25 4 each M8 10 M8 15 M8 25 1 Lower TV Mounting Bracket 1 Electronic Stu...
Page 5: ...des for more information 9 DO NOT over tighten screws or bolts This can damage the wall plate or the surface of your wall Thread screws or bolts carefully by hand before tightening If you feel any res...
Page 6: ...ws you to conceal your display s power cord Your mounting location must be at least 3 ft from any source of heat or water TIP To hide your TV s power cord and AV cables install a Monster FlatScreen Cl...
Page 7: ...e battery To locate a wall stud hold the studfinder against the wall where you want to mount your TV Push down the button on the studfinder and slide the studfinder along the wall until the indicator...
Page 8: ...wall mounting plate over the holes drilled in the wall studs 3 With your electric drill and bit pre drill a 3 deep hole where indicated on template After drilling holes remove template from wall 4 Re...
Page 9: ...This can damage the wall plate or the surface of your wall DO NOT release the wall plate until you are absolutely sure it is secured to the wall 8 Replace plastic covers on wall mounting plate Contin...
Page 10: ...the supplied cardboard template in the desired location and tape template to wall with masking tape Make sure the template is level by using the supplied bubble level 2 With your electric drill and m...
Page 11: ...d 5 Position the wall mounting plate over the holes drilled in the wall 4 Remove plastic covers on wall mounting plate 3 Install the supplied plastic concrete anchors in each hole Tap into hole with h...
Page 12: ...ure DO NOT over tighten bolts This can damage the wall plate or the surface of your wall DO NOT release the wall plate until you are absolutely sure it is secured to the wall 8 Replace plastic covers...
Page 13: ...display determine which screw set is correct for your display Do not lay your TV face down when attaching the TV mounting brackets This can cause permanent damage to your screen Lean it against a wal...
Page 14: ...the end of articulating arm 2 Hang brackets from appropriate keyholes on center bar depending on bracket spacing and desired height See illustration at right 3 Fix lower bracket with Allen bolts 4 Wi...
Page 15: ...key and hex wrench adjust the bolts on the side of the articulating arm where it connects to the center plate to desired feel of the tilt mechanism 2 To adjust tilt angle gently pull top of TV while p...
Page 16: ...the mount completely installed on the wall and your TV properly secured to the mount fully extend the mount s articulating arm 2 Connect your TV s power cord to the TV if TV uses a detachable type pow...
Page 17: ...ections to your TV 6 Slide the cable channel covers back into place Cable channels are in place when you hear them click 7 Plug the TV power cord into an AC outlet Note Do not run power and AV cables...
Page 18: ...ords and cables for a clean sleek look Easy to install with paintable covers to match any decor Monster FlatScreen CleanView Cable Manager Monster Flatscreen Cables are compact and flexible for easy r...
Page 19: ...or flood Warranty Period means the time period during which Monster must have received Your Formal Warranty Claim The different Warranty Periods related to Product Defects are defined in the Specifica...
Page 20: ...Products the completed claim form and printed Return Authorization Number on the outside of the return package the claim form will include instructions for return TELEPHONE NUMBERS If You bought the P...