background image


12 


8. Photo Mode 


With the power on   
Press the power/mode button until you are in Photo Mode.   
Press the OK/shutter button to take a picture. 


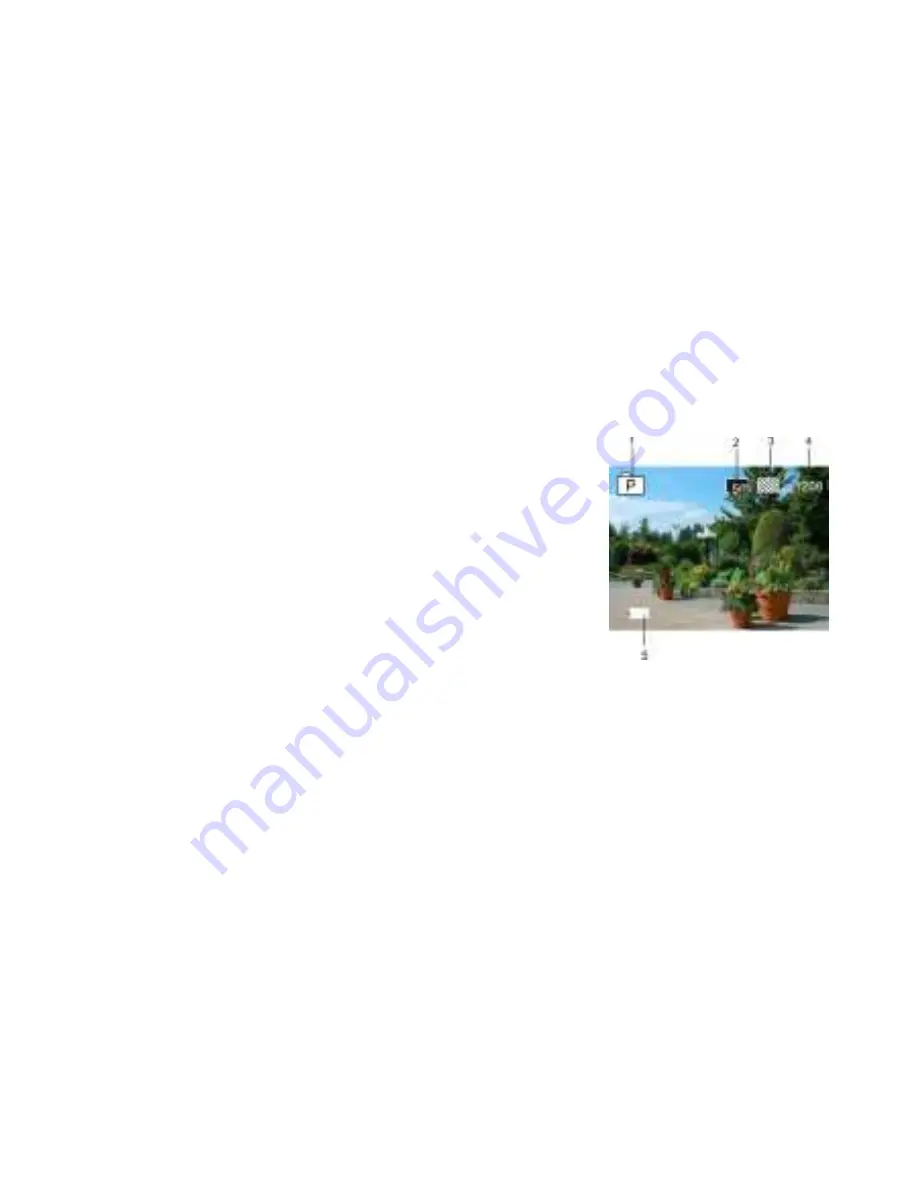
PHOTO MODE DISPLAY 

1. Photo mode icon 
2. Image size in Mega Pixels 
3. Photo quality icon   
4. Counter, indicating number of photos left   
5. Battery capacity 

       
Photos can also be taken while the camera is recording video.     
Just press the OK/shutter button to take a picture.

Summary of Contents for VISION 1080p+

Page 1: ...1 1080p Quick Start Guide V1 02...

Page 2: ...os with your camera Feel free to share them with us and we might post them on our website YouTube channel Facebook Instagram etc If you ever have any issues or want to learn more please reach out to u...

Page 3: ...3 FEATURES AND BUTTONS Note A RF radio frequency remote control is available Sold separately Display Menu Button LCD Display Lens Charging or Recording LED Power on or Recording LED Microphone...

Page 4: ...4 FEATURES AND BUTTONS WiFi Indicator Down Button Mini HDMI Port Power Mode button Battery Door MicroSD Card Slot OK Shutter Micro USB Port Speaker...

Page 5: ...ge the battery To charge connect the camera to a 1 amp minimum USB power source with a micro USB cable The charging indicator will be in on when charging and will turn off after charging It takes 2 4...

Page 6: ...he memory card up to 32GB microSD Push the microSD card into the slot until it clicks To remove the card push it in slightly and it will pop out BE SURE TO BACK UP YOUR FILES ON A COMPUTER OR OTHER ST...

Page 7: ...ery is very low this icon will appear When the battery is out of power the icon turns red and flashes Finally the camera turns off automatically The camera will record for approximately 1 75 hours bas...

Page 8: ...nd playback After the power is on press power mode button to cycle through each mode Note When you power down the current mode will be remembered The next time you power up the camera it will be in th...

Page 9: ...ng Press it again to stop recording NOTE If the memory card is full or battery is low it will stop recording automatically VIDEO MODE DISPLAY 1 Icon of mode indicating video recording mode 2 Indicate...

Page 10: ...s in video mode While in video mode press the DISP MENU button then press the WiFi down arrow to scroll to Slow Motion and press OK Use the WiFi down arrow button to select on or off When the slow mot...

Page 11: ...ON After choosing dash cam mode turn the camera off Connect a USB cable to the camera and a switched power outlet that is on when the car is on The camera will automatically start recording when the i...

Page 12: ...e OK shutter button to take a picture PHOTO MODE DISPLAY 1 Photo mode icon 2 Image size in Mega Pixels 3 Photo quality icon 4 Counter indicating number of photos left 5 Battery capacity Photos can als...

Page 13: ...on on the right side of the camera to move the cursor down The frequency how often photos are taken and the duration of the time lapse recording can be adjusted to the following options Time lapse Fre...

Page 14: ...ower on Press the power mode button until you find Playback Mode Press the down WiFi button on the right side to select file type Press OK SELECT CAR to play videos recorded in dash cam mode VIDEO to...

Page 15: ...AYBACK MODE 1 View Mode icon 2 Number of the current video and the total number of videos 3 Total video time 4 Date and time of the video 5 Playback time When playing a video Press the OK shutter butt...

Page 16: ...AY ICONS IN PHOTO PLAYBACK MODE 1 View mode icon 2 Number of the current photo and the total number of photos Press the down WiFi button to advance to the next photo There is no button to go backward...

Page 17: ...reen is on before going into Screen Saver mode can be adjusted under the settings menu Options are 1 3 5 minutes or OFF The LED on the upper left will indicate the camera is on when the display is off...

Page 18: ...hown below Press DISP MENU Menu button to view the menu Press POWER MODE button to tab right Press WIFI down button to move the cursor down Press OK shutter button to confirm Press Menu button to retu...

Page 19: ...connect your camera to an HDTV with a mini HDMI Type C to A cable When connected and powered on you can view all the photos and videos available on the camera s memory card Be sure to use a high qual...

Page 20: ...nstalling the application press the WIFI button on the right side and the Screen will say Waiting for WiFi Connection On your mobile device go to WiFi settings and select VISION When connecting for th...

Page 21: ...le then download by pressing the up arrow at the bottom right of the screen After the file is downloaded to your device use an app like iMovie to edit and then upload to Facebook and YouTube 1 Resolut...

Page 22: ...press the View Mode button select then download After the file is downloaded to your device use an app to edit and then upload to Facebook and YouTube 1 Battery Status 2 Resolution 3 White Balance Set...

Page 23: ...nition 16 9 FHD 1920x1080 60fps or 30fps HD 1280x720 120 60 or 30fps 3 4 aspect ratio 1920x1440 30 fps Storage Media microSD Card up to 32GB File Formats Video MOV H 264 Photo JPG USB Port USB 2 0 Pow...

Page 24: ...rsion 10 0 0 or above CPU Intel Pentium of more than 1GB Hz or equivalent Internal Memory Larger than 1GB Sound Card and Video Card The sound card and video card supports DirectX8 or higher CD Driver...

Page 25: ...performance or reduce its life expectancy Do not expose camera to direct sunlight heat for extended periods When charging the camera in a vehicle be sure to always disconnect the camera from the powe...

Page 26: ...tions However there is no guarantee that interference will not occur in a particular installation If this equipment does cause harmful interference to radio or television reception which can be determ...

Page 27: ...t appareil est conforme avec Industrie Canada RSS standard exempts de licence s Son utilization est soumise les duex conditions suivantes 1 Cet appareil ne peut pas provoquer d interf rences et 2 Cet...

Page 28: ...rademarks used under License by Monster Digital Inc or its subsidiaries in the U S and other countries Trademarks and registered trademarks are property of their respective owners 1 year Limited Warra...

Reviews: