background image

AP MODE BULB INSTALLATION 

AP mode differs from EZ mode in that it does not use your wireless network to manage the 
communications between your smartphone and the Smart Bulb. Instead, it connects your 
phone's wireless directly to the bulb's built-in wireless. 

1.


Ensure that the light fixture where you will be installing this Smart Bulb is turned 
off. 

2.


Remove any bulb currently in this light fixture, then screw the Smart Bulb into the 
light socket. 

3.


Ensure that the Simple Home app is active on your smartphone or tablet. 

4.


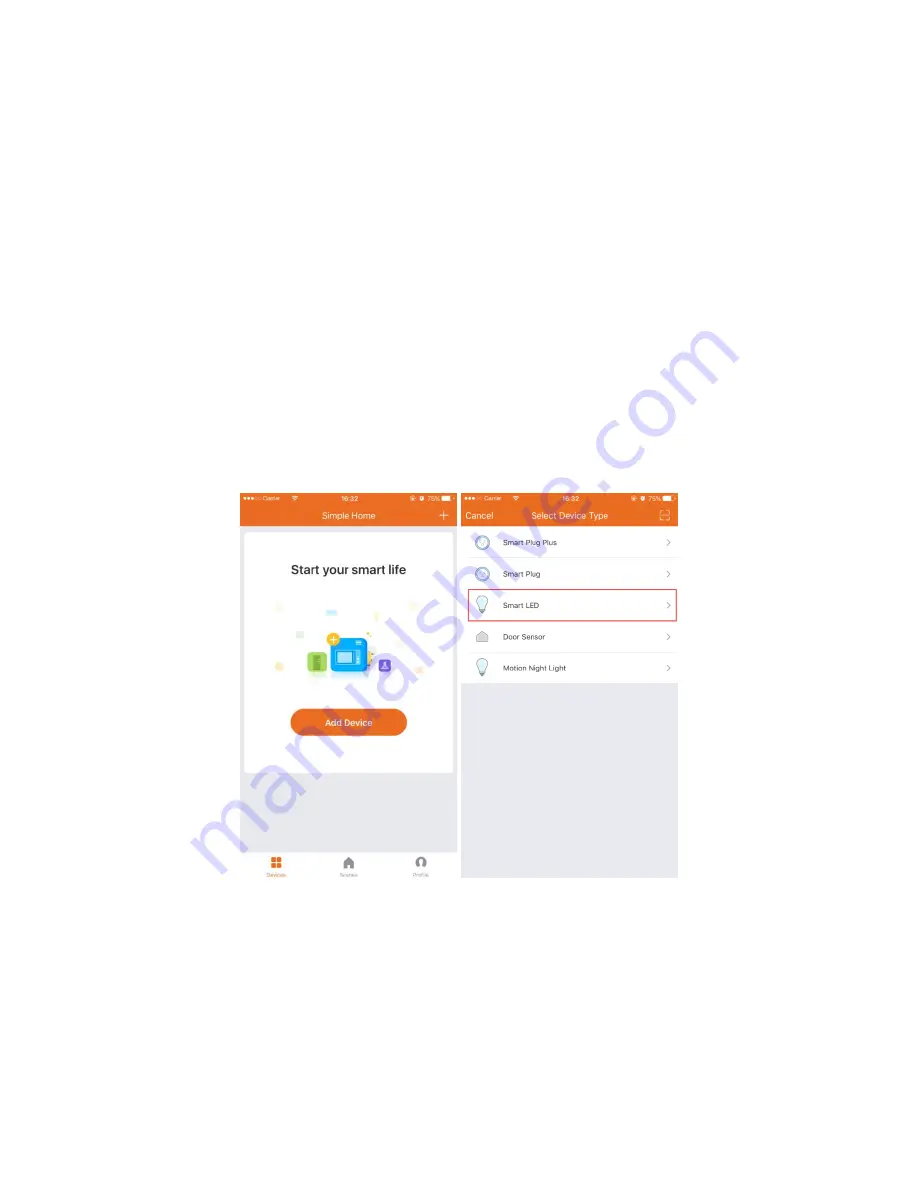
Tap the + in the upper right corner of the 

Add Devices screen to add a device to the 

Simple Home app. 


5.


Select the Smart LED option. 

6.


Tap the AP Mode entry at the top right. 

7.


Turn on the light. The bulb should begin blinking slowly, indicating that it is ready to 
be added in AP mode. 

Summary of Contents for 27936

Page 1: ...MONOPRICE Wireless Smart LED Light Bulb P N 27936 User s Manual ...

Page 2: ...ing Your Email Address 6 EZ MODE BULB INSTALLATION 6 AP MODE BULB INSTALLATION 9 BULB CONTROL SCREEN 11 SCHEDULING 12 REMOVING THE BULB 13 TECHNICAL SUPPORT 13 SPECIFICATIONS 14 REGULATORY COMPLIANCE 15 RF Exposure Statement for FCC 15 Notice for Industry Canada 15 Radio Notice for Industry Canada 16 RF Exposure Statement for Industry Canada 16 ...

Page 3: ...s Smart LED Light Bulb allows you to remotely control the lighting in your home using your Android or iOS smartphone or tablet The bulb communicates with your phone through your local wireless network so you won t need any separate mesh network hubs or controllers such as Z Wave This allows you to control the bulb by voice using your Amazon Alexa or Google Home It can be scheduled to turn on or of...

Page 4: ...e App Store Scan one of the two QR codes below for to go directly to the app page in the appropriate store Android iOS 2 Once the app is installed launch it 3 If you have already used the Simple Home app tap the Login button then enter your login with your Simple Home account information If you have not installed and used the Simple Home app before you will need to register with the Simple Home so...

Page 5: ... button Within 60 seconds an SMS message will be sent to your phone c Enter the verification code that was sent to your phone in the Verification Code field d Enter a password for the Simple Home software in the Please input password field the tap the Confirm button The password must contain 6 20 characters and must include at least one number ...

Page 6: ...clude at least one number EZ MODE BULB INSTALLATION EZ mode is the default mode for installing the Smart Bulb It uses your wireless network to communicate between your smartphone and the Smart Bulb If you do not have a wireless network or do not wish to include the bulb in your network see the AP MODE PLUG INSTALLATION section 1 Ensure that the light fixture where you will be installing this Smart...

Page 7: ...e Home app 5 Select the Smart Bulb option 6 Turn on the light The bulb should begin blinking rapidly indicating that it is ready to be added in EZ mode If it does begin blinking rapidly tap the blinking bulb icon on your phone then enter your wireless password to log into your wireless network then tap Confirm to continue The app will start connecting with the bulb ...

Page 8: ... for 10 seconds then turn it off c Turn the fixture ON OFF ON OFF ON The bulb should begin blinking rapidly d Enter your wireless password to log into your wireless network then tap Confirm to continue The bulb will stop blinking and the app will begin connecting to the bulb 7 Once the bulb and the app are synchronized into the network the app will inform you that the device was successfully added...

Page 9: ... will be installing this Smart Bulb is turned off 2 Remove any bulb currently in this light fixture then screw the Smart Bulb into the light socket 3 Ensure that the Simple Home app is active on your smartphone or tablet 4 Tap the in the upper right corner of the Add Devices screen to add a device to the Simple Home app 5 Select the Smart LED option 6 Tap the AP Mode entry at the top right 7 Turn ...

Page 10: ...the bulb does not start blinking at all tap the How to make light slowly blink link then perform the following steps a Turn off the light fixture with the Smart Bulb installed for at least 30 seconds b Turn on the light fixture with the Smart Bulb installed for 10 seconds then turn it off c Turn the fixture ON OFF ON OFF ON The bulb should begin blinking rapidly d Turn the fixture OFF ON OFF ON OF...

Page 11: ... Common functions link to display the Bright icon Tap the Bright icon to access the Brightness slider pop up Drag the slider to the desired brightness level then tap the back button to return to the Connected Devices screen If you tap the bulb entry on the Connected Devices screen the display will change to the Bulb Details screen with a bulb icon in the middle While on the Bulb Details screen you...

Page 12: ...rm the following steps to schedule events for the bulb 1 From the Connected Devices screen tap the bulb entry to display the Bulb Details screen 2 Tap the Schedule icon at the bottom of the screen 3 Tap the Add Schedule button at the bottom of the screen 4 The display will show two time wheels at the top one on the left for the hour and one on the right for the minutes Drag the wheels up or down t...

Page 13: ...k tap the Confirm button then tap it again The bulb will begin blinking rapidly indicating that it is ready to be added to the network in EZ mode TECHNICAL SUPPORT Monoprice is pleased to provide free live online technical support to assist you with any questions you may have about installation setup troubleshooting or product recommendations If you ever need assistance with your new product pleas...

Page 14: ...t 50 watts Luminous Flux 600 lumens Edison Screw Size E26 E27 Radio Protocol IEEE 802 11 b g n Radio Frequency 2 4 2 484 GHz Radio Range up to 70 meters outdoors 30 meters indoors Amazon Alexa Voice Control Supported Google Home Voice Control Supported Operating Temperature 14 104 F 10 40 C Storage Temperature 40 158 F 40 70 C Dimensions ø2 36 x 4 92 ø60 x 125 mm ...

Page 15: ...radiate radio frequency energy and if not installed and used in accordance with the instructions may cause harmful interference to radio communications Operation of this equipment in a residential area is likely to cause harmful interference in which case the user will be required to correct the interference at his own expense RF Exposure Statement for FCC Caution This equipment complies with radi...

Page 16: ...tion RF Exposure Statement for Industry Canada Caution This equipment complies with radiation exposure limits set forth for an uncontrolled environment End users must follow the specific operating instructions for satisfying RF exposure compliance This transmitter must be at least 20 cm from the user and must not be collocated or operated in conjunction with any other antenna or transmitter Androi...

Reviews: