background image

Summary of Contents for energy 736

Page 1: ...INSTRUCTION MANUAL Monark Energy model 736...

Page 2: ......

Page 3: ...ns 5 8 Brake belt contact surface Brake belt 11 Chain 12 13 Crank bearing 14 Flywheel bearing 15 General 4 General about exercise 15 17 Operation instructions 9 Replacement of brake belt 10 Service ro...

Page 4: ...se note The production number of your exercise cycle is placed according to fig 2 page 6 WARRANTY Monark products and parts are guaranteed against defects in material and workmanship for a period of o...

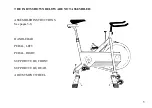
Page 5: ...THE PARTS SHOWN BELOW ARE NOT ASSEMBLED ASSEMBLED INSTRUCTIONS See pages 5 8 HANDLEBAR PEDAL LEFT PEDAL RIGHT SUPPORT TUBE FRONT SUPPORT TUBE REAR ADJUSTMENT WHEEL 5...

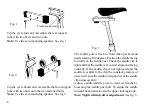
Page 6: ...ion the saddle facing forwards on the saddle post Check the saddle clip is tight and that the saddle is at correct angle and facing centrally If the saddle clip is not tightened and the saddle is cent...

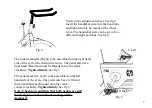
Page 7: ...of the cycle the chain wheel side The pedal axle has a right hand thread and must be threaded onto the crank clockwise Tighten firmly See fig 5 The pedal marked L Left to be assembled on the left han...

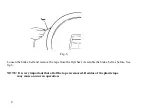
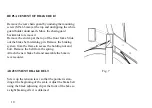
Page 8: ...ke belt and remove the tape from the flywheel Assemble the brake belt as before See fig 6 NOTE It is very important that all of the tape is removed Residue of the plastic tape may cause an uneven oper...

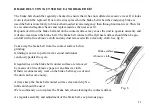
Page 9: ...ywheel The reststance is adjusted by increasing or decreasing the tension of the brake belt against the flywheel DUE TO THE FORCES BUILT UP IN THE BIKE IT IS ESSENTIAL THAT THE USER IS AWARE OF THE CO...

Page 10: ...ide out the brake belt retaining pin Remove the braking system from the frame to access the holding nut and bolt Remove the belt from the spring Attach the new brake belt and assamble the bike in reve...

Page 11: ...elt contact of the flywheel surface should then be gro und off with a fine abrasive cloth and any dust removed with a clean dry cloth See fig 8 Take away the brake belt from the contact surface before...

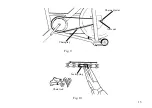
Page 12: ...ters it is worn out and shall be replaced with a new one Loosen the lower chain guard bracket Remove the rear right chain guard by undoing the mounting screw M5x6 5mm at the top and unclipping the whi...

Page 13: ...Fig 9 Fig 10 13 Chain play Axle nut Chain adjuster Chain lock Lock spring...

Page 14: ...no play on the pedal crank pedal crank is secure to the crank axle pedals moving smoothly and is the pedal axle clear of dirt and fibres pedals are securely fitted to the pedal crank pedal toe straps...

Page 15: ...sues such as muscles bone and blood and also a number of bodily functions can adapt to inactivity and to stress Studies have proved that if you use 30 minutes for exercise like brisk walking running b...

Page 16: ...Yes You do use calories A few miles on your bike every day over one year you will have lost the equivalent of 20 pounds of body fat You will achieve best results if you combine exercise with healthie...

Page 17: ...Get off the bike and rest a few minutes Cycle again and then rest Train at your own pace and with a comfortable pedal resistance After a few weeks you can increase the resistance 3 Before ending pedal...

Page 18: ...SE 432 82 Varberg Sweden Tel 46 0340 86000 Fax 46 0340 80485 SE 78050 Vansbro Sweden Tel 46 0281 594940 Fax 46 0281 71981...

Reviews: