background image

10

English

7  Configuration of the 

Dante Network

PA-900DT is configured as a receiver in the 
Dante network by means of the program “Dante 
Controller”, available as a free download on the 
website of the company Audinate . The settings 
made via the program will be saved in the corre-
sponding transmitters and receivers of the Dante 
network so that the program is only required 
for network configuration but not for normal 
operation . The following system requirements 
apply to the computer on which the program 
“Dante Controller” is to be executed:

Component

Minimum requirements

Processor

1 GHz

RAM

512 MB

Network

Standard Ethernet interface  

(100 Mbits /s or Gigabit) or wireless LAN 

(WiFi) interface

Operating 

system

Windows 7


(SP1 or higher), 

8.1

 or 

10

Note:

 Both UTF-8 and Unicode will be sup-

ported, except for host names and names 
of units; the DNS standard will not support 
Unicode for them.

Mac OS X 10.9.5, 10.10.5

 or 

10.11

Note:

 Intel architecture only; PPC architecture 

will not be supported.

Windows is a registered trademark of Microsoft Corpora-
tion in the USA and other countries. 


Mac OS is a registered trademark of Apple Computer, Inc. 
in the USA and other countries.

7.1  Installing the “Dante Controller”

To install the program from the Audinate web-
site:
1) Call up the following Internet address:

https://www .audinate .com/products/software/
dante-controller

2) Select the operating system .
3) Click the button with the version of the Dante 

controller .

4) Log in or create an account .
5) Download the software .
6) Install the software .

7.2  Configuration of the unit with the 

Dante Controller

1) Start the Dante Controller .
2) Wait for the desired Dante transmitter and 

PA-900DT to appear in the matrix (under 
“Dante Receivers”) .

Note:

 If PA-900DT or the Dante transmitter fails 

to appear, the reason may be that 


–   the corresponding unit has not been switched 

on


–   the unit is in a different subnet


–   the unit is not able to synchronize with the other 

Dante units .

However, if one of the two last-mentioned rea-
sons applies, the Dante unit should at least appear 
under the tab “Device Info” or “Clock Status” in 
the network view . A fast solution of the problem 
may be to switch off the unit or to disconnect the 
connection to the switch . For further information 
please refer to the user manual of the Dante Con-
troller from Audinate .

3) In the menu bar of the Dante Controller, se-

lect “Device / Device View” or use the shortcut 
Ctrl+D . The Device View window will open .

4) Select “PA-900DT” in the bar of the drop-

down menu appearing beneath the menu 
bar .

5) The third bar can be used to indicate informa-

tion on the unit and to make settings . Select 
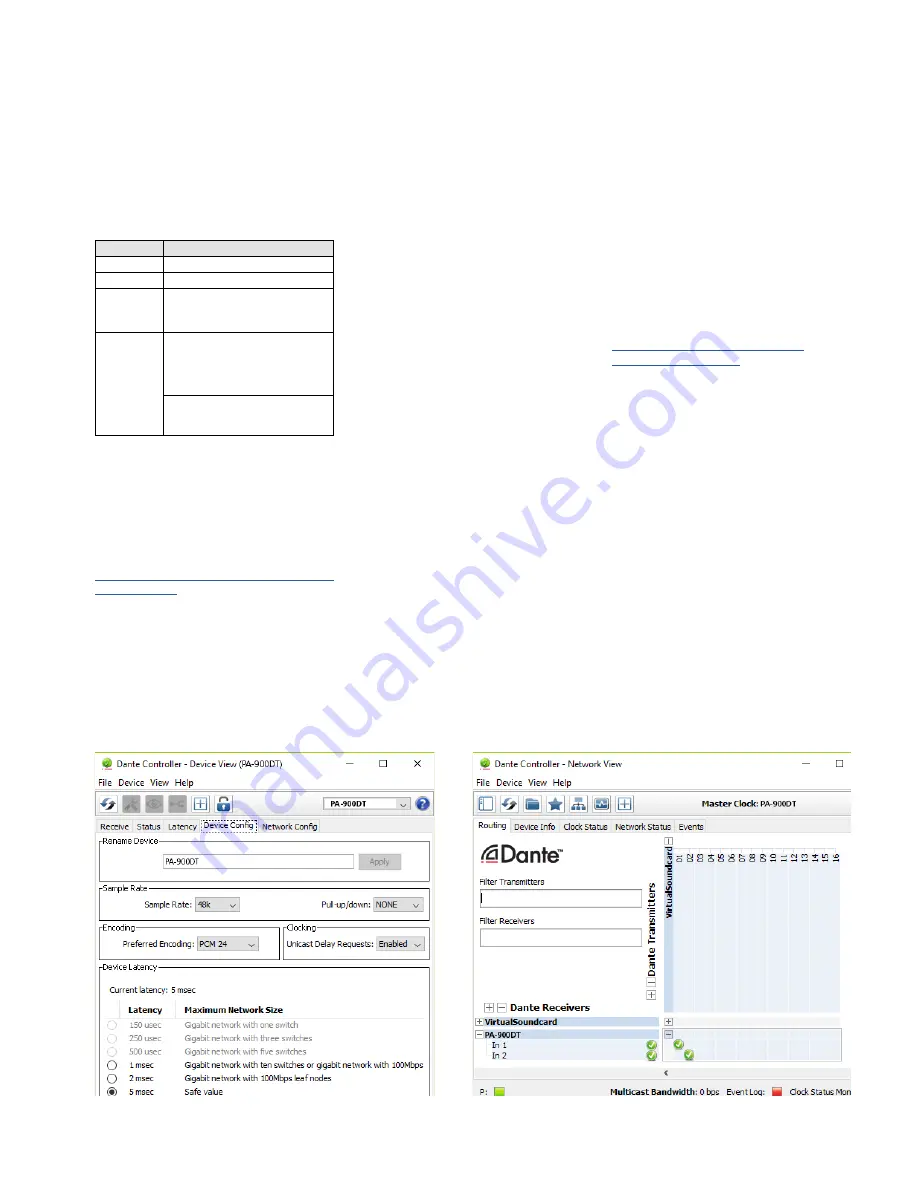
the tab “Device Config” (refer to fig . 8) .

6) Adjust the “Sample Rate” to the desired 

Dante transmitter or set a different common 
sample rate for both units, if required .

7) In the field “Rename Device”, the name 

used for the unit in the Dante network can 
be changed (e . g . to a specific name referring 
to the place of installation) . Click “Apply” to 
confirm the change .

8) Use the tab “Network Config” to change the 

network settings for the Dante interface of 
PA-900DT, if required .

7.3  Routing with the Dante Controller

To assign the input signals and output signals of 
the corresponding units:
1) Under “Routing” in the window “Network 

View”, click 

 to open the channels of the 

desired Dante transmitter under “Dante 
Transmitters” and the channels of PA-900DT 
under “Dante Receivers” (refer to fig . 9) .

2) Navigate from the column of the Dante trans-

mit channel to the line of the desired Dante 
receive channel of PA-900DT and click the 
field at the intersection point .

3) Wait for the field to show a green circle with 

a white check mark 

 .

4) Repeat the last two steps for the second 

Dante receive channel of PA-900DT, if re-
quired .

An English user guide for the Dante Controller is 
available for download on the Audinate website:

https://www .audinate .com/resources/
technical-documentation

Fig. 8  Device View of PA-900DT

Fig. 9   Routing from the audio source “VirtualSoundcard” 

to the receiver “PA-900DT”

Summary of Contents for PA-900DT

Page 1: ...ENUNGSANLEITUNG INSTRUCTION MANUAL MODE D EMPLOI ISTRUZIONI PER L USO VEILIGHEIDSVOORSCHRIFTEN CONSEJOS DE SEGURIDAD RODKI BEZPIECZE STWA SIKKERHEDSOPLYSNINGER S KERHETSF RESKRIFTER TURVALLISUUDESTA E...

Page 2: ...PUT 4 70V 100V 4 COM SPEAKER OUTPUT 4 70V 100V 4 COM SPEAKER OUTPUT 4 70V 100V 4 COM SPEAKER OUTPUT 4 70V 100V 70 V 100 V 100 V 100 V 70 V 70 V 70 V 4 30W RMS 8 60W RMS 4 120 W RMS 8 60W RMS 4 30 W RM...

Page 3: ...R SPECIALISTS ELECTRONICS FOR SPECIALISTS ELECTRONICS FOR SPECIALISTS 3 Deutsch Seite 4 English Page 8 Fran ais Page 12 Italiano Pagina 16 Nederlands Pagina 20 Espa ol P gina 20 Polski Strona 21 Dansk...

Page 4: ...rker bet tigen um Schaltge r usche zu vermeiden Bitte beachten Sie auch den Vorsichtshinweis der Position 14 2 Hinweise f r den sicheren Gebrauch Das Ger t entspricht allen relevanten Richtlinien der...

Page 5: ...k nnen auch die Schraubanschl sse 20 verwendet werden 1 Bei Anschluss eines Mikrofons den dazugeh rigen Schalter MIC LINE 19 ausrasten 2 F r die Buchsen an denen ein phantomge speistes Mikrofon angesc...

Page 6: ...syn chronisieren kann F r einen der beiden zuletzt genannten Gr nde sollte das Dante Ger t aber zumindest unter dem Reiter Device Info oder Clock Status im Net work View aufgef hrt werden Das Ausscha...

Page 7: ...6kHz Datenschnittstelle Ethernet RJ 45 Buchse Frequenzbereich 50 15000Hz 3dB Klirrfaktor 0 5 St rabstand 80dB Klangregelung Tiefen 10dB 100Hz H hen 10dB 10kHz Phantomspeisung 20V Einsatztemperatur 0 4...

Page 8: ...the switches when the amplifier has been switched off Please refer to the note under item 14 2 Safety Notes The unit corresponds to all required directives of the EU and is therefore marked with WARN...

Page 9: ...ed alternatively 1 When connecting a microphone disengage the corresponding switch MIC LINE 19 2 For the jacks to which a phantom powered microphone has been connected use the cor responding DIP switc...

Page 10: ...not able to synchronize with the other Dante units However if one of the two last mentioned rea sons applies the Dante unit should at least appear under the tab Device Info or Clock Status in the netw...

Page 11: ...kHz Data interface Ethernet RJ45 jack Frequency range 50 15000Hz 3dB THD 0 5 S N ratio 80dB Tone control BASS 10dB 100Hz TREBLE 10dB 10kHz Phantom power 20 V Ambient temperature 0 40 C Power supply Ma...

Page 12: ...icateur est teint pour viter tout bruit de commutation Veillez respecter les conseils de s curit du point 14 2 Conseils de s curit et d utilisation L appareil r pond toutes les directives n ces saires...

Page 13: ...endommag 5 2 Microphones Il est possible de relier jusqu trois microphones aux entr es INPUT 1 INPUT 3 14 Il est gale ment possible d utiliser les bornes 20 la place de la prise XLR INPUT 1 1 Lors du...

Page 14: ...areils Dante Pour une des deux raisons cit es en dernier il faut que l appareil Dante soit pr sent au moins dans la visualisation Network sous l onglet Device Info ou Clock Status Un arr t de l appare...

Page 15: ...z Interface donn es Ethernet prise RJ45 Bande passante 50 15000Hz 3dB Taux de distorsion 0 5 Rapport signal bruit 80dB R glage de tonalit Graves 10dB 100Hz Aigus 10dB 10kHz Alimentation fant me 20V Te...

Page 16: ...er l uso sicuro L apparecchio conforme a tutte le direttive rilevanti dell UE e pertanto porta la sigla AVVERTIMENTO L apparecchio alimentato con pericolosa tensione di rete Non intervenire mai person...

Page 17: ...he i contatti a vite 20 1 Se si collega un microfono sbloccare il rela tivo commutatore MIC LINE 19 2 Per le prese dove collegato un microfono con alimentazione phantom attivare la ten sione phantom d...

Page 18: ...motivi indicati per ultimi l apparec chio Dante dovrebbe essere segnalato per lo meno sotto il cavalierino Device Info o Clock Status nella network view Lo spegnimento dell appa recchio oppure il dist...

Page 19: ...presa RJ 45 Gamma di frequenze 50 15000Hz 3dB Fattore di distorsione 0 5 Rapporto S R 80dB Regolazione toni Bassi 10dB 100Hz Alti 10dB 10kHz Alimentazione phantom 20V Temperatura d esercizio 0 40 C Al...

Page 20: ...velo a la planta de reciclaje m s cercana para que su eliminci n no sea perjudicial para el medioambiente Deze gebruiksaanwijzing is door de auteurswet beschermd eigendom van MONACOR INTERNATIONAL Gmb...

Page 21: ...li urz dzenie by o u ywane niezgodnie z prze znaczeniem zo sta o niepoprawnie zainstalo wane lub obs ugiwane oraz by o poddawane naprawom przez nieautoryzowany personel Je li urz dzenie nie b dzie ju...

Page 22: ...n k ytt Laitteen toiminnasta saa lis tietoa tar vittaessa t m n laitteen muunkielisist k ytt ohjeista Turvallisuudesta Alla r ttigheter r reserverade av MONACOR INTERNATIONAL GmbH Co KG Ingen del av d...

Page 23: ......

Page 24: ...MONACOR INTERNATIONAL GmbH Co KG Zum Falsch 36 28307 Bremen Germany Copyright by MONACOR INTERNATIONAL All rights reserved A 1831 00 01 04 2017...

Reviews: