background image


ENGLISH 

VS-1 CHRONOGRAPH v2.0 INSTRUCTIONS  


                     © COPYRIGHT ST. MORITZ WATCH CORP. 2008 


7

COMPASS MODE 


The VS-1 is equipped with a highly accurate digital magnetic compass with reading in one degree increments. The compass can be 
adjusted to compensate for the magnetic declination corresponding to the area where the compass is being used. 
 
CALIBRATING THE COMPASS 
The COMPASS of the VS-1 must be calibrated on a regular basis. The compass should be calibrated any time it does not seem to 
be working properly. We recommend calibrating the compass prior to any activity where optimal accuracy is desired, such as a long 
back country trip. 
 
NOTE: For the optimum accuracy, the compass must be held completely level, both during the calibration process and when taking 
a bearing. While performing the calibration, we recommend placing the unit on top of a drinking glass to hold it level and turn it. 
 
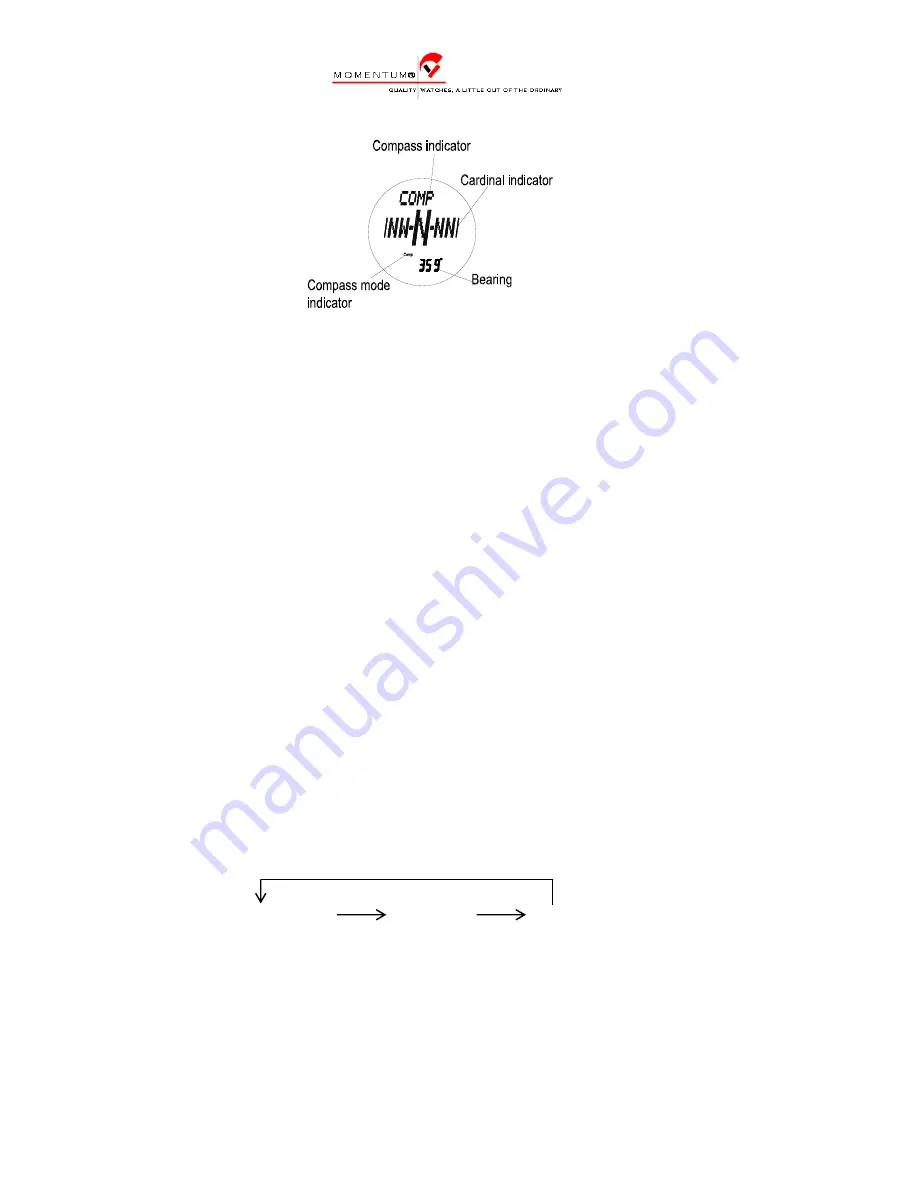
Press S3 to select Compass mode. 
* Mode prompt “COMP” is displayed briefly. Calibration mode will start automatically when selecting Compass mode 
 for the first time (e.g. after resetting the watch, or after installing a new battery.) 
- When you take bearings, readings are shown in graphical direction, with bearing in degrees. 
  * Hold the watch horizontal/ level: Reading shown indicates the direction that the 12 o’clock position is pointing to. 
- Declination correction is provided. (Declination is the difference between true north and magnetic north.) 
- The compass offset range: 00-90°. Check setting compass offset, if offset >90°, then change offset to 90°,and wait 2 minutes. 
Watch will return to normal function. 


Important Note: 
1. The compass should be calibrated before use, then recalibrated at regular intervals. 
2. The compass must be kept in a level position when taking a reading. 
3. Compass readings are easily affected by large metal objects and sources of magnetism (e.g. CRT Television magnets), so the 
compass should always be used in outdoors, away from buildings and large metal objects. 


To calibrate the compass 
1. Press and hold down S4 until “ROTATE CAL” is shown on the display, which indicates the calibration screen. 
2. Rotate the product slowly for 2 complete, slow rotations. Each rotation must last for at least 15 seconds. 
3. After calibration/ rotation, press S3: the ten-degree digit starts to flash on the display, which indicates the declination angle 
setting screen. 

* Do not press S4, S1 or S2 at this point: this will end calibration, skipping the declination angle setting. In this case, the 
declination angle is set to 0 degree and the compass reading will not be as accurate. 

4. Use S1(+) and S2 (-) to change the setting. Holding down either button scrolls the setting at high speed. 
5. Press S3 to advance to the next setting as follows: 


TENS OF DEGREE  

DEGREE  

E/W 

S3 

S3 S3 


* When E or W is flashing, press S2 or S1 to switch between East and West. 

Summary of Contents for VS-1

Page 1: ...ENGLISH VS 1 CHRONOGRAPH v2 0 INSTRUCTIONS COPYRIGHT ST MORITZ WATCH CORP 2008 1 VS 1 Chronograph Series v2 Instructions 2 4 6 YEAR Warranty Information ...

Page 2: ...e unit in the water be avoided whenever possible as water could enter the unit through the altimeter sensor port and damage the unit The unit should not be worn while snorkeling or scuba diving as these activities can damage the altimeter sensor CAUTION Care should be taken not to press any pushbuttons while the unit is wet or submerged as this can force moisture past the pushbutton seals and dama...

Page 3: ...f changes provided 24 hours barometric data recall Both sea level pressure and absolute pressure can be shown Weather forecast Temperature displayed in F or C user selectable Compass Bearing in degrees Graphical direction bearing indicator Declination setting Auto deviation of direction calculation and display Ski 1 press to record the base altitude Automatic timing of a ski run from start point t...

Page 4: ...en variable NOTE 1 Generally when a PRESS HOLD action is required the word HOLD will appear on the center line of the display NOTE 2 In this manual we will indicate when a PRESS HOLD is required Otherwise a QUICK PRESS should be assumed S3 MODE CHANGE PRESS S3 TO SELECT SETTING VALUE ON TIME COMPASS BARO ALTITUDE AND ALARM MODE PRESS TO SELECT NEXT MODE PRESS AND HOLD FOR 3 SECONDS TO RETURN TO NO...

Page 5: ...9 modes Time Compass Barometer Altimeter Log Data Ski Chronograph Sail and Alarm Press S3 to select to your desired mode Hold S1 NORMAL TIME T1 DUAL TIME T2 S3 COMPASS S3 BAROMETER S3 ALTIMETER S3 S3 LOG DATA S3 SKI S3 CHRONOGRAPH S3 SAIL S3 ALARM Press and hold S3 approx 3 4 seconds in any mode to return to Normal Time mode ...

Page 6: ...ion There is an auto calendar from 2006 to 2055 To switch among the 5 time displays views Use S2 to switch among the 5 displays for time To set time 1 Press and hold S4 to enter time setting mode 2 Press S3 to select the value you want to set hour min sec year month day 12 24 hour format altitude unit barometric unit and temperature unit 3 Use S1 and S2 to increase or decrease value 4 Press S4 to ...

Page 7: ...is pointing to Declination correction is provided Declination is the difference between true north and magnetic north The compass offset range 00 90 Check setting compass offset if offset 90 then change offset to 90 and wait 2 minutes Watch will return to normal function Important Note 1 The compass should be calibrated before use then recalibrated at regular intervals 2 The compass must be kept i...

Page 8: ...ttings is up to date The following websites are good sources for finding local Magnetic Declination http www geolab nrcan gc ca geomag apps mdcal_e php English http www geolab nrcan gc ca geomag apps mdcal_f php français http www ngdc noaa gov seg geomag jsp Declination jsp TAKING A COMPASS BEARING Press S3 to enter Compass mode Mode prompt COMP is displayed briefly and bearing will be taken autom...

Page 9: ...e graph of sea level pressure The graph shows the relative changes in sea level pressure with the current pressure shown on the right Each horizontal point represents one hour while each vertical point represents the relative pressure reading pressure at that time The graph is not intended to show exact pressure readings but rather to show the trend of pressure changes To recall Barometric Data fr...

Page 10: ... S2 to change the setting Holding down either button scrolls the setting at high speed 4 Press S4 to exit the setting screen If there is no button operation for 2 3 minutes from the setting screen the display will return to Barometer mode automatically To set current weather 1 Hold down S4 until SET WEATHER is displayed The weather indicators start to flash 2 Use S1 and S2 to change the setting 3 ...

Page 11: ...2 until MAX flashes Then Press S3 stored Max altitude value will flash Then Press S1 or S2 to reset Max altitude to zero Finally press S3 to exit and store 8 To reset ACC accumulated altitude Press S1 or S2 until ACC flashes Then Press S3 stored ACC altitude value will flash Then Press S1 or S2 to reset ACC altitude to zero Finally press S3 to exit and store 9 To set an altitude Alarm press S1 or ...

Page 12: ...2 to choose your desired view There are five views for user selection shown in the following illustration To Review data recorded in Altitude Logbook memory 1 Ensure that the logbook recording has been stopped above 2 Press S3 to select Altitude Logbook mode The words LOG DATA will appear briefly on the screen 3 The most recent LOG will be displayed You will see the year and date above and below w...

Page 13: ...ess and hold down S2 Store Alti will flash Keep holding S2 to set current altitude as new BASE altitude always set BASE altitude prior to your run Alternatively you can set BASE altitude to a known altitude by Pressing and Holding down S4 Set Hold will flash Keep holding until altitude display flashes then use S1 and S2 to set desired BASE altitude Set BASE altitude prior to starting skiing Press ...

Page 14: ...ime split time and lap number then the display will release automatically to show the current running time To Start Stop chronograph 1 Press S1 to start the chronograph 2 Press S2 to stop the chronograph You can resume timing by pressing S1 3 With chronograph stopped press hold S2 to reset chronograph to zero To take laps or split intermediate times 1 Press S1 to start the chronograph 2 Press S1 t...

Page 15: ...00 minutes in 5 00 minute increments then in 1 00 minute increments for base countdown times of 15 00 00 or less 2 Once the desired base countdown time is displayed press S1 to start count down 3 After the countdown reaches 00 00 00 the Stopwatch will automatically start to count up and time the race 4 Press S1 to stop the stopwatch race timing You can restart the timing by pressing S1 again To ta...

Page 16: ...rm 4 Press S3 to select the value you want to set hour or minute Selected value will flash 5 Use S1 and S2 to adjust S1 for forward setting and S2 for reverse setting 6 Press S4 to save new alarm time and exit If no button is pressed for 2 3 minutes the watch will exit the setting mode Arming disarming Alarm and Chime 1 Press S3 to select Alarm mode 2 Press S2 to select Alarm 1 Alarm 2 or Chime 3 ...

Page 17: ...tery hatch which allows you to change the battery yourself should you not have time to send it in to one of our authorized Service Centers for service If you decide to do the battery change yourself take special care when removing the battery hatch then after battery replacement screw the back on firmly taking special care not to cross thread or damage the o ring as this ensures the ongoing reliab...

Page 18: ...end that you extend your warranty for an additional 2 years by sending your watch to a St Moritz Momentum Service Center for a Factory Full Service This includes battery replacement cleaning lubrication or replacement of all seals accuracy tuning check waterproof testing to original specification return shipping and insurance At the end of 4 years send it in for another Full Service and extend the...

Reviews: