background image

IDT Hand Tool 

Doc No: ATS-638259900 

Release Date: 05-24-13 

UNCONTROLLED COPY


Page 3 of 6 

Revision: A 

Revision Date: 05-24-13 

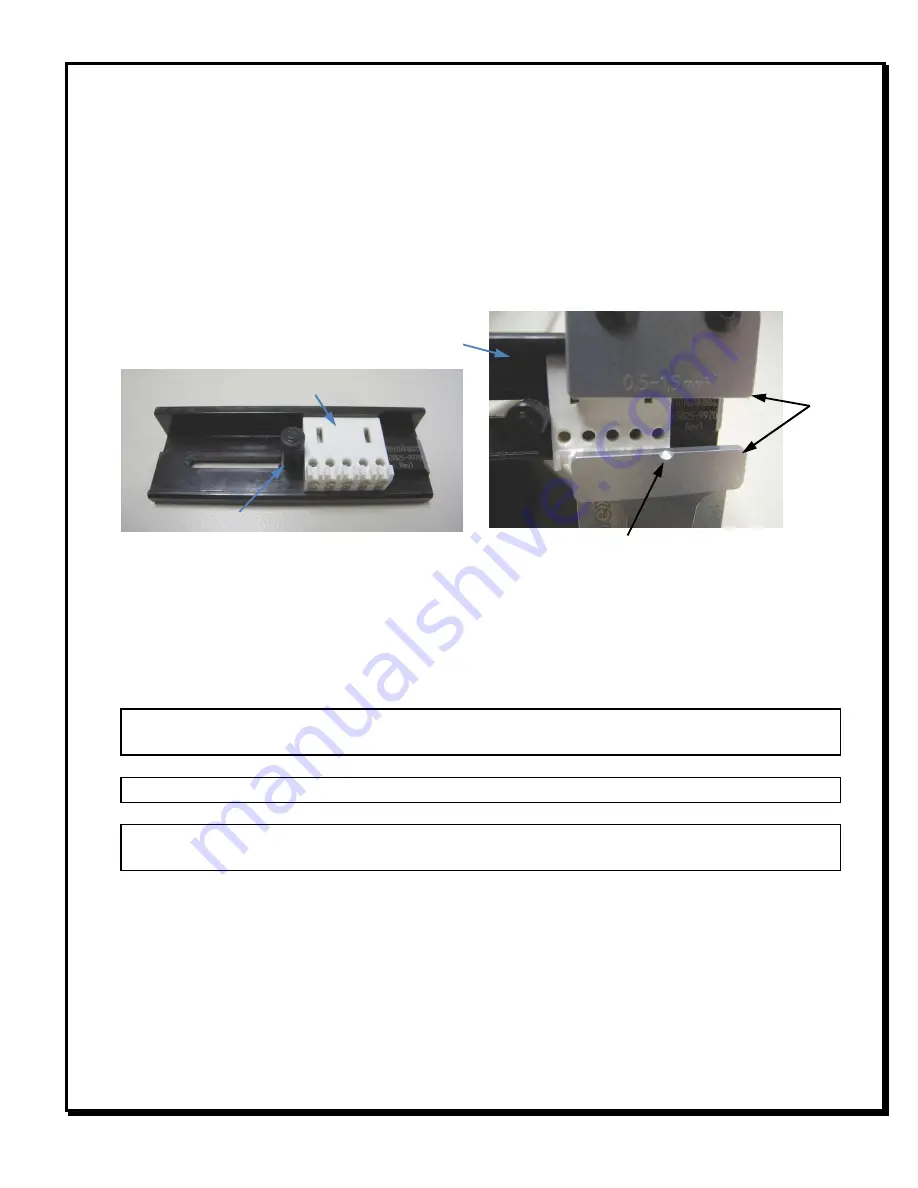
Figure 5 

TOOL 

FRAME 

REFERENCE MARK 

CONNECTOR 

NEST 


OPERATION 

 
Open the hand tool by squeezing the handles together.  At the end of the closing stroke, the ratchet mechanism 
will release and the handles will spring open. 
 
1.


Slide the connector nest out of the tool frame. 

2.


Place the proper connector into the nest as shown in Figure 4.  The mating side of the connector should be 
against the top of the nest and the wire holes toward the bottom. 

3.


Slide the connector nest into the tool frame until the first termination position is aligned with the reference mark 
on the frame face. See Figure 5. The connector nest is detented and will “click” into place. 


NOTE

: If the connector nest is difficult to slide into the tool frame, slide it out and make sure the connector is fully 

seated in the nest. 
 
4.


Insert the appropriate wire into the connector hole until it stops. 

5.


Make sure the inserted wire is in alignment with the reference mark on the frame face, then squeeze the tool 
handles together until the ratchet releases. 


NOTE

: If the wire is not in alignment with the reference mark, connector and/or tool damage will occur if 

termination is attempted. 


NOTE

: The full cycle ratchet action will not release the tool until it has been fully closed. 


NOTE

:  If something jams, the ratchet mechanism can be released by pushing upward on the ratchet pawl 

located between the tool handles. See Figure 9. 

 
6.


Release the tool handles and allow them to spring open. 

7.


Move the connector nest to the next termination position.  The nest is detented and will “click” into place. 

8.


Repeat steps 4 through 7 until all terminations are complete. 

9.


Slide the connector nest out of the tool frame and remove the terminated connector. 

Figure 4 

ADJUSTABLE POST 

CONNECTOR POSITION 

Summary of Contents for 63825-9900

Page 1: ... 0202 93055 0203 93055 0204 93055 0205 93055 0206 93055 0207 93055 0208 93055 0209 93055 0210 93055 0211 93055 0212 93055 0213 93055 0214 93055 0215 93055 0216 93055 0217 93055 0218 93055 0219 93055 0220 93055 0221 93055 0222 93055 0223 93055 0224 93055 0225 93055 0226 93055 0227 93055 0228 93055 0229 93055 0230 93055 0231 93055 0232 93055 0233 93055 0235 93055 0236 93055 0237 93055 0238 93055 023...

Page 2: ...244 0219 93244 0220 93244 0221 93244 0222 93244 0223 93244 0225 93244 0226 93244 0228 93244 0301 93244 0302 93244 0303 93244 0304 93244 0305 93244 0306 93244 0307 93244 0308 93244 0309 93244 0310 93244 0311 93244 0312 93244 0315 93395 93395 0101 93395 0102 93395 0105 93395 0126 93395 0133 93395 0134 93395 0135 93395 0136 93395 0201 93395 0202 93395 0203 93395 0218 93395 0227 93395 0228 93395 0229 ...

Page 3: ...tool frame slide it out and make sure the connector is fully seated in the nest 4 Insert the appropriate wire into the connector hole until it stops 5 Make sure the inserted wire is in alignment with the reference mark on the frame face then squeeze the tool handles together until the ratchet releases NOTE If the wire is not in alignment with the reference mark connector and or tool damage will oc...

Page 4: ...es closed to prevent objects from becoming lodged in the termination punch and store the tool in a clean dry area Miscrimps or Jams Should this tool ever become stuck or jammed in a partially closed position Do not force the handles open or closed The tool will open easily by pressing the ratchet release lever up See Figure 9 Tool Frame Preload Tool frame preload is not available on this type of f...

Page 5: ...nect the power source electric or pneumatic from the actuator CAUTION Keep fingers away from the crimping area when operating a powered tool It can cause severe injury CAUTION Wear safety glasses when operating or servicing this tool The chart below shows all applications for this Modular Crimp Head Modular Crimp Head Order No Tool Order no Tool Description Adapter Order No Adapter Description Fig...

Page 6: ... Date 05 24 13 RATCHET RELEASE LEVER HANDLE SPRING 2 1 4 Figure 9 3 PARTS LIST IDT Hand Tool 63825 9900 Item Order No Description Quantity 1 63825 9970 Modular Crimp Head 1 2 63816 0000 Hand Crimp Frame Short 1 3 63816 0001 Locking Pin 2 4 63600 0525 Handle Spring 1 Visit our Web site at http www molex com ...

Reviews: