background image

4


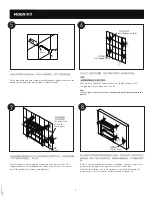
Take the remaining three mounting bases against the wall, and use a 

pencil or marker to outline the mounting holes in the mounting foot 

contour circle.

Note: Please install the plug hole in dislocation as shown in the figure.


1

确定安装位置后,在产品的开关安装脚处预埋PVC穿线管;在预计安装漏
电保护处预埋标准86开关。

注意:PVC不应突出墙面。

取剩下三个安装底座靠在墙上,在安装脚轮廓圈内用铅笔或记号笔画出安装孔
轮廓。

注意:请按图将螺丝孔位错位摆放。

4

墙体

86开关盒

500mm

取出安装脚中已预装的紧定螺钉,将毛巾架上的线缆穿过双孔装饰盖中偏上
的孔洞。用平头螺钉将装饰盖安装到毛巾架脚上。

注意:装饰盖侧面的螺丝孔朝向地面。

a. 请根据购买的型号,将三孔安装底座带孔洞的一面,如图所示,靠在墙
上,中间圆孔与PVC穿线孔重合,在安底座轮廓圈内用铅笔或记号笔画出
安装孔轮廓。
b. 将三孔底座安装好后(可参考第五、六步),把毛巾架放到准备安装的
墙面,用铅笔或记号笔在墙上画出安装脚装饰盖的轮廓。

Remove the pre-installed set screws in the mounting feet and route the 

cables from the towel bar through the upper holes in the double-hole 

decorative cover. Install the decorative cover to the towel bar feet with the 

flat head screws .

Note: The screw holes on the side of the decorative cover should face the 

ground.

a. Please place the hole side of the three-hole mounting base against the 

wall as shown in the picture according to the model you purchased, with 

the middle round hole overlapping the PVC threading hole, and draw the 

outline of the mounting hole with a pencil or marker in the contour circle 

of the mounting base.

b. Once the three-hole base is installed


(Refer to step 5 and 6), place the 

towel bar on the wall to be installed, and use a pencil or marker to outline 

the mounting foot decorative cover on the wall.

2

3

After determining the installation position, install the PVC threading pipe 

on the switch mounting foot of the electric towel bar; install the 86 switch 

in the   leakage protection place.

Note: The PVC threading pipe should not be extend beyond the wall.

86 Switch Box

Wall

PVC穿线管
直径16mm

PVC Threading Pipe 

Diameter 16mm

螺丝孔

Screw Hole

平头螺钉

Flat Head Screw

装饰盖

Decorative Cover

安装底座

ACC2506

ACC2506MCL

Mounting Base

三孔底座在毛巾杆

右下方安装

The three-hole base is 

installed at the bottom 

right of the towel bar 

三孔底座在毛巾杆

左下方安装

The three-hole base is 

installed at the bottom 

left of the towel bar 

ACC2506

ACC2506MCL

Summary of Contents for Eva ACC2506

Page 1: ...明书以备将来参考 电热毛巾架 安装使用说明书 如需安装支持 配件丢失等 请联系MOEN 中国 400 630 8866 www moen cn PLEASE CONTACT MOEN FIRST For Installation Help Missing or Replacement Parts China 400 630 8866 www moen cn 推荐工具 为了安全和让安装和替换变得容易 Moen建议 您使用以下工具 HELPFUL TOOLS For safety and ease of replacement Moen rec ommends the use of these helpful tools 手枪钻 φ8玻璃钻头 φ8 Glass Drill 卷尺 Tape Measure Pencil or Marker Pen 铅笔或记号笔 2 十字螺丝刀 2 Phillip...

Page 2: ...d use this product under the supervision of someone Basic precautions should be followed when using electrical products including a There is a risk of electric shock all lines must be connected by a licensed electrician The line must be grounded and use the model number of towel bar body and controller for 60227 IEC 53 RVV 300 500V cross sectional area 0 75 square mm power cord for connection and ...

Page 3: ...m and the threading tube and switch box must be reserved in advance ACC2506 ACC2506MCL 220V 50Hz 80W 额定输入电源 功率 Rated Input Power Supply Power Product Model 产品型号 面板开关 电热毛巾架 Panel Switch Electric Towel Bar 安装完成示意图 Installation Complete Diagram ACC2506 面板开关 Panel Switch 电热毛巾架 Electric Towel Bar 开关在右侧安装脚上 The switch is on the right mounting foot ACC2506MCL 开关在左侧安装脚上 The switch is on the left mounting ...

Page 4: ...ce the hole side of the three hole mounting base against the wall as shown in the picture according to the model you purchased with the middle round hole overlapping the PVC threading hole and draw the outline of the mounting hole with a pencil or marker in the contour circle of the mounting base b Once the three hole base is installed Refer to step 5 and 6 place the towel bar on the wall to be in...

Page 5: ...he hole tighten the base with self tapping screws and fix it on the wall Note Please place the screw holes in a misplaced position according to the picture 5 7 45mm 紧定螺钉 电源线通到 开关面板处 Undercounter Installation Refer to the installation instructions of the panel switch to connect the power cord and tighten the panel switch to the switch box After the installation check if the product is installed fir...

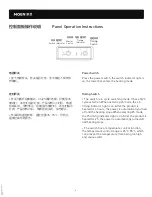
Page 6: ...e switching mode It has 4h 2h cycle selection When selecting 4h mode the 4h timing indicator light is on After the product is heated for 4 hours the power is automatically turned off and the heating stops When selecting 2h mode the 2h timing indicator light is on After the product is heated for 2h the power is automatically turned off and heating stops Timing Switch The switch has a temperature co...

Page 7: ...ted 2 Faults were caused by the incompliance with the instructions and precautions provided in the user s manual 3 Damages and faults were caused by self actuated dismantling repair and refit 4 Faults and damages were caused by external factors such as force majeure 5 Damages were caused by transportation unloading and extrusion etc This warranty is valid for the original consumers only including ...

Reviews: