background image

Mobilex A/S

Grønlandsvej 5
DK-8660 Skanderborg

www.mobilex.dk

24" wheel set 302017 und 302023 (Accessories)

It is possible to easily replace the 2 rear 5" wheels with 24" wheels. All parts, including mounting brackets and 
brakes, are included in the accessory kit.

Mounting of 24" wheels

Remove the 2 rear 5" wheels by loosening the bolts.

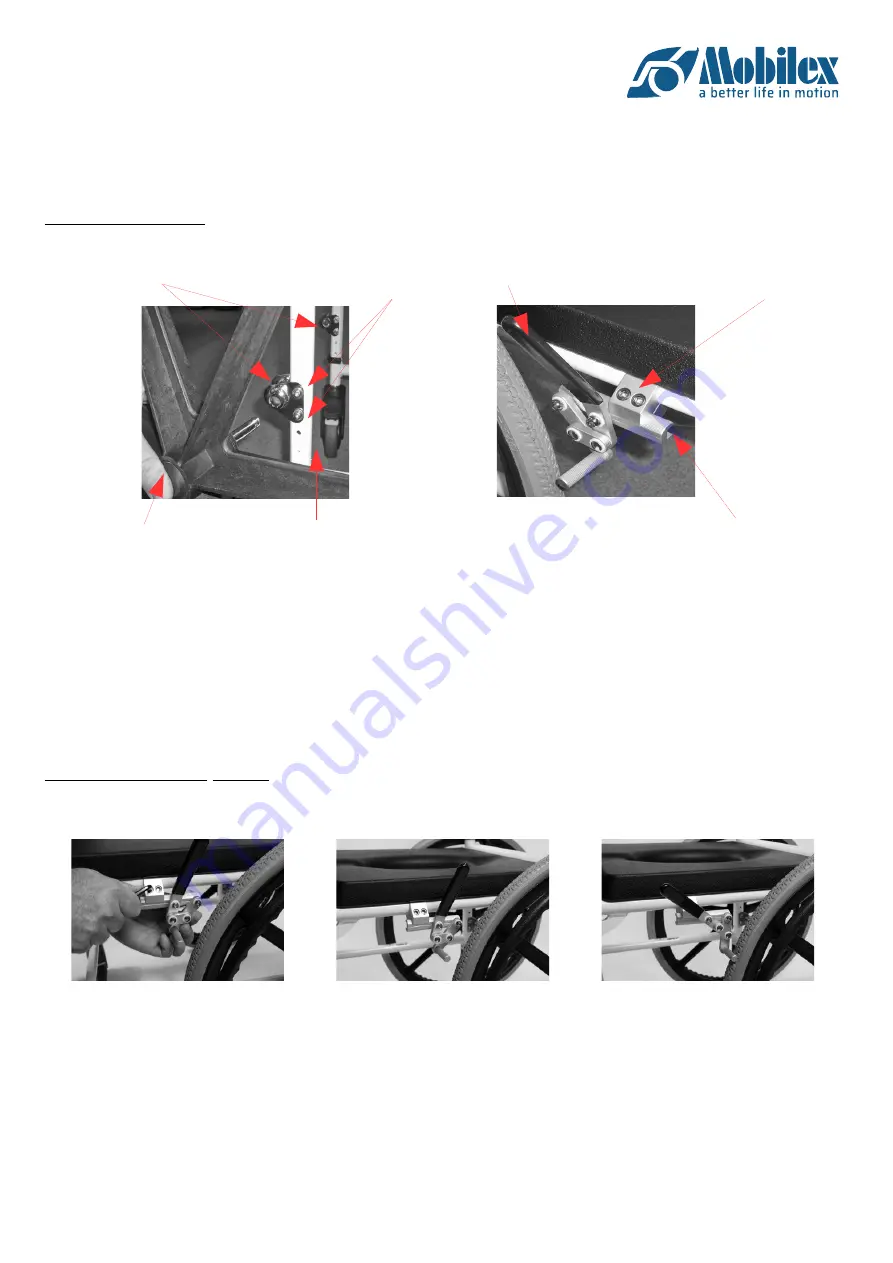
Place the mounting brackets as shown in the picture above.

Several holes have been drilled in the frame to allow a single height adjustment. Choose a height and insert 
and secure the mounting bolts with the corresponding washers.

Press the quick release axle located in the middle of the wheels. Insert the axle into the brackets as far as it  
will go and release the push button.

Take hold of the wheels and check that they are properly fastened.

To remove the wheels, press the push button while pulling the wheel with the other hand.

After fitting 24" wheels, it may be necessary to adjust the front wheels so that the chair appears horizontal.

Brake assembly with 24

"

 wheels:

The 24" wheel set (302017 or 302023) comes with 2 parking brakes with brackets. The brakes are mounted on the 
wheelchair frame and are used to lock the two rear wheels.

Attach the brake to the 
frame

Brake released

Brake locked

When 24" wheels are fitted it is necessary to fit normal wheelchair brakes.

The brakes consist of mounting brackets, the brake itself and 2 fixing bolts.

Insert the brake adjustment profile into the smallest opening of the brake caliper.

Place the mounting bracket on the horizontal tube of the chair as shown in the picture.

Move the brake until the friction pin almost touches the tyre.

Secure the bolts so the brake is stable.

To apply the brakes, push the brake lever forward. To release the brake, pull the lever backwards.

Rev. 14.06.22

 20 - 40

UM-302015-20-MULTI_14062022.odt

Friction surface

on the brake

Brake lever

Fixing screws

for the mounting plate

Rear 5" wheel

Mounting clamp

of the brake with

2 screws for fixing

Mounting plates

for 24" wheels

24" quick-release 

axle

Adjustment slider for 

brakes

Summary of Contents for 302015

Page 1: ... d utilisation Mobilex A S Grønlandsvej 5 8660 Skanderborg Denmark www mobilex dk Mobilex Sp z o o ul Duńska 3 5 91 204 Łódź tel 0 42 214 29 11 www mobilex pl Standard model w 4 lockable 5 wheels Soft PU seat cover for the bucket Detachable adjustable footrests and leg support White powdercoated frame 24 wheels model w quick release ...

Page 2: ...hnis Indholdsfortegnelse Table of content Indice Table des matières Gebrauchsanleitung 3 9 DEUTSCH Brugervejledning 8 16 DANSK User Manual 17 23 ENGLISH Manuale d uso 24 30 ITALIANO Manuel d utilisation 31 37 FRANÇAIS CE 38 DOC Rev 14 06 22 2 40 UM 302015 20 MULTI_14062022 odt ...

Page 3: ... Sie die Angaben auf dem Produkt Aufkleber Nutzen Sie den Dusch Toilettenrollstuhl nur für den vorgesehenen Einsatzbereich Nehmen Sie keine konstruktiven Veränderungen vor die nicht vom Hersteller genehmigt sind Sowohl beim Zusammenbau wie bei den verschiedenen Einstellungen die der Duschtoiletten Rollstuhl bietet achten Sie darauf sich nicht Finger oder andere Körperteile einzuquetschen Das Gerät...

Page 4: ...f den Eimer Schieben Sie ihn in die unter dem Sitz angebrachten Schienen Dies wird von der Vorderseite des Stuhls aus gemacht Verschließen Sie dann den Ausschnitt mit dem abnehmbaren PU Deckel Montieren Sie die Fußrasten indem Sie den Kunststoffstopfen an der Oberseite der Fußrasten in die Rohrenden an der Rahmenfront einführen Drehen Sie dann die Fußstütze bis sie einrastet Benutzung der Bremsen ...

Page 5: ...r in das Loch am vorderen Rahmenrohr und drehen sie nach innen bis der Blockierhebel wieder einrastet Einstellung der Fußplatten auf die gewünschte Höhe Die Höhe der Fußplatten des Toilettenrollstuhls sollte an den Benutzer angepasst werden Die Höhe ist korrekt eingestellt wenn der Benutzer auf dem Toilettenrollstuhl sitzt seine Oberschenkel auf dem Sitz korrekt aufliegen und beide Füße auf den Fu...

Page 6: ...hörradsatzes 302017 ist darauf zu achten dass die Mutter an der Steckachse gut festgezogen ist Nach der Montage der 24 Räder kann es notwendig sein die Höhe der Vorderräder nachzustellen Die Höhe ist richtig eingestellt wenn die Sitzfläche parallel zum Boden ist Montage der Bremsen bei 24 Rädern Dem 24 Räder Kit 302017 oder 302023 liegen 2 Festellbremsen mit Halterung bei Die Bremsen werden am Rah...

Page 7: ...eneimer wieder mit der Sitzabdeckung ab Wenn der Toilettenausschnitt am Sitz montiert wird muss auch der Eimer mit Deckel montiert werden Abnehmen der Sitzabdeckung Eimer nach hinten entfernen Eimer entleeren reinigen Anbringung eines Sicherheitsgurtes oder Sicherheitsbügel optional Am Dusch und Toilettenrollstuhl lässt sich ein Sicherheitsgurt Art Nr 233012 oder Sicherheitsbügel Art Nr 302126 302...

Page 8: ...igungsmittel oder alkoholhaltige Produkte sollten nicht verwendet werden und steife Bürsten und scharfe Gegenstände sollten nicht zur Reinigung eingesetzt werden Das Produkt ist in der Regel wartungsfrei sollte aber einer regelmäßigen Kontrolle unterzogen werden die von einem Fachmann durchgeführt werden kann Bei einer solchen Überprüfung empfehlen wir Folgendes zu prüfen und durchzuführen Rev 14 ...

Page 9: ...s Empfohlene Nutzungsdauer Normalerweise 10 Jahre je nach Verwendung Lagerung Wir empfehlen die Lagerung an einem trockenen Ort Wiederverwendung Das Produkt ist zur Wiederverwendung geeignet Vor der Wiederverwendung bei der ein neuer Benutzer das Produkt übernehmen soll muss das Produkt gemäß Punkt 5 geprüft werden 6 Allgemeine Problembehebungen Problembeschreibung mögliche Ursache was ist zu tun ...

Page 10: ...bilex A S Grønlandsvej 5 DK 8660 Skanderborg Danmark Telefon 45 87 93 22 20 Telefax 45 87 93 17 77 E Mail info mobilex dk 2 Sikkerhedsanvisninger Sørg for at alle personer der bruger produktet læser denne brugsanvisning Producenten påtager sig intet ansvar for skader og eller personskader der skyldes manglende overholdelse af denne vejledning Benyt kun produktet i fejlfri tilstand Hvis der opdages...

Page 11: ...Skub det ind i skinnerne monteret under sædet Dette gøres fra fronten af stolen Derefter lukkes udskæringen med det aftagelige PU låg Monter fodstøtterne ved at isætte plastproppen i toppen af fodstøtterne i rør enderne i rammefronten Drej derefter fodstøtten til den låser Brug af bremserne 1 Brems altid når du ikke ønsker at flytte stolen 2 Lad aldrig Kakadu brusestolen og toiletkørestolen stå ub...

Page 12: ...ammebræt billede til højre For at montere og fastgøre fodstøtterne igen skal du sætte dem ind i hullet på det forreste rammebræt og dreje dem indad indtil låsehåndtaget igen går i hak Justering af fodstøtterne til den ønskede højde Højden på toilet og badestolens fodstøtter skal tilpasses brugeren Højden er korrekt indstillet når brugeren sidder på kørestolen lårene hviler korrekt på sædet og begg...

Page 13: ...ere de forreste hjul så stolen fremstår vandret Montage af bremse med 24 hjulsættet 24 hjulsættet 302017 eller 302023 leveres med 2 parkeringsbremser med beslag Bremserne er monteret på kørestolens ramme og bruges til at låse de to baghjul Spænd bremsen fast på rammen Bremse åben Bremse lukket Når 24 hjul monteres er det nødvendigt at montere normale kørestolsbremser Bremserne består af montagekla...

Page 14: ...spanden m låg også være monteret Eimer nach hinten entfernen E Sædepladen tages af Spanden fjernes bagudtil Tøm og rengør spanden Fastgørelse af sikkerhedssele eller sikkerhedsbøjle valgfrit En sikkerhedssele art nr 233012 eller en sikkerhedsstang art nr 302126 302127 302149 kan være sikkerhedssele art nr 233012 eller sikkerhedsbøjle art nr 302126 302127 302149 Til 302018 20 kan monteres meget let...

Page 15: ...er alkoholholdige produkter og der bør ikke anvendes stive børster og skarpe genstande til rengøringen Produktet er normalt vedligeholdelsesfrit men bør regelmæssigt gennemgå en kontrol der kan foretages af en sagkyndig Ved en sådan kontrol anbefaler vi at følgende kontrolleres og udføres Rev 14 06 22 15 40 UM 302015 20 MULTI_14062022 odt MOBILEX A S Grønlandsvej 5 DK 8660 Skanderborg Tel 45 87 93...

Page 16: ...des men skal udskiftes Anbefalet levetid Normalt 10 år afhængigt af brugen Opbevaring Vi anbefaler opbevaring på et tørt sted Genanvendelse Produktet er egnet til genanvendelse Før genanvendelse hvor en ny bruger skal overtage produktet skal produktet være kontrolleret i henhold til pkt 5 6 Generel problemafhjælpning Hvad er der sket Hvad kan være grunden Hvad skal jeg gøre Badestolen er ikke stab...

Page 17: ...questions please contact your dealer or Mobilex A S Mobilex A S Grønlandsvej 5 DK 8660 Skanderborg Denmark Phone 45 87 93 22 20 Telefax 45 87 93 17 77 Email info mobilex dk 2 Security instructions Make sure that this user manual is read by all persons using the device Manufacturer doesn t take any responsibility for damages and or injuries caused by the fact that the user manual has not been follo...

Page 18: ...the seat This is done from the front of the chair Then close the cut out with the removable PU lid Fit the footrests by inserting the plastic plug at the top of the footrests into the tube ends in the frame front Then turn the footrest until it locks Use of the brakes 1 Always brake when you don t want to move the chair 2 Never leave the Kakadu shower chair and toilet wheelchair unbraked when a pe...

Page 19: ...ight To refit and secure the footrests insert them into the hole on the front frame and turn them inwards until the locking lever engages again Adjusting the footrests to the desired height The height of the toilet and bath seat footrests must be adapted to the user The height is correctly adjusted when the user sits on the wheelchair the thighs rest correctly on the seat and both feet rest on the...

Page 20: ...djust the front wheels so that the chair appears horizontal Brake assembly with 24 wheels The 24 wheel set 302017 or 302023 comes with 2 parking brakes with brackets The brakes are mounted on the wheelchair frame and are used to lock the two rear wheels Attach the brake to the frame Brake released Brake locked When 24 wheels are fitted it is necessary to fit normal wheelchair brakes The brakes con...

Page 21: ...eat the bucket with lid must also be mounted Eimer nach hinten entfernen E Seat plate removal The bucket is removed from the rear Empty and clean the bucket Fastening of seat belt or safety bar optional A safety belt art no 233012 or a safety bar art no 302126 302127 302149 can be safety belt art no 233012 or safety bar art no 302126 302127 302149 For 302018 20 can be fitted very easily The safety...

Page 22: ...only commercial cleaning products which are suitable for cleaning and disinfection do not use alcohol containing products and no solvents or abrasives The device basically does not need maintenance Despite the solid construction and the use of resistant materials the product is subject to wear It is therefore recommended to check the product at regular intervals by a professional service We recomm...

Page 23: ...e life Normally 10 years depending on use Storage We recommend storage in a dry place Reuse The product is suitable for reuse Before reusing where a new user is to take over the product the product must be checked according to point 5 6 Most common problems and solutions Symptoms Possible cause What to do The chair is not stable and can t reach horizontal position The wheels are adjusted to differ...

Page 24: ... valutazione individuale dello stato di salute del potenziale utente La scelta dell ausilio ortopedico appropriato per un determinato quadro clinico deve essere sempre fatta con l aiuto di un medico specialista o di un fisioterapista Osservate sempre le informazioni per la sicurezza nel Capitolo 2 In caso di ulteriori domande La preghiamo di rivolgersi al Suo rivenditore o direttamente a Mobilex M...

Page 25: ...e maniglie Montare il coperchio sul secchio Inserirlo nelle guide montate sotto il sedile Questa operazione si effettua dalla parte anteriore della sedia Chiudere quindi l apertura con il coperchio in PU rimovibile Montare i poggiapiedi inserendo il tappo di plastica nella parte superiore dei poggiapiedi nelle estremità del tubo nella parte anteriore del telaio Ruotare quindi il poggiapiedi fino a...

Page 26: ... risulti orizzontale Gruppo freni con ruote da 24 Il set di ruote da 24 302017 o 302023 viene fornito con 2 freni di stazionamento con staffe I freni sono montati sul telaio della carrozzina e servono a bloccare le due ruote posteriori Fissare il freno al telaio Freno rilasciato Freno bloccato Quando si montano ruote da 24 è necessario montare i normali freni per carrozzine I freni sono costituiti...

Page 27: ...ecchio con coperchio Togliere il copri WC in PU Estrarre il secchio WC Svuotare e pulire il secchio WC Fissaggio della cintura di sicurezza o della barra di sicurezza opzionale È possibile fissare una cintura di sicurezza art 233012 o una barra di sicurezza art 302126 302127 302149 La cintura di sicurezza art 233012 o la barra di sicurezza art 302126 302127 302149 Per 302018 20 possono essere mont...

Page 28: ...e estraetelo verso l alto dal telaio foto a destra per riagganciare nuovamente i poggiapiedi inseriteli nel foro anteriore del telaio e girate il poggiapiedi verso l interno fino a far scattare la leva di bloccaggio Regolazione dei poggiapiedi all altezza desiderata l altezza dei poggiapiedi della carrozzina deve essere adattata all utente l altezza è regolata correttamente se ad utente seduto le ...

Page 29: ...tilizzare solo prodotti di pulizia commerciali adatti alla pulizia e alla disinfezione non utilizzare prodotti contenenti alcol e nessun solvente o abrasivo Il dispositivo fondamentalmente non ha bisogno di manutenzione ma nonostante la costruzione solida e l uso di materiali resistenti il prodotto è soggetto a usura Si raccomanda quindi di far controllare il prodotto a intervalli regolari da un s...

Page 30: ...rvare il prodotto in un luogo asciutto Riutilizzo Il prodotto è adatto al riutilizzo Prima del riutilizzo quando un nuovo utente deve prendere in consegna il prodotto il prodotto deve essere controllato secondo il punto 5 6 Risoluzione di piccoli guasti descrizione del problema possibile causa cosa fare durante l uso la carrozzina tira da una parte sporcizia tra ruota e forcella o freno eliminate ...

Page 31: ...ricant n accepte par écrit de telles modifications Lors du montage ou lors des différents réglages possibles sur l appareil l utilisateur doit veiller à ne pas coincer les doigts ou d autres parties du corps entre deux éléments mobiles de l appareil L appareil ne doit être utilisé que sur une surface stable Toutes les roues DOIVENT être en contact avec le sol pendant l utilisation Cela garantira q...

Page 32: ...llez tous les freins des 4 roues afin que l appareil ne bouge pas Glissez maintenant les extrémités des tubes de cadre arrière dans deux trous d assemblage situés dans la partie supérieure arrière du cadre principal Serrez les boulons des deux côtés du cadre pour que le dos soit stable et rigide Placez le couvercle sur le seau Glissez le dans les rails situés sous le siège Vous devriez le faire de...

Page 33: ...les freins poussez simplement le levier de frein vers l avant du fauteuil Pour relâcher les freins tirez le levier vers l arrière de la chaise Jeu de freins avec des roues de 24 pouces L ensemble de roues 24 302017 ou 302023 est livré avec 2 freins de stationnement avec supports Les freins sont montés sur le châssis du fauteuil roulant et servent à bloquer les deux roues arrière Fixer le frein au ...

Page 34: ...ur le siège le seau avec couvercle doit également être monté Retirer le couvercle du PU WC Sortir le seau des WC Vider et nettoyer le seau des WC Fixation de la ceinture de sécurité ou de la barre de sécurité en option Une ceinture de sécurité Art No 233012 ou une barre de sécurité Art No 302126 302127 302149 peut être attachée La ceinture de sécurité Art No 233012 ou la barre de sécurité Art No 3...

Page 35: ...ers le haut pour le sortir du cadre photo à droite pour remettre les repose pieds en place insérez les dans le trou avant du cadre et tournez le repose pied vers l intérieur jusqu à ce que le repose pied glisse vers l intérieur jusqu à ce que le levier de verrouillage soit libéré Réglage des repose pieds à la hauteur souhaitée la hauteur des repose pieds du fauteuil roulant doit être adaptée à l u...

Page 36: ...oduit et utilisez uniquement des produits de nettoyage commerciaux adaptés au nettoyage et à la désinfection n utilisez pas de produits contenant de l alcool ni de solvants ou d abrasifs En principe l appareil ne nécessite pas d entretien Malgré une construction solide et l utilisation de matériaux résistants le produit est sujet à l usure Il est donc recommandé de faire contrôler le produit à int...

Page 37: ... de vie recommandée Normalement 10 ans selon l utilisation Réutilisation Le produit peut être recyclé Avant le recyclage si un nouvel utilisateur doit reprendre le produit celui ci doit être contrôlé conformément au point 5 6 Problèmes les plus courants et solutions Symptômes Cause possible Que faire La chaise n est pas stable et ne peut pas atteindre la position horizontale Les roues sont ajustée...

Page 38: ... na naszą wyłączną odpowiedzialność jako legalny producent że produkt wyszczególniony na poniższej liście produktów spełnia zasadnicze wymagania zdrowotne i bezpieczeństwa oraz jest zgodny z przepisami Rozporządzenia Parlamentu Europejskiego i Rady UE 2017 745 w sprawie wyrobów medycznych Produkt sklasyfikowana jako klasa I wyrób medyczny Klasyfikacja opiera się na wymaganiach reguły 1 załącznika ...

Page 39: ...ories item no 302015 302125 302017 302125 302018 302017 302128 302129 302127 302125 302109 302110 302122 302164 302019 302128 302129 302126 302125 302154 302155 302122 302165 302020 302017 302128 302129 302149 302125 302156 302157 302122 302166 Rev 14 06 22 39 40 UM 302015 20 MULTI_14062022 odt ...

Page 40: ...Mobilex A S Grønlandsvej 5 DK 8660 Skanderborg www mobilex dk Rev 14 06 22 40 40 UM 302015 20 MULTI_14062022 odt ...

Reviews: