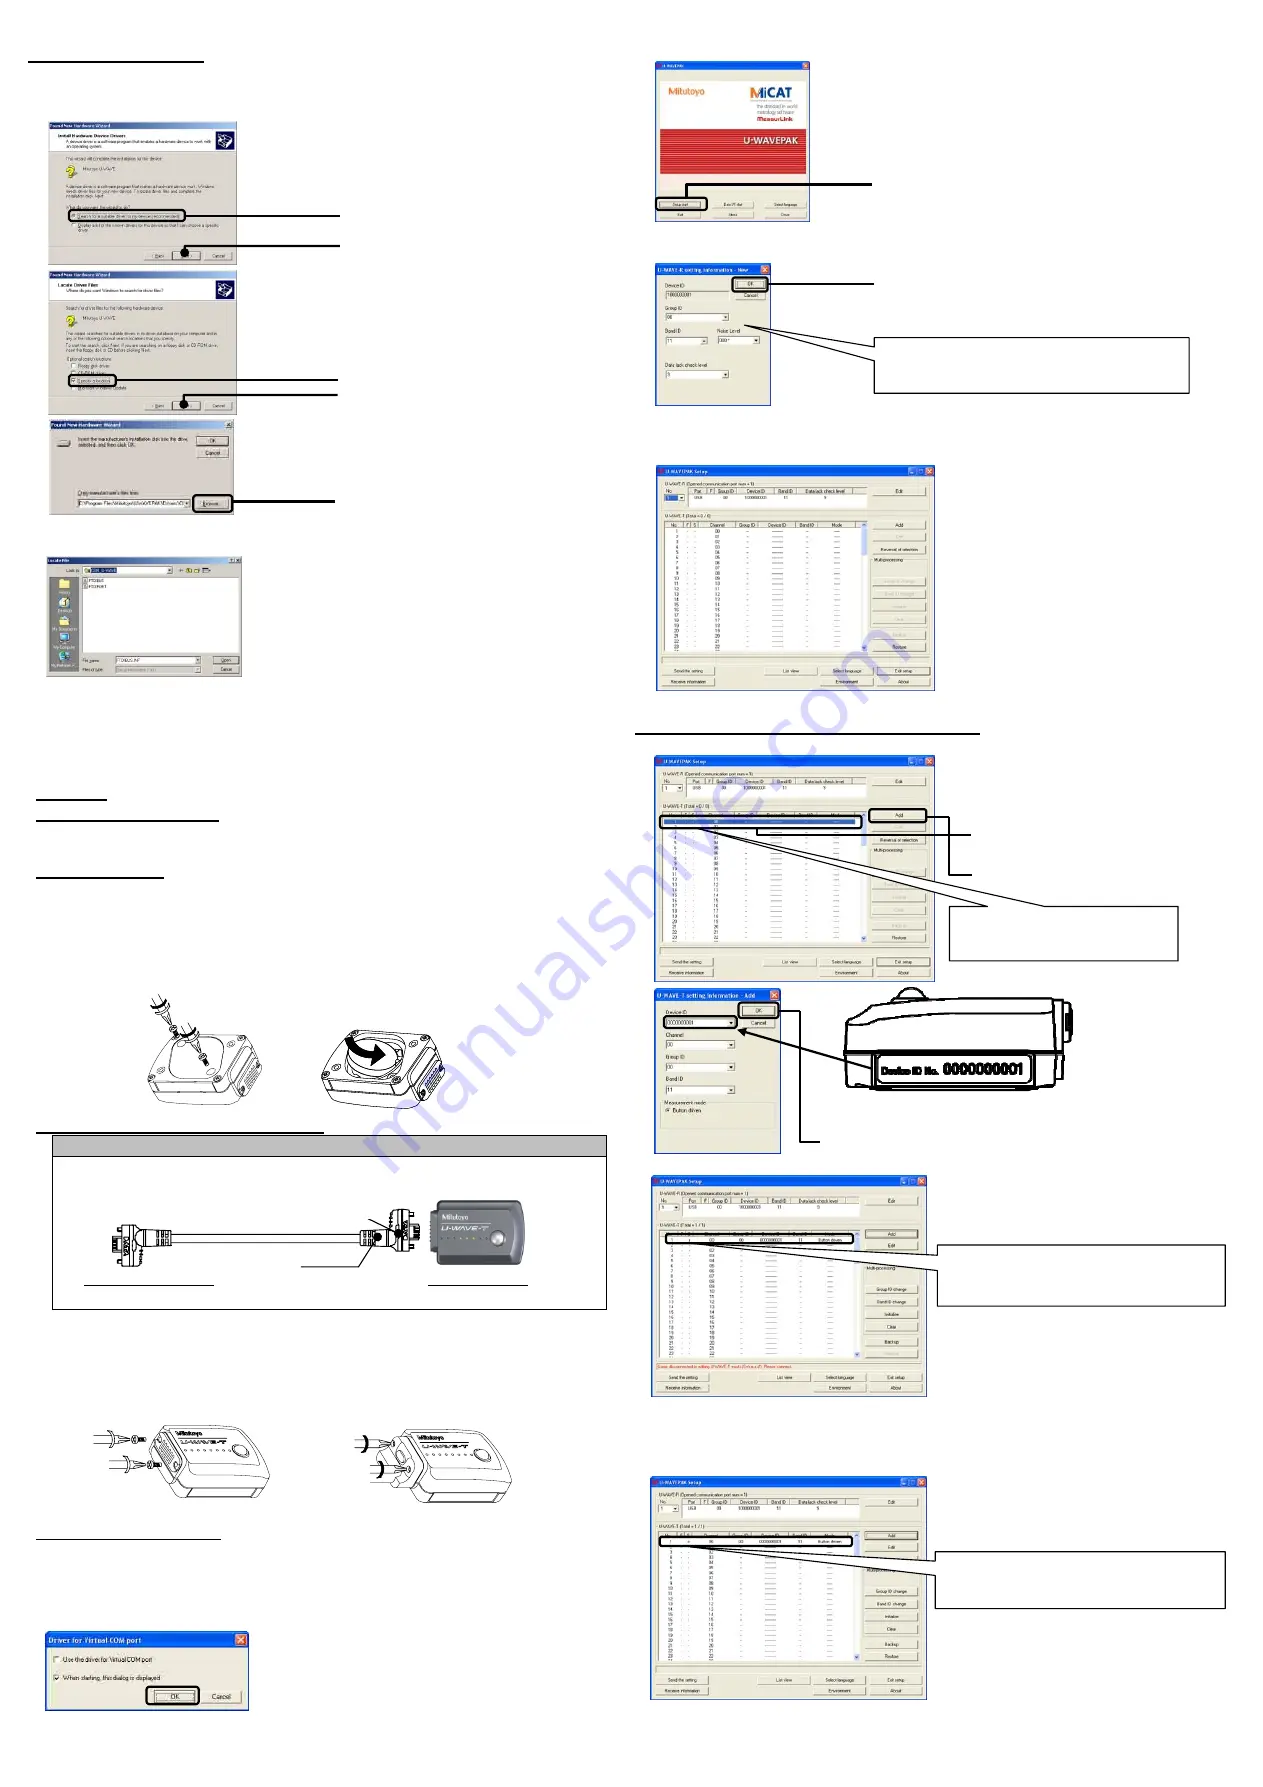
For Windows 2000:
1) Connect the U-WAVER-R to a personal computer with a USB cable.
2) After a while, “Welcome to the Found New Hardware Wizard” will appear. Then, press the
[Next] button.
3)
4)
5)
6) Select C:\Program Files\Mitutoyo\UWAVEPAK\Drivers\CDM_U-WAVE\, press the [Open]
button, and then press the [OK] button on the dialog in step 5).
7) “Driver File Search Results” will appear. Then, press the [Next] button.
8) “Completing the Found New Hardware Wizard” will appear. Then, press the [Finish] button.
9) The dialog in step 2) appears again. Then, repeat steps 2) through 8).
Now, driver installation is complete. Upon the completion of the driver installation, the green
LED and red one on the U-WAVE-R blink alternately.
3. Setup
3.1. U-WAVE-T Setup
Use the 0-size screwdriver, a standard accessory of the U-WAVE-T, to mount and remove
screws and fasten them with a torque of about 5-8N•cm.
Battery setting
1) Remove the set screws on the rear of the U-WAVE-T and remove the battery lid.
2) With the plus side of the battery facing toward the lid, insert the battery edge into the “+”
battery terminal of the U-WAVE-T and slide the other side of the battery into the battery
retaining lug.
3) Ensure that the battery lid packing (circular type) is fitted in place.
4) Replace the battery lid into position and fix it by tightening screws.
(
1
)、(
4
)
(
2
)
Connecting the connecting cable
CAUTION
When connecting a connecting cable to the U-WAVE-T, ensure that the black
marked connector of the connecting cable is connected to the U-WAVE-T.
1) Remove the connector cover set screws of the U-WAVE-T and take off the connector cover.
2) Ensure that a packing is fitted in place in the connector.
3) Connect the connecting cable to the U-WAVE-T.
4) Holding the edges of the connecting cable down by the fingers and ensuring that there will
be no gap between the lid and the main body, fasten them with screws.
5) Put the removed connector cover and screws in place for safekeeping.
(1) (4)
Now, the U-WAVE-T setup is complete.
3.2. U-WAVE-R Setup
Next, set up the U-WAVE-R with the U-WAVEPAK.
1) Connect the U-WAVE-R to a personal computer with a USB cable.
The green LED and red one on the U-WAVE-R blink alternately.
2) Boot the U-WAVEPAK with the desktop icon.
3) “Driver for Virtual COM port” will appear. Then, press the [OK] button.
4) The U-WAVEPAK menu dialog appears.
5) “Confirm processing” will appear. Then, press the [Yes] button.
6) After a while, the following dialog will be displayed.
7) “Confirm processing” will appear. Then, press the [Yes] button.
8) After a while, the following setup dialog will be displayed and the green LED on the
U-WAVE-R lights up. Now, the U-WAVE-R setup is complete.
3.3. U-WAVE-T Information Registration
Proceed to register the U-WAVE-T information in the U-WAVE-R.
1)
2)
3)”Confirm processing” will appear. Then, press the [Yes] button.
4) Press the DATA switch on the U-WAVE-T already set up.
(After blinking in orange color, the U-WAVE-T blinks in green upon connection.)
Please connect the DATA switch pushing long (Push-down time: 5sec <t,
Orange blinking 0.3 sec interval ) when it is not possible to communicate and red blinks.
5) Connect the measuring tool to be used to the U-WAVE-T.
Press the [Setup start] button.
Press the [OK] button.
Setup is made to the default conditions
(Group ID: 00, Band ID: 11).
a) Select the number
you want to register.
b) Press the [Add] button.
a) Enter the Device ID given on the side of
the U-WAVE-T concerned.
b) Press the [OK] button.
Here, register the U-WAVE-T
(Device ID: 0000000001) as No.1.
The U-WAVEPAK status turns into that:
“S (status) = r (U-WAVE-T registered).”
The U-WAVEPAK status turns into that:
“S (status) = c (U-WAVE-T connected).”
Measuring tool side
U-WAVE-T side
(The connector differs in shape and color depending on the measuring tool to be mated.)
Black
Refer to the U-WAVEPAK User’s Manual when
altering the group ID and/or band ID.
DATA
switch
a) Select “Search for a suitable driver for my
device [recommended].”
b) Press the [Next] button.
a) Select “Specify a location”.
b) Press the [Next] button.
Press the [Browse] button.


